What to do when Wi-Fi not connecting automatically in Windows 10. Wi-Fi meaning described as Wireless Fidelity that is a medium by which we connect the system through Network. To connect your system through Wi-Fi network, you have to setup a connection initially. Later, it is automatically connected whenever you turn On Wi-Fi. But most of the users occasionally report that Wi-Fi not connecting automatically in Windows 10. Here in this article we will discuss in brief about its possible solution by various methods. be continue with this article.
How to Fix Wi-Fi not connecting automatically in Windows 10
The following are the various workarounds to resolve the issue regarding Wi-Fi not connecting automatically in Windows 10: –
Set up a new connection or Network
- Go to Control Panel.
- From the list of items available under control Panel, navigate the option Network and Sharing Center.
- Make a click on it to open.
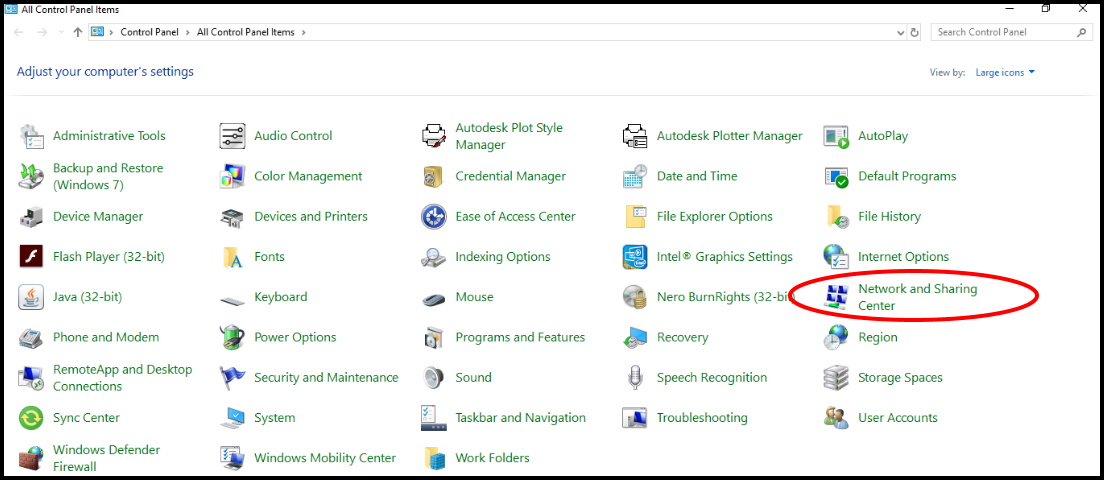
- Here click on the option Set up a new connection or network.
- Now choose Manually connect to a wireless network option and then click on Next button.
- Enter the network name and other settings.
- You should mark the check against options Start this connection automatically and Connect even if the network is not broadcasting respectively.
- Thereafter click on Next button.
- Follow on-screen instructions to complete the process.
After completion of process, a new connection is ready to use and Windows will automatically connect to it.
Delete all previously saved Wi-Fi Networks
- Press Win + I shortcut key conjointly.
- Windows setting app will open now.
- Here select Network & Internet option.
- Then From the left pane of setting page, go to Wi-Fi option.
- Now go to the right pane, you will see the option Manage Wi-Fi settings.
- Make a click on it.
- Now find out the option Manage known networks and click on it.
- You will see a list of available wi-fi networks in your windows 10 system.
- Make a click on each network and click on Forget option to remove it from your saved network list.
Reinstall Wi-Fi Driver to Fix Wi-Fi not connecting automatically in Windows 10
- Open Device Manager.
- Find out your Wi-Fi device from the list available under Device Manager.
- If found, make a right click on it and choose Uninstall device option from the drop down menu.
- A confirmation message will pop up on your screen.
- Here click on yes or Uninstall to continue.
- When uninstallation process finishes, go to the top menu bar of Device manager.
- Thereafter, click on Scan for hardware changes icon.
- Windows will now scan your system and will install the missing drivers afresh.
Install Latest Wi-Fi Driver Manually
- Go to Device Manager of your Windows 10 system.
- Find out your wireless device.
- Make a right click on it and choose Update drvicer from the drop down menu.
- A new window box will open with two options.
- Here select the option Browse my computer for driver software.
- Now click on Let me pick from a list of available drivers on my computer.
- You should see several different drivers available.
- Select the driver from your wireless adapter manufacturer and click on Next button.
Fix Wi-Fi not connecting automatically in Windows 10 through Group Policy Setting
- Open Run Command box.
- Type gpedit.msc on it.
- Press Ok Button.
- Group Policy Editor window will open now.
- Then Navigate the following path from the left pane of Group Policy Editor window: –
- Computer Configuration => Administrative Templates => System => Internet Communication Management => Internet Communicating Settings.
- Now go to the right pane of window.
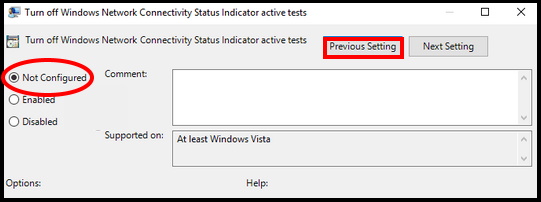
- Find out the option Turn off Windows Network Connectivity Status Indicator active tests.
- Thereafter apply a double click it to open its properties.
- Select Not Configured from the menu and click on Apply and OK to save changes.
Fix Wi-Fi not connecting automatically in Windows 10 through Registry Editor
To go through registry editor is risky. So you must create a backup of your windows 10 system before applying any changes in Registry. You should keep extra vigil while making changes in registry. Follow these steps to complete the process: –
- Open Run dialog box.
- Type regedit in it and press Enter.
- Registry window will open now.
- Here, navigate the following path from left pane of registry window.
- HKEY_LOCAL_MACHINE\SOFTWARE\Policies\Microsoft\Windows\WcmSvc
- Expand WcmSvc key and look for GroupPolicy key.
- If this key isn’t available, you should create it manually.
- For this, make a right click on WcmSvc and choose New > Key from the menu.
- Now enter GroupPolicy as the name of the new key.
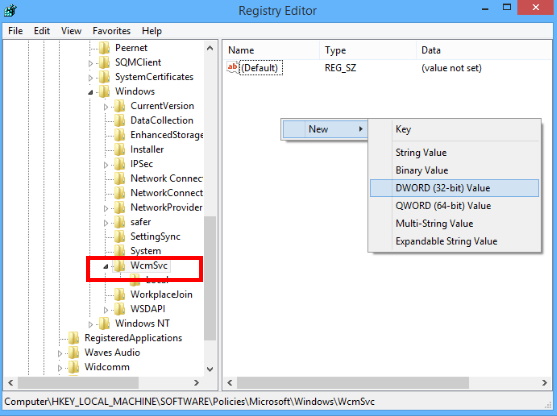
- Then navigate to the GroupPolicy key and in the right pane click on empty space and choose New > DWORD (32-bit) value.
- Enter fMinimizeConnections as the name of the new DWORD.
- Now close the Registry window.
- Reboot your Windows 10 system.
Through Power Option setting
- Open Control Panel by any one method described in this article.
- Go to Power option.
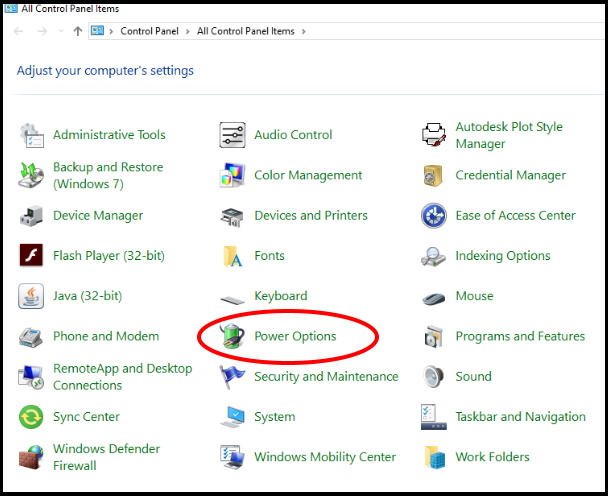
- From the left menu of Power option, click on Choose what the power button does option.
- Thereafter Click on Change settings that are currently unavailable.
- Uncheck Turn on fast startup (recommended) option and click on Save changes.
- Restart your system.
Make changes in Router setting
- Log in to your router.
- Now click on Advanced option and click Yes to confirm.
- Then Find out IGMP Proxy feature and select Disable.
- Make a click on Apply button to save changes.
- Now your PC will automatically connect to Wi-Fi network.
Minimize the number of Simultaneous connections through Group Policy Editor
- Open Group Policy Editor.
- Navigate the following path from the left menu of Group Policy Editor Window: –
- Computer Configuration => Administrative Templates => Network => Windows Connection Manager
- Now go to right side of window.
- Find out the option Minimize the number of simultaneous connections to the Internet or a Windows Domain.
- Apply a double click on it.
- Select Disabled and click on Apply and OK to save changes.
Clear Files from Wlansvc Directory
- Launch Run Dialog Box.
- Type services.msc in it and press Enter.
- Services window will open now.
- Now Navigate WLAN AutoConfig service.
- Make a right-click on it and choose Stop from the drop down menu.
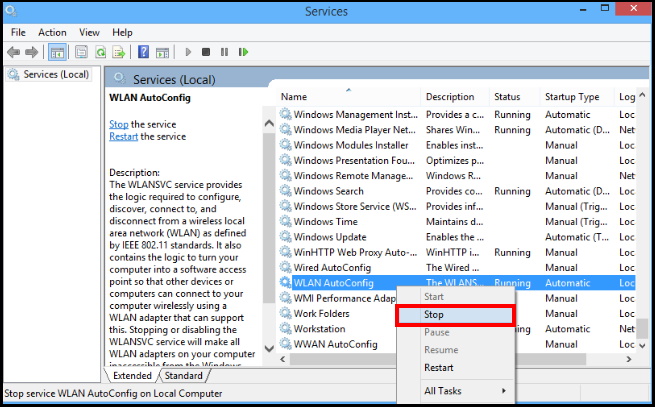
- Once the services stop, minimize the services window
- Thereafter, go to File Explorer window and open the following path from its directory:
- C:\Program\Data\Microsoft\Wlansvc
- If this path is not visible in your windows 10 system, simply go to hidden files and folders.
- Then Make a click on the View tab and then check Hidden items option.
- Once you enter Wlansvc directory, delete all files and directories from it except Profiles directory.
- Now find out the Profiles directory.
- Here delete all files and directories except Interfaces folder.
- Open Interfaces folder and delete all files and folders from it.
- Now again open the Services window.
- Find out WLAN AutoConfig service.
- Make a right-click on it and select Start from the menu.
- Connect to your wireless network once again. Be sure to check the option to automatically connect to the selected network.
Delete Third Party Wireless network Software from your Windows 10 system
- Open Device Manager.
- Find out your wireless adapter from the list available under Device Manager.
- Make a right-click on it and choose Update driver from the drop down menu.
- Now select Browse my computer for driver software.
- Then, click on the Browse button and navigate the wireless drivers on your PC.
- If you downloaded the drivers online, be sure to check your download directory.
- After you select the driver directory, Check Include subfolders option and click on Next.
- Follow on-screen instructions to complete the process.
Set Services as Automatic to Fix Wi-Fi not connecting automatically in Windows 10
- Open Run Dialog Box by pressing Win + R shortcut key conjointly.
- Type services.msc in it and press Enter .
- Services window will open.
- Now go to the right pane of services window and navigate WLAN AutoConfig.
- Make a double click on it to open.

- WLAN AutoConfig Properties window will open now.
- Here go to the Startup type section.
- Then Select Automatic from the drop down menu.
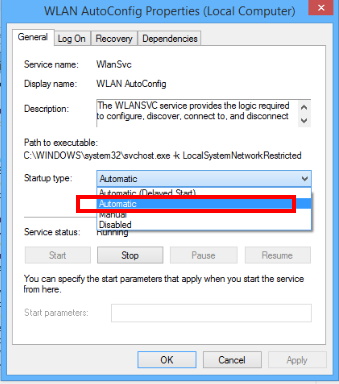
- Now Go to Dependencies tab from the top menu bar.
- Check the list of services that are dependent on WLAN AutoConfig.
- Then Make a click on OK and Apply button to save the changes.
- Now locate all dependent services from the previous step and make sure that their Startup type is set to Automatic.
Reset your Windows 10 system Power Setting
- Open Device Manager.
- Go to your Wireless adapter.
- Make a right click on it and select Properties option from the drop down menu.
- A new window will open now.
- Thereafter Go to Power Management section.
- Thereafter, navigate the option Allow the computer to turn off this device to save power.
- Mark a check against it.
- At the end, click on Ok button to save the changes.
That’s all.

2 thoughts on “Tips: What to do when Wi-Fi not connecting automatically in Windows 10”