How to Update Uninstall Reinstall and Roll Back Keyboard Driver in Windows 10. Keyboard driver is an important program that permits operating system to receive input provided through keyboard and respond accordingly by OS. Keyboard driver facilitates processor, memory and other input receiving data to the keyboard. Sometimes users have to face certain keyboard related issues, such as keyboard not responding, keyboard switches not functioning and so on. In this situation, you have to take action either update driver or reinstall driver or roll back driver. In this article we will discuss one by one. Be continue with this topic.
How to Fix Keyboard not working in Windows 11 / 10
How to Update Keyboard Driver in Windows 10
An outdated or corrupt driver may be a cause of non-functioning of Keyboard. So you should update your keyboard driver occasionally. Follow these steps: –
- Open Device Manager.
- Expand Keyboards category.
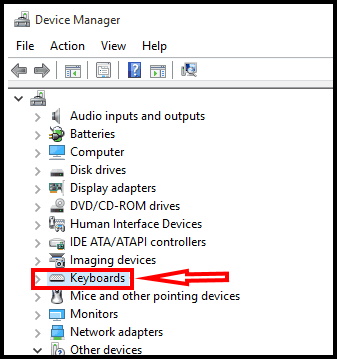
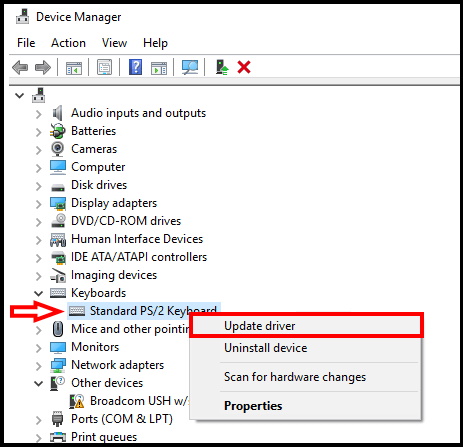
- Apply right click on the keyboard that you are using and want to update.
- Select Update driver and follow the instruction.
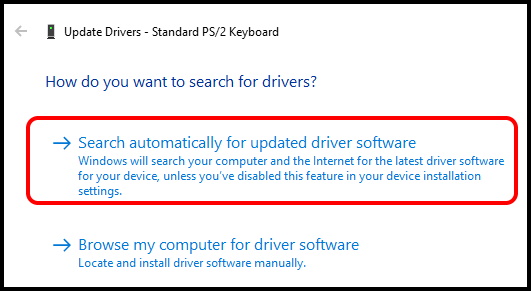
- A new window box will appear on your screen duly asking “How do you want to search for driver software?”
- Select “Search automatically for updated driver software” – Windows will search online for an update to your keyboard. If one is available it will apply the update to your keyboard
- You must reboot your system to make the changes affected.
How to Uninstall and Reinstall Keyboard Driver in Windows 10
If updating process of keyboard driver not completed successfully and problem remains, it means your keyboard drive may be corrupt. In this scenario, you should first uninstall keyboard driver and again reinstall it to resolve the issue. There is also a possibility of uninstalling the keyboard driver accidentally. So to get rid of this problem follow these steps: –
Step-1 : Open Device Manager.
Step-2 : Expand it and locate your installed keyboard driver which you want to uninstall.
Step-3: Make a right-click on it.
Step-4: A drop down menu will appear on your screen.
Step-5: Here, click on the Uninstall device option.
Step-6: A dialog box will pop up asking to confirm if you want to uninstall the driver.
Step-7: Press the Uninstall button in the dialog box. This will remove the driver from the system.
Step-8: At last, restart your Windows 10 PC.
Step-9: After restart of PC, the system will automatically reinstall the Keyboard driver to your system.
Important Point
If you want to keep your PC safe, you need to use third-party programs to update your ol’ system drivers. Downloading and installing the wrong system drivers will cause permanent damage to your system, so we suggest you to try a third-party tool.
How to Roll Back Keyboard Driver in Windows 10
Sometimes, after windows 10 update with windows latest update, the problem of keyboard not functioning arises, It means your previous version of Keyboard driver is functioning well. The reason behind this due to update or installation of drivers from unknown sources. In this case, Microsoft facilitate the windows users to roll back the driver means allow you to go to the previous version which is already functioning well. Roll back of previous version of update will definitely help in resolving the issue. Go through these steps: –
Though new device drivers almost always improve Windows 10 performance, there are cases when it does just the opposite. This can be the case, especially if you update or install drivers from unreliable sources. If you believe the problematic functioning is due to the new driver, you can roll-back to the previous driver. To do this:
- Open Run dialog box.
- Here, type in devmgmt.msc and click OK.
- When Device Manager appears on your screen, expand the Keyboards by clicking on small arrow mark.
- Right-click on the driver as before.
- Select Properties.
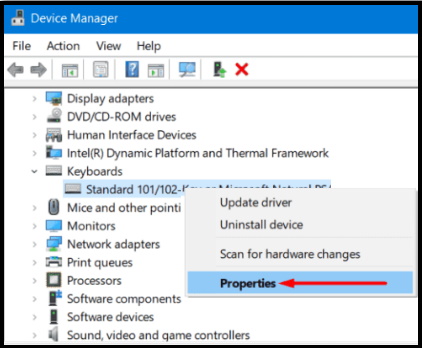
- In the Properties window, click on the Driver tab.
- Then click on the Roll Back Driver button.
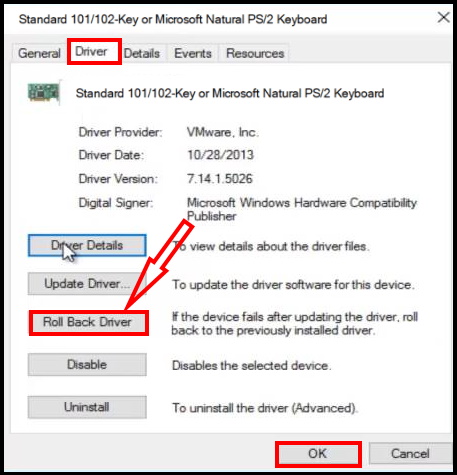
That’s all.

1 thought on “Easy way to Update Uninstall Reinstall Roll Back Keyboard Driver Windows 10”