How to Fix Unable to Set Default printer Error 0x00000709 in Windows 10. If you have only one printer installed in your system, you are free free from Error code 0x00000709 in Windows 10. Because this error basically prevent to set Default printer in Windows 10. Windows 10 Users having more than one printer on their computer installed in their system, are facing this issue.
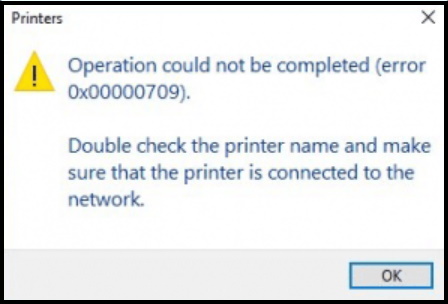
When any user try to set default printer, the error message appear in the form of yellow exclamation mark duly quoted,
“Operation could not be completed (error 0x00000709). Double check the printer name and make sure the printer is connected to the network.”
How to Fix Unable to Set Default printer Error 0x00000709 in Windows 10
Now we will help you to resolve this issue by various methods as described below. After that you can easily set default printer in windows 10.
How to resolve Default Printer keeps changing Automatic in Windows 10
Tips-1: Go through Registry Editor
You should make certain changes in Registry to resolve the issue regarding Unable to Set Default printer Error 0x00000709 in Windows 10.
But before making changes in Registry, you must create a full backup of your system. Thereafter follow these steps: –
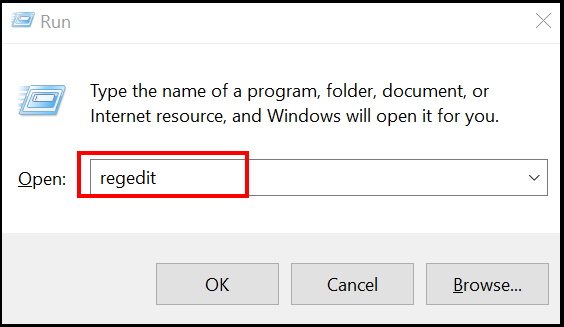
- Open Run dialog box by pressing Win + R shortcut key.
- Type regedit in it and press Ok button.
- Registry Editor window is open now.
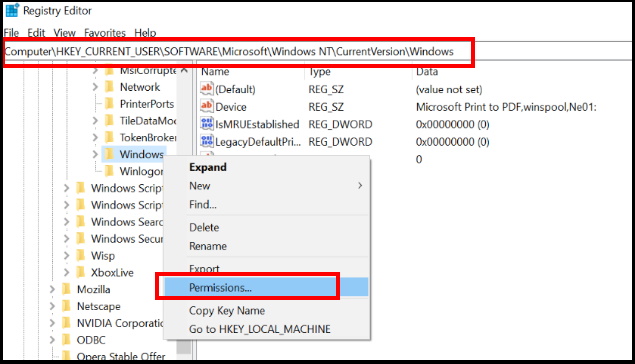
- Navigate the following path in the Registry window: –
- HKEY_CURRENT_USER > Software > Microsoft > Windows NT > CurrentVersion > Windows
- Make a right-click on the Windows folder and choose the option Permissions.
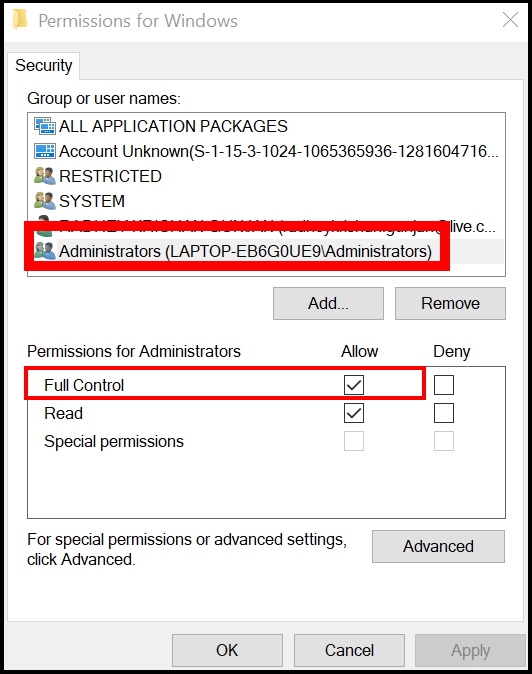
- A permission for windows will open.
- Here select the option Administrators account under Group or user names.
- Thereafter go to the Permissions for administrators section.
- You should ensure that the Full Control is marked at Allow.
- At the end, click on the OK button to save the changes.
- You should apply the same procedure for your Username also.
- Full control for your Username also.
- Thereafter go tot he right side of Registry window.
- If you find the following key in the right side of window, delete it: –
- Device
- LegacyDefaultPrinterMode
- UserSelectedDefault
- Restart your windows 10 system.
Tips-2: Disable option Let windows manage my Default printer
Microsoft has introduced a feature which permits you to manage the default printer according to the one previously used at a particular location. However, it doesn’t always works properly and accordingly the error 0x00000709 appears on your screen. So, you should disable this feature to Fix Unable to Set Default printer Error 0x00000709 in Windows 10. Follow these steps: –
- Apply a right-click on the Start menu button and select the option Settings.
- Here go to Devices section.
- Now from the left side of menu, select Printers & scanners option.
- Thereafter go to the right side of page.
- Here, Uncheck the box against option Let Windows manage my default printer to disable it.
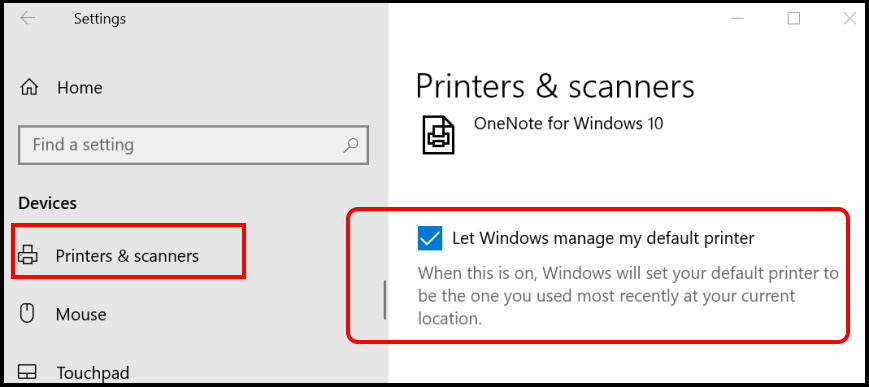
- Now windows will not set your default printer to be the one you used most recently at your current location.
- Restart your computer.
Tips-3: Manually set default Printer to Fix Unable to Set Default printer Error 0x00000709 in Windows 10
Once you disable the feature Let Windows manage my default printer, you will have to set default printer manually by following these steps: –
- Go to the Cortana search and type CP.
- Select Control Panel from the top result as best match.
- Now from the available menu list, choose the option Hardware and Sound.
- Go to Devices and Printers.
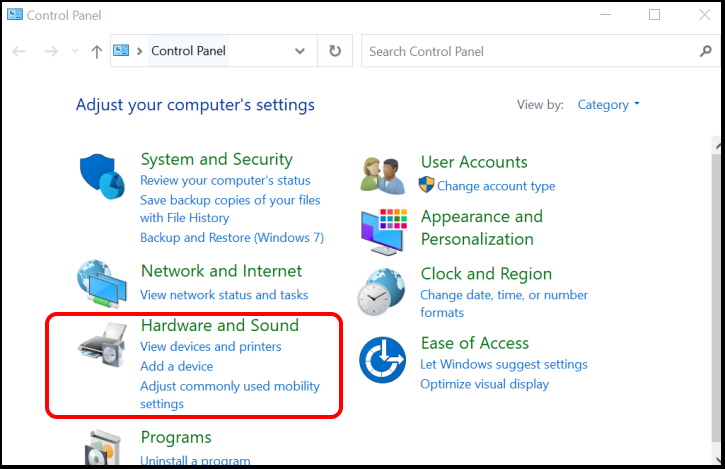
- All printer installed in your windows 10 system will display here.
- Choose the printer which you want to set default printer.
- Make a right-click on your printer and select Set as default printer.
- Reboot your computer.
Check if your problem resolved or not. If it didn’t, try the next method.
Tips-4: Apply sfc /scannow to Fix Unable to Set Default printer Error 0x00000709 in Windows 10
Any corrupt file system may be a cause of the error code 0x00000709 in Windows 10. You should apply sfc scannow through Command Prompt window. Follow these steps: –
- Open Run dialog box by pressing Win + R key altogether.
- Type cmd in it and press Ok button.
- Command Prompt will open.
- Set it Run as Administrator.
- Now type the following command and press Enter key: –
- sfc /scannow

- Let the window be complete the scanning process. It will take few minutes.
- It will find any corrupted files in the system and repaired them accordingly.
Tips-5: Apply DISM tool
- Go to Cortana search.
- Type cmd.
- Make a right-click on Command prompt from top results
- Thereafter go to the right side and select Run as administrator.
- Now enter the following command in Command prompt window and press Enter: –
- DISM /Online /Cleanup-Image /RestoreHealth
- Wait for DISM tool to finish the scanning and fixing process. It will take at least 15-20 minutes.
- Once the process is complete, reboot your system.
Now try to set default printer, it will definitely complete without error.
Tips-6: Sign-in with New User Account
According to some users experience, after creating new user account, the problem regarding Unable to Set Default printer Error 0x00000709 in Windows 10 could resolved. So you should also create a new user account. To create a new user account in Windows 10, go through these steps: –
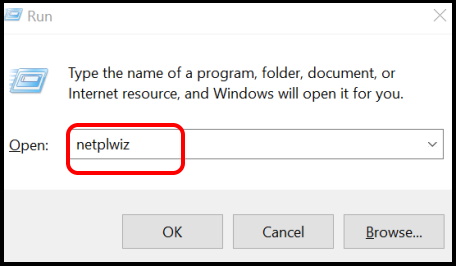
- Open Run Command (Win + R).
- Type netplwiz in the box and click on OK button.
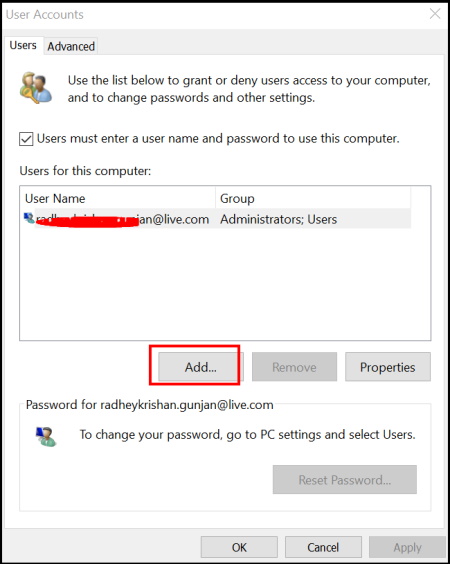
- Now go to the Users tab.
- Choose Add to create a new user account.
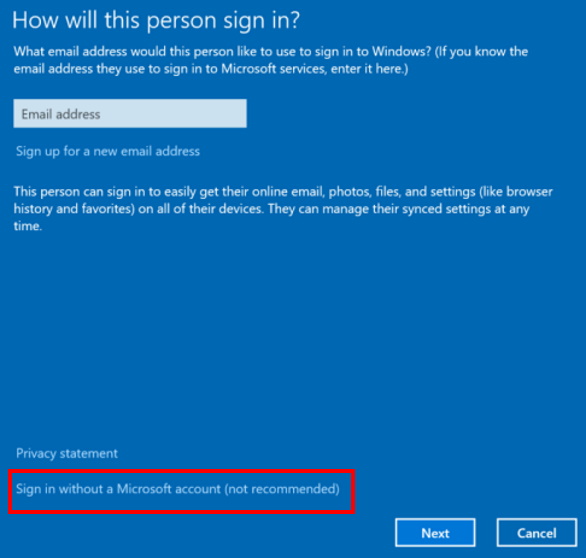
A new window How will this person sign in? will open.
Here, click on Sign in without a Microsoft account (not recommended).
- On the Add a user screen, select Local account.
- Enter the User name, Password and Reenter password for the new user account.
- You needn’t enter anything in Password hint.
- Now, click on Next button.
- Follow on-screen instructions to create the new user account.
- Now restart your system with this new user account. Now you will free from any such error related to Printer.
That’s all.
