TPM 2.0 Windows 11 Error and Management. At first we will know what is TPM and how to enable TPM 2.0 ? TPM stands for Trusted Platform Module and used for the purpose of your Windows 10 security. It is a hardware based security feature that authenticate your system. Your computer must have a Trusted Platform Module (TPM 2.0) chip if you want advance security features in your system. Also TPM 2.0 is the minimum system requirement for installation of Windows 11.
Trusted Platform Module, is a chip embedded on your computer motherboard that helps enable tamper-resistant full-disk encryption without the need of an extremely long complicate passphrase.
BitLocker feature works with the help of Trusted Platform Module through TPM chip. The process of Bitlocker Drive Encryption with a TPM chip is more efficient and having more security features.
How to check availability of Trusted Platform Module Windows 10
- Press Windows key + R shortcut key.
- Run command will open now.
- Type TPM.msc in it and click on Ok button.
- Services window will open now.
- If you find the message Compatible TPM cannot be found, it means Trusted Platform Module is not available in your system.
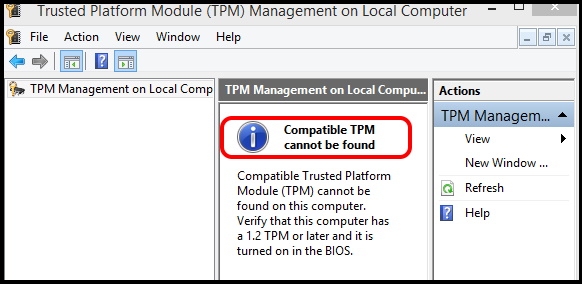
One another way to Check TPM in Windows 10 system is through Device manager.
- Type devrmgmt.msc in Run command box.
- Press Enter key.
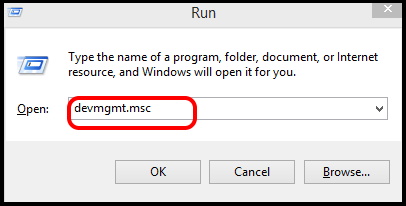
- Device Manager window is open.
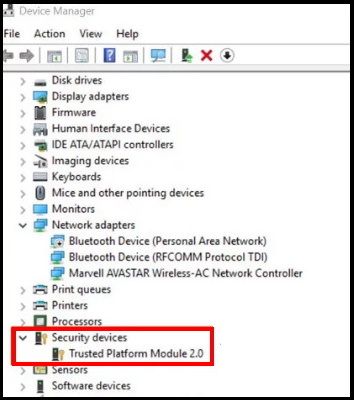
- Here go to the Security devices section.
- Make a click on it to expand.
- You will find the Trusted Platform Module 2.0 in your system.
How to Enable TPM hardware through BIOS settings
- Open Windows Setting.
- Select Update & Security.
- Now from the menu of left side, select Recovery option.
- Go to right pane and click on Restart Now button located under Advanced Startup option.
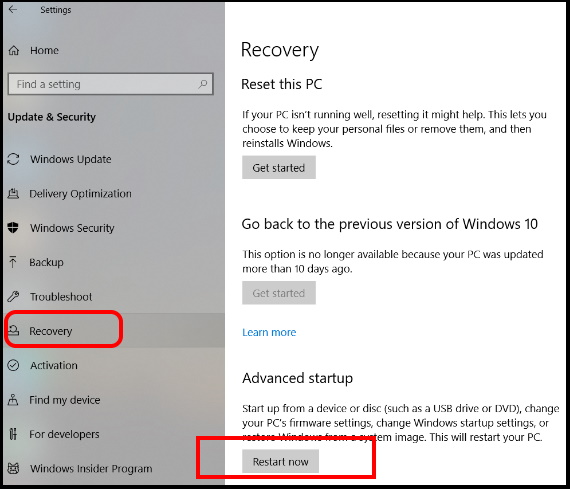
- As soon as you click Restart now tab, your PC will start to boot.
- While rebooting, you will access to Advance Startup Screen.
- Here select the Troubleshoot option.
- Under troubleshoot, tap on Advanced options at the bottom part.
- Select on Startup Settings.
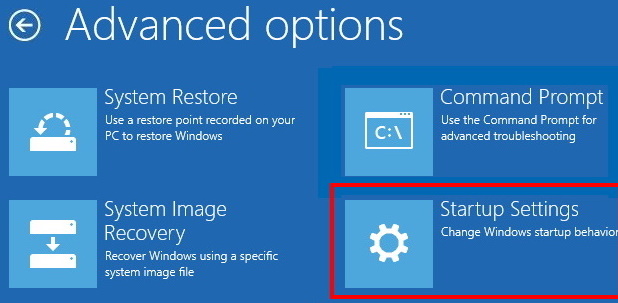
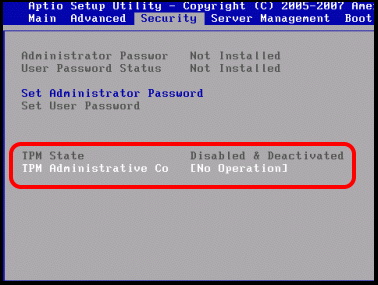
- Here from the available list, go to the system information.
- Look for TPM state.
- If you find it in disable mode, click on it and make enable.
How to add a TPM Chip to Windows 10 PC
You can buy a TPM chip from Here. Your System Motherboard should support this TPM chip. Newly introduced Laptop or Desktop computer generally having TPM chip installed. It is permanently attached with Motherboard of your Windows 10 system. It’s not possible to add TPM chips to an older PC that doesn’t have the hardware to accept one.
You should consult your Motherboard manufacturer’s documentation for more information about whether your PC supports a TPM chip and which one it requires.
Why Clear TPM is necessary?
1. If you are going to start a clean installation of a new Windows 10 system on a older PC, to clear TPM is necessary. Clearing TPM ensures that the new system can fully deploy any TPM-based functionality. However its is not necessary that not-cleared TPM will screw up the system but it’s just better with a clean TPM.
2. Clearing TPM will also effective for extracting BitLocker keys from a TPM. Before leaving, you should clear TPM on that system.
3. If you are using BitLocker to encrypt disk as a way to wipe out old SSD drives, you will need to clear the TPM to destroy the encryption key so no one can recover it.
How to Clear a TPM content from Windows 10 system
- Press Windows Key + S to open search window.
- Type powershell in it.
- Now go to the top and select the top result as Windows PowerShell.
- Thereafter go to the right side and choose the option Run as Administrator.
- Now type the following command and press Enter: –
- Clear-TPM

The another way to clear TPM is through Windows Security Settings. Go through these steps: –
- Press Windows key + I shortcut key to open Settings App in Windows 10.
- Go to the Update & Security section.
- Now from the left pane of settings window, choose the option Device Security.
- Thereafter go to the right side, here you will find Security Processor section.
- Make a click on Security Processor details link.
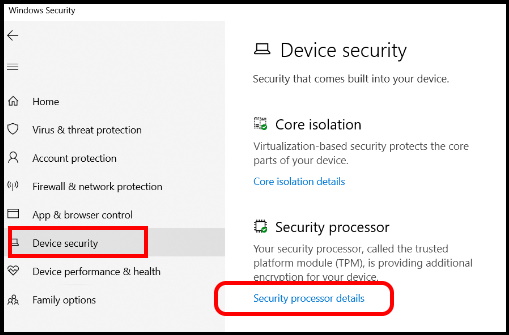
- Under Security Processor Troubleshooting, you will find the section Clear TPM.
- Make a click on Clear TPM button.
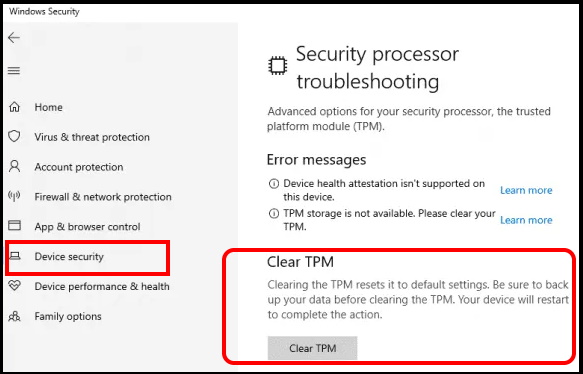
- Finally Restart your system.
How to Fix Trusted Platform Module TPM Error in Windows 10
Sometimes, Users have to face various types of Trusted Platform Module 2.0 error in Windows 10. TPM may be malfunctioned. If Trusted Platform Module is not available or having TPM error in Windows 10 system, some of the app such as Outlook and Microsoft account will not function well. Here the some fixes that will help you to resolve the issue.
Tips-1: Apply a clean Boot of your Windows 10 system
Applying clean boot is the starting process of any windows 10 system to check whether any third party software interfering in your system or not. There is a possibility of conflict between your PC and third party software and lead to Trusted Platform Module error in Windows 10. Follow these steps: –
- Launch Run command box by pressing Win + R shortcut key.
- Type msconfig in it and press Ok button.
- System Configuration windows will open now.
- Here go to the Service tab from the top menu bar.
- Thereafter make the check against option Hide all Microsoft services box.
- Then select all the services listed in the window, and click Disable all.
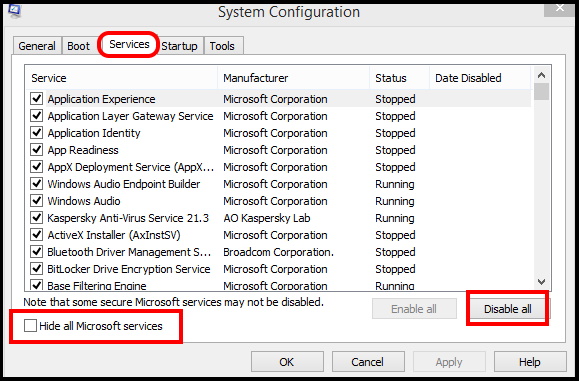
- Finally click on Ok button to save the changes.
- Close the System Configuration window.
- Thereafter press CTRL + Shift + Esc to open the Task Manager.
- Here go to the Startup tab and click on each service one by one and click on Disable.
- Click on OK and close Task Manager.
- Reboot your computer.
Tips-2: Update TPM 2.0 Driver to Fix Error Code 80090016 in Windows 10
The most common error which most of the users face occasionally is Error code 80090016. It is basically the driver related error. You should update the Trusted Platform Module 2.0 device driver through Device Manager. Go through these steps: –
- Press Windows Key + R to open the Run application.
- Type devmgmt.msc and press Enter to open the Device Manager.
- In the Device Manager window, go to the Security Devices section.
- Click on it expand.
- Apply a right-click on Trusted Platform Module 2.0 and choose the option Update driver.
- In the next window, select Search automatically for drivers.
- Windows will automatically download and install the latest version of the Trusted Platform Module 2.0 driver.
- Reboot your computer.
Tips-3: Reinstall TPM 2.0 Driver in Windows 10
- Type devmgmt.msc in Run Command box and press Enter.
- Device Manager window will open.
- Go to the Security Devices section.
- Click on it expand.
- Apply a right-click on Trusted Platform Module 2.0 and choose the option Uninstall.
- Restart your system.
- Windows will now automatically download and install the latest version of the TPM 2.0 driver.
- Reboot your computer.
Tips-4: Disable Authentication process to Fix Trusted Platform Module Windows 10 Error
If you are facing the opening issue of Microsoft office due to TPM error in Windows 10, apply this solution. Follow these steps: –
- Go to Run Command box.
- Type regedit in it and press Ok button.
- Registry Editor window will open now.
- Here navigate the following path: –
- HKEY_CURRENT_USER\SOFTWARE\Microsoft\Office\16.0\Common\Identity
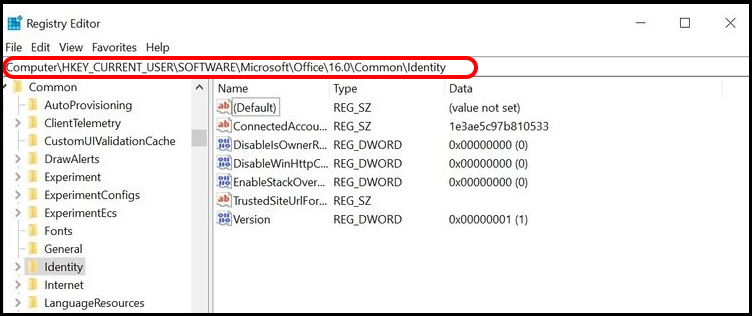
- Apply a right click on empty space at the right side of page.
- Go to the path New > DWORD (32-bit) value.
- Assign the name of value as EnableADAL.
- Thereafter apply a double click on it.
- In small window box, put the value 0.
- Close Registry Editor and reboot your computer.
Tips-5: Delete the Ngc folder from C Drive
- Press Windows + E shortcut key to open File Explorer.
- Here navigate the following path in File Explorer Window: –
- C:\Windows\ServiceProfiles\LocalService\AppData\Local\Microsoft
- Find out the folder namely Ngc.
- Make a right click on it and choose the option Properties.
- Now go to the Security tab from the top menu bar.
- Click on Advance option.
- Under Owner, click on Change.
- You’ll asked administrative privileges to do so. Click on Continue.
- Now under the text box, enter your local account username that you recently using.
- Thereafter click on Check names.
- Click on OK button.
- Make the check against box namely Replace owner on subcontainers and objects.
- Press OK button.
- Thereafter apply a double-click to open the Ngc folder.
- Delete all its contents.
- Restart your computer.
Tips-6: Remove Windows Credential to Fix Trusted Platform Module Windows 10 Error
- Go to Windows search.
- Type cp in it.
- Choose the Control Panel option appeared as top result.
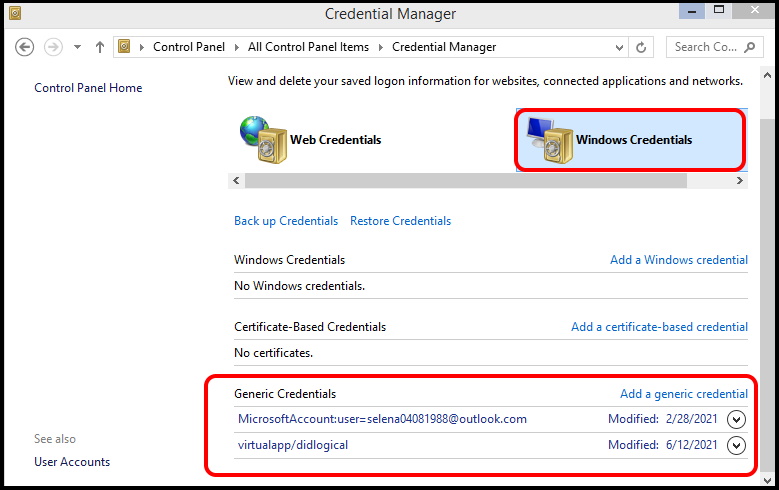
- In Control Panel window, select the option Credential Manager.
- Here you will find two types of Credential: –
- Web Credential
- Windows Credential
- Choose the Windows credential.
- Now go to the Generic credential section.
- Click on small arrow for each option and remove it.
Related Search:
- Windows 11 TPM 2.0
- Trusted Platform Module 2.0
- TPM error after Motherboard replacement
- What is Trusted Platform Module.
- Trusted Platform Module clear
- Trusted Platform Module has malfunctioned
- TPM error in Outlook
- TPM error in BitLocker
That’s all.

3 thoughts on “Trusted Platform Module TPM 2.0 Windows 11 Error and Management”