How to Resolve WiFi Disconnected automatically in Windows 10 / 8. This issue becomes more serious for any user who is working on very important task and have to face interruption due to “Wifi disconnected”. There are various reason of Wifi disconnected automatically in Windows 10 / 8. Most of the users complaint of Wifi connection gets disconnected on the following event: –
- When you connect any other device.
- When you keep your system in sleep mode.
- While using VPN.
- Wifi device randomly not detected.
How to Resolve WiFi Disconnected automatically in Windows 10/ 8
The following are the possible ways to resolve WiFi disconnected automatically in Windows 10/8: –
- Change Power Saving Option
- Through Windows PowerShell
- Through Network Troubleshooter
- Uninstall Network Card Device
- Tweak the Power Option
- Disable Roaming Sensitivity
- Change Channel of your Router
- Work with Google DNS
Ways-1: Change Power Saving Option
Whenever, you keep your system in sleep mode, Wifi may disconnected automatically. If you are facing such type of problem, you must change power saving option under Network Adaptor.
- Open Run Dialog Box.
- Type devmgmt.msc.
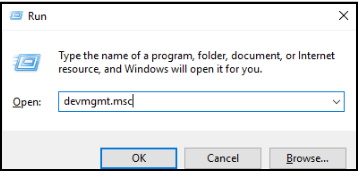
- Device Manager window will appear on screen.
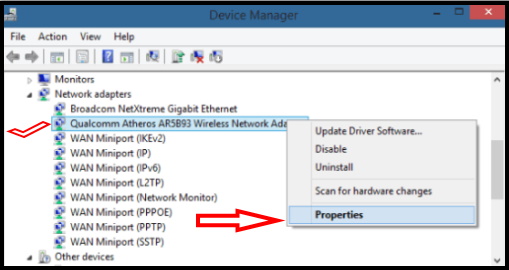
- Double Click on the Network Adapters in Device Manager window.
- Locate your WiFi driver.
- Make a right click on it and click on Properties.
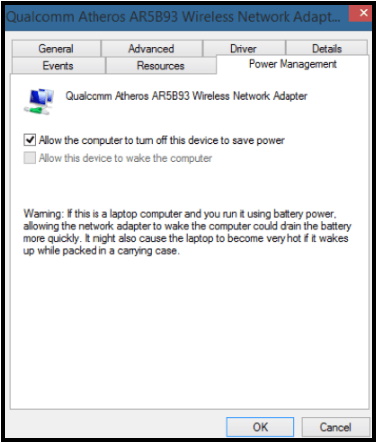
- Under the Properties page, click on the Power Management tab.
- Now uncheck the Allow the computer to turn off this device to save power option.
- Click on Ok button.
- Close the Device Manager window.
- Reboot your system to get your problem resolved.
Ways-2 : Re-set Wifi Properties through Windows PowerShell
- Proceed to the Windows Desktop.
- Right click on the desktop at any place and click on New under Shortcut option.
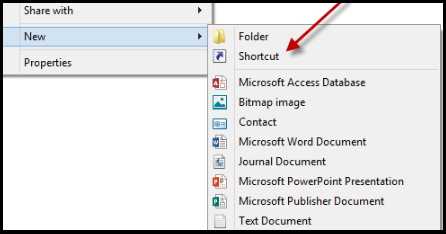
- A Create Shortcut window will pop up on the screen.
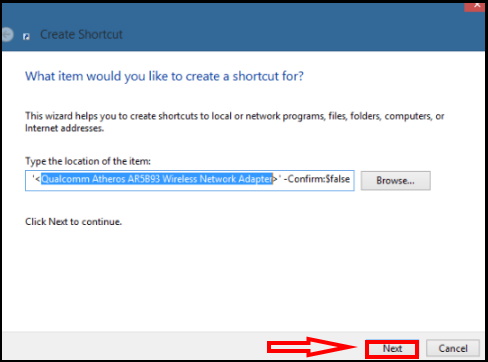
- Paste the below command in the field provided.
- C:\Windows\System32\WindowsPowerShell\v1.0\powershell.exe restart-netadapter -InterfaceDescription ” -Confirm:$false
- Here you have to enter your wireless adapter name.
- You will get your wireless adapter name from the Device Manager.
- See the Device Manager steps and get the wireless adapter name and enter it in its position in the above command. Now the new command of mine reads like this –
- C:\Windows\System32\WindowsPowerShell\v1.0\powershell.exe restart-netadapter -InterfaceDescription ” -Confirm:$false
- Click Next.
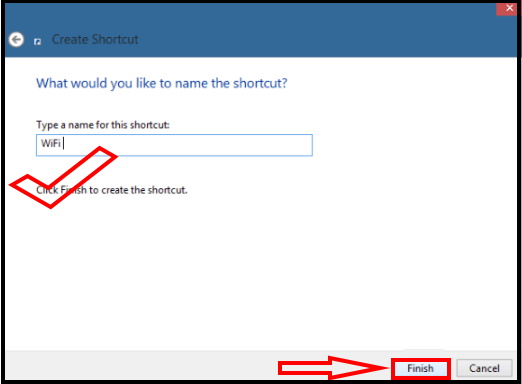
- Give a name to your shortcut and click Finish.
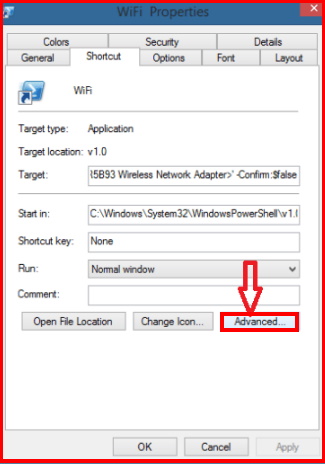
- Now again go to your Desktop, right-click the shortcut created.
- Click on Properties.
- Click the Advanced tab.
- Advanced Properties Window will appear .
- Select the Run as administrator option.
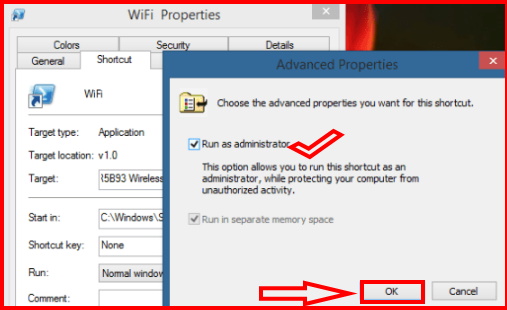
- Click Ok.
- Now click Apply and then Ok.
You can pin the shortcut to your start screen also. Whenever you face the problem, double-click the shortcut icon and allow the command to work on your system and let it solve the problem for you.
Ways-3 : Resolve the Issue through Network Troubleshooter
Network Troubleshooter is an in-built tools by which you can resolve Wifi disconnected automatically in Windows 10 / 8. You may apply this tool once.
- Press Windows key + C on your keyboard to show the Charms bar.
- Type Troubleshooting and click Troubleshooting under Settings.
- Now type Network Troubleshooter in the search option.
- Click on Network troubleshooter to run the troubleshooter.
Ways-4 : Uninstall Network Card Device to Resolve WiFi Disconnected automatically in Windows 10/ 8
Corrupted or outdated Network Card may be a reason of wifi disconnected issue in Windows 10 / 8. You should
- Press Windows key + W from your keyboard.
- Then type Device Manager without quotes in the search box and hit Enter.
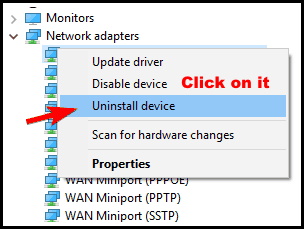
- Expand Network Adaptor and then right click on Network Card.
- Click on Uninstall and restart the computer.
Ways-5 : Tweak the Power Option
- Open Device Manager.
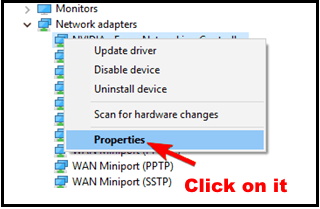
- Right click on your installed network adapter.
- Then, choose Properties from the menu.
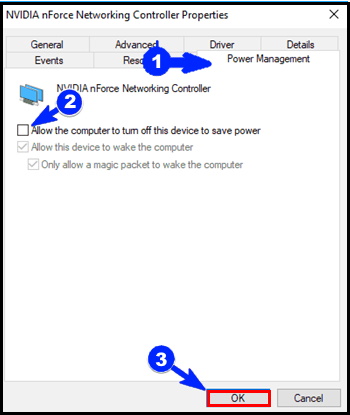
- Find out Power Management tab.
- Uncheck Allow computer to turn off this device to save power.
- Make a click on OK to save changes.
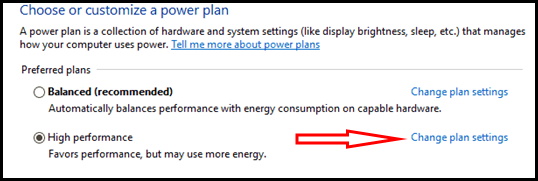
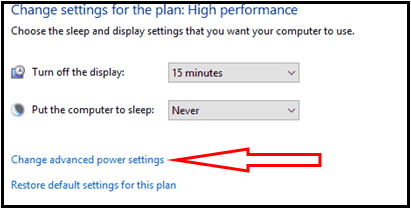
- Click on Change Plan Settings next to your selected plan.
- Click on Change Advanced Power Settings in Edit Plan Settings.
- Scroll down to Wireless Adapter Settings and expand it.
- Then expand Power Saving Mode.
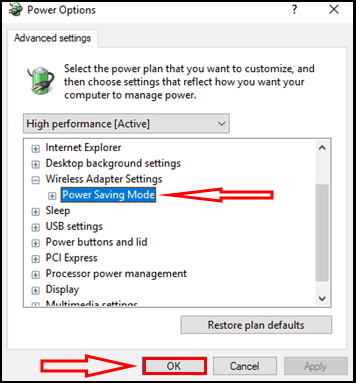
- Click on the On battery and Plugged in drop downs.
- Here select Maximum Performance on both i.e on battery and Plugged in option.
Ways-6: Disable Roaming Sensitivity to Resolve WiFi Disconnected automatically in Windows 10/ 8
Some users occasionally reported about Roaming sensitivity feature in Windows 10 / 8. Through which, a user can switch to another wireless network. But it leads to wifi disconnected automatically issue. So you should disable it to get rid of wifi disconnection. Follow these steps: –
- Open Control Panel.
- Find out and click on Network and Sharing Center.
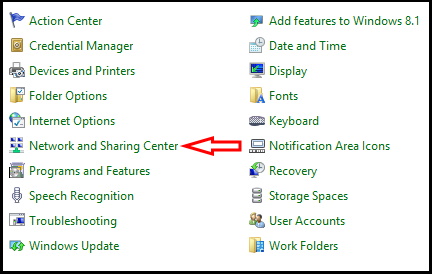
- Network and Sharing Center window will now open.
- From the left pane, click on Change adapter settings.

- Network connections list will appear on your screen.
- Make a right click on your wireless connection.
- Choose Properties from the appearing menu.
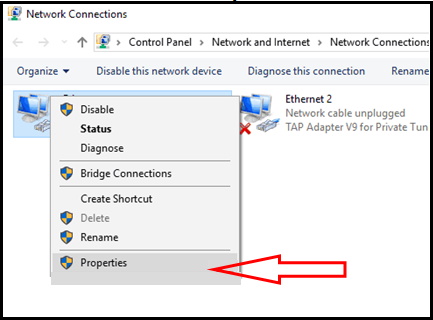
- When Properties window opens, click on Configure.
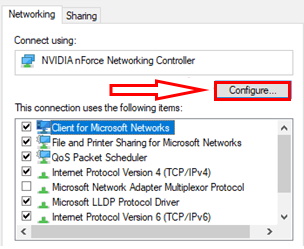
- Navigate to Advanced tab and select Roaming Sensitivity.
- Set it to Disabled and click on OK and Apply to save changes.
After doing that your PC won’t automatically try to connect to other available wireless networks and the problem with WiFi should be completely resolved.
Ways-7 : Change Channel of your Router
Most of the users switch to a different channel when their Wifi disconnected automatically. Buy do you know that every router may operate on different channel. But if more than one router exists on the same channel, your wifi connection may be disconnected automatically. Because your wireless adapter might try to connect other wireless network available on the same channel. In view of the above, you must change your channel on router. Follow these steps: –
- Go to the router’s configuration page.
- Navigate to Wifi Section.
- Change the channel number
- For more details, you may see user’s manual of Router provided by manufacturer company.
Ways-8 : Work with Google DNS
DNS, which you use, may be a reason for Wifi disconnected automatically. So I advise you to work with Google DNS. Here is how to use Google DNS: –
- Open control panel.
- Here click on Network and Sharing Center.

- From the left pane, click on Change adapter settings.

- Make a right click on your wireless connection appeared on your screen.
- Thereafter Choose Properties from the appearing menu.

- Select Internet Protocol Version 4 (TCP/IPv4).
- Now click on Properties.
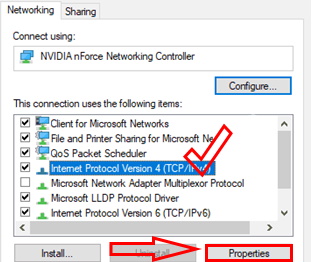
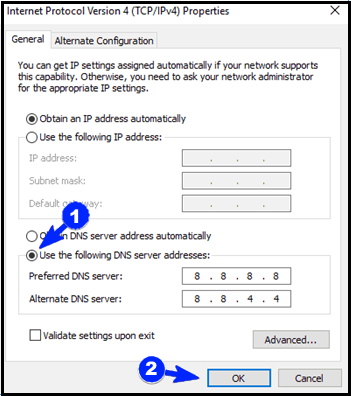
- When the Properties window opens, select Use the following DNS server addresses.
- Thereafter Set Preferred DNS server to 8.8.8.8 and Alternate DNS server to 8.8.4.4.
- Click on OK to save changes.
People also search for: –
- Wifi disconnects frequently windows 10
- Wi-Fi keeps disconnecting on Laptop
- Laptop keeps disconnecting from wifi
- Internet keeps disconnecting windows 10
- My internet keeps disconnecting every few minutes
- Wi-fi router keeps disconnecting
Thnx..

1 thought on “Tips : How to Resolve WiFi Disconnected automatically in Windows 10 / 8”