How to Perform Full Scan with Windows Defender in Windows 10. Windows Defender Firewall is an in-built antivirus installation which protect your system from unwanted threats, spyware, ransomware and various types of online viruses such as Trojans. Windows defender Firewall having various aspects such as scheduled scan, quick scan, full scan, Custom scan, offline scan etc. In this article, we will discuss about scanning procedure with windows defender in windows 10. You must perform scanning of your system once to avoid external malware as well as online threats.
How to Perform Full Scan with Windows Defender in Windows 10
You may try any one of three methods described below: –
Perform Full Scan Full Scan with Windows Defender Through Windows Security
- Click Windows Security (shield) icon from the system tray.

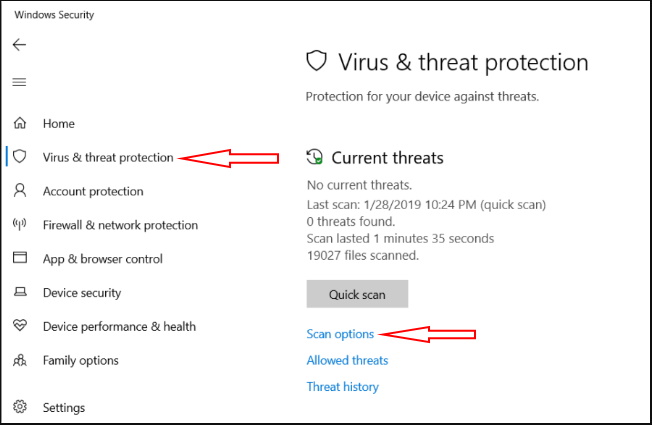
- Here, select Virus & Threat Protection from the left pane of Windows security page.
- Make a click on Scan options from the right side of Windows security page.

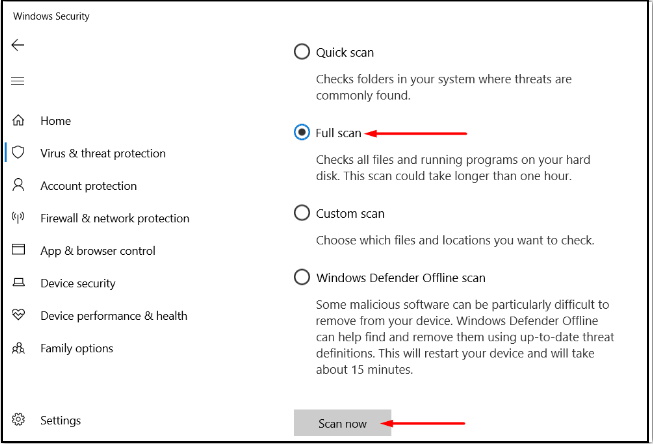
- Make a check on Full scan radio button.
- Finally click on Scan Now option.

- Windows Defender will now start detecting existence of any threats on the system. Once the process for full scan completes, the scan result will appear on your screen.
- If the scan traces out any threats, click Clean threats button to get rid of them from the system.
- If you want to know more about the threat, click See threat details link.
- On the following page, Windows Defender will offer you three actions for the threat.
- Choose the radio button Remove and click Start actions button.
Perform Full Scan with Windows Defender in Windows 10 Via Command Prompt
- Open Run Dialog Box.
- Type “cmd” under typing field and click OK to access Command Prompt console.
- To Run Windows Defender Full Scan, copy-paste the below-given command and hit Enter to execute the scan.
"%ProgramFiles%\Windows Defender\MpCmdRun.exe" -Scan -ScanType 2

Through PowerShell Perform Full Scan with Windows Defender
- Make a right click on the Start icon on the left corner of the taskbar.
- Make a click on PowerShell option.
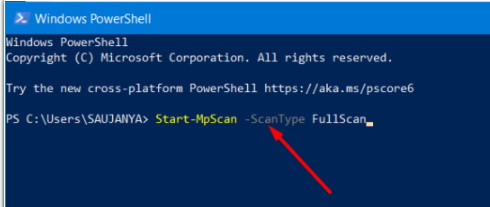
- When the blue color console appears on screen, type in or copy/paste the following syntax.
- Press Enter.
Start-MpScan -ScanType FullScan

How to See Windows Defender Scan Result Log History in Windows 10
That’s all.

1 thought on “Tips : How to Perform Full Scan with Windows Defender in Windows 10”