How to optimize and Free Hard Disk Space in Windows 8. Sometimes users reportedly complaint about slow performance of their system. But it depends upon usages. The files or folders you create, they are saved in your hard drive space. When it heavy loaded or fill with unnecessary or temporary files, your system get slow in performance. It takes long time in responding when you try to open any files or folders. In order to get rid of this issue, you should optimize your hard drive space by various method as I am going to describe through this article.
Ways to Optimize and Free Hard Disk Space in Windows 8
1. Perform Disk Cleanup
You should clean junk / temporary files from your system. Here are the ways to free hard disk space. Windows includes a built-in tool that deletes temporary files and other unimportant data. To access it follow the following steps:
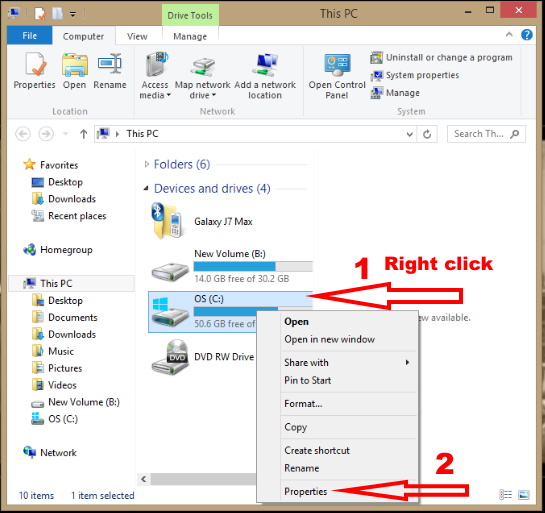
- Make a right-click one of your hard drives in the Computer window.
- select Properties.
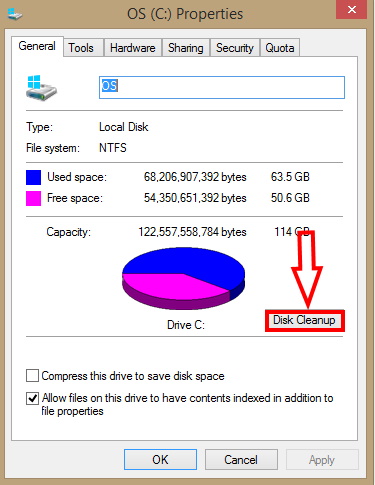
- Here click on disk cleanup option.
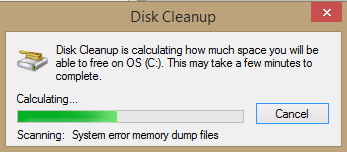
- A new disk cleanup box will appear. It will calculate how much space you will be able to free on drive C.
- It will take few minutes to complete.
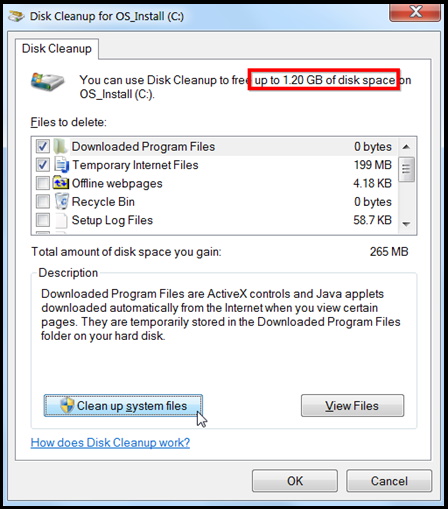
- Now a list of files will display in a new windows. Also a message about strength of files upto which you can free space will display.
- This includes downloaded program files, temporary internet files, offline web pages, recycle Bin and other unwanted files. A total of
- You have to choose which files you want to delete to freeup space of Hard disk C.
You can also cleanup system files, which not appeared in the list. for this act you should perform the following action: –
- Make a click on Cleanup system files adjacent to view files button.
- Go to the more option button.
- Click on cleanup button under System restore and shadow copies.
- This will delete the most recent restore point.
- Make sure that you would not able to view or see older system restore point before applying this action.
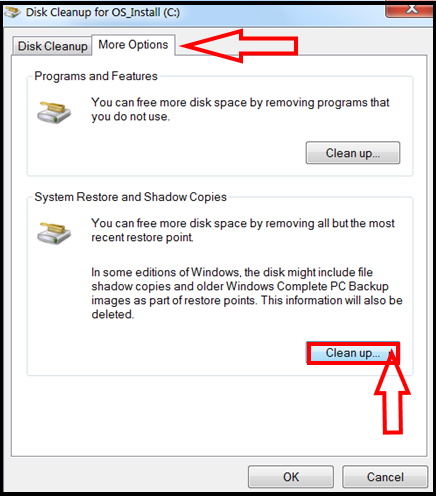
In another way, you may also apply this method: –
- Prompt the Run dialog box applying the Win+R hotkeys conjointly.
- Write cleanmgr in the search box and press Enter key.
- A small dialog will open on your screen and ask for location where you want to perform cleanup. Choose C: drive from drop down menu appearing on screen.
- The Disk Cleanup utility will analyze the required space in the drive first. When the Wizard appears, click on Clean up system files option from here.
- The small popup will appear again and you need to choose the same drive from there as like before.
- When the Disk Cleanup for (C:) rolls in, check all the options from Files to delete segment except the Downloads only.
- Press Ok button from the bottom and start the freeing up process.
2. Uninstall much space cover Application to optimize and free Hard disk space in windows 8
Uninstalling programs will free up space, but some programs use very little space. From the Programs and Features control panel, you can click the Size column to see just how much space each program installed on your computer is using. The easiest way to get there is to search for “Uninstall programs” in the Start Menu. Follow the following steps: –
- Open Control panel.
- Click on Programs and feature option.

- A program may be using a lot of space but may not have any information in its Size column
- Find out the application under program and features option which consumes more space on your hard disk.

- Right click on it
- Select Uninstall option.

This will increase your space in a particular drive. You must ensure that the feature you selected to delete is no longer to use and not important for your system.
3. Remove Old Backup
System Image Backup is a vital resource to keep a machine safe but, it holds a substantial field of Hard drive. If you have appointed an internal drive to accumulate, time to time multiple backup files are piled up here. The Backup file is considerably volumetric. Hence, to Wipe Out Data to Free Hard Drive Windows 10, eradicating these gigantic old backup volumes is necessary.
4. Locate and Delete Duplicate files
Sometimes exact duplicate image files created in a single folder. In this case, you should remove it to free disk space in windows 8. If you have large collection of these images, then it becomes more difficult to delete these files one by one. In order to View Exact Duplicate Images as a Single File in Photos App, you need to turn on Linked duplicates. The Linked duplicates settings also identify copies saved in different folders and RAW image files. Follow the following steps: –
- Press Windows key.
- On the Start Menu, go to the P section, locate and select Photos app.
- Once Photos app appears on screen, click See more button (…) on the far top right.
- You can see three options, click Settings.
- The Settings page of Photos app displays numerous options to configure.
- Find View and editing section in the settings page.
- Toggle ON the setting Link duplicates.
- You can View Exact Duplicate Images as a Single File in Photos App on Windows 10 PC.
- Select all and delete it.
Hopefully, you will get more disk space as well as increase your PC performance. You should apply above methods to all your drives one by one. Remove junk files, temporary files and duplicate files time to time.
