How to Manage Color Filters in Windows 10 by Two ways. Color filter is a feature under Ease of Access Setting of Windows 10. It helps the user to improve the visualization of elements on the screen while working on apps or viewing content. This feature is specially useful for visually impaired users while differentiating various elements on screen in windows 10. Users have to face difficulties specially while recognizing various apps as Thumbnail view on the screen. Color Filters feature of Windows 10 facilitate a user to distinguish the each and every app easily. Microsoft allows the users to make enable or disable the color filter features as per their requirement or choice.
How to Manage Color Filters in Windows 10
Now we will discuss about how to Manage Color Filters in Windows 10. There are two two ways to enable or disable color filter option in windows 10. These are as under: –
Ways-1: Through Windows Setting
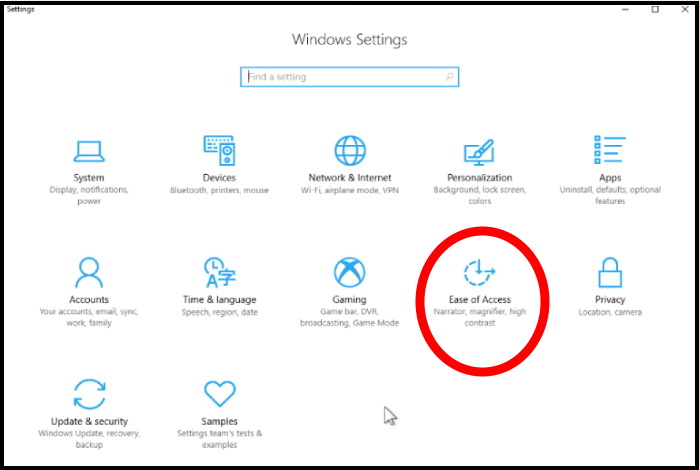
- Open Windows setting.
- Go to Ease of Access Setting.

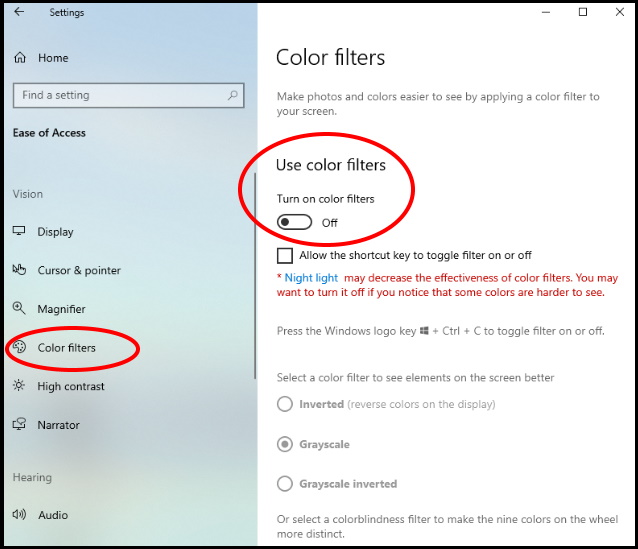
- From the left side of setting window, select color filter option.
- From its corresponding right pane, toggle On the option for the setting Turn on color filters.
- You may use shortcut key Windows key+ Ctrl + C to launch color filter and set grayscale as default color for your entire window.
- Now, choose any color you like from the list and the feature applies the selected filter instantly.

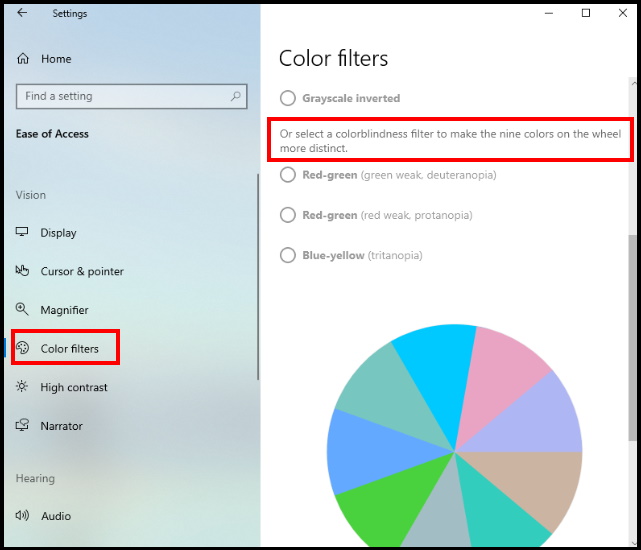
- You may select a colorblindness filter to make the nine colors on the wheel more distinct.

Ways-2: Manage Color Filters through Registry
You can also manage color filters by using Registry editor in windows 10. Follow these steps to complete the process: –
- Open Run Dialog Box.
- Type regedit in the box and press Ok button.
- Registry window will open.
- Now navigate the under mentioned path from the left side of Registry window: –
Computer\HKEY_CURRENT_USER\Software\Microsoft\ColorFiltering
- From the right side of the screen, two types of DWORD Active and FilterType will available.
- Make a right click on the Active DWORD option and choose modify from the drop down menu.
- Type 1 in the value data area and click on Ok button. It will let you enable color filters.
- You should type 0 in the value data field, if you want to disable color filters.
- Now we will see second type of DWORD, i.e FilterType. It helps you in selection of color filter. The following are the value for different type of colors. You have to enter these value in the data value box: –
- Grayscale – 0
- Invert – 1
- Grayscale Inverted – 2
- Deuteranopia – 3
- Protanopia – 4
- Tritanopia – 5
- Perform a right click on FilterType option.
- Choose modify from the drop down menu.
- Select the data value as per your requirement from the above mentioned list and click Ok button to save the changes.
That’s all.

1 thought on “Tips : How to Manage Color Filters in Windows 10 by Two ways”