How to Enable or Disable Windows Defender Antivirus in Windows 10. Don’t be anxious about the new nomenclature of Firewall as “Windows Defender Firewall”. It came into effect after inclusion of Windows Defender Security Center in Windows 10. Windows defender antivirus is an in-built security solution that provides security for your windows 10 system. It not only defends from external threats but also keep save from Hackers. Its very easy to Windows Defender Firewall on or off.
Also Read: How to Restore as Default Firewall settings in Windows 10
How to On or Off Windows Defender Firewall in Windows 10
- By Control Panel
- Through Taskbar
- Via Windows Setting
- Using Cortana Search
- From Start Menu
- Go through the Advance Setting
Tips-1: By Control Panel
To make enable or disable Windows Defender Firewall through Control Panel is the easiest method. Follow these steps to complete the procedure: –
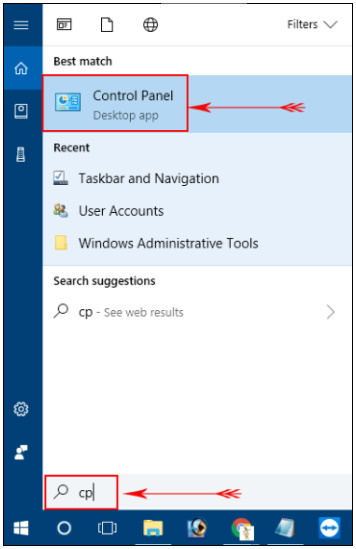
- To open Control Panel, proceed to taskbar search icon, type cp and press Enter.
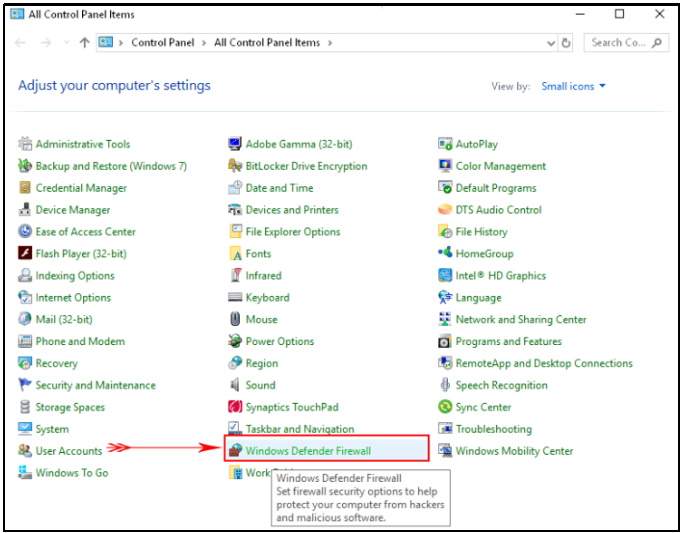
- Thereafter, Locate Windows Defender Firewall from the control Panel menu list and click on it.
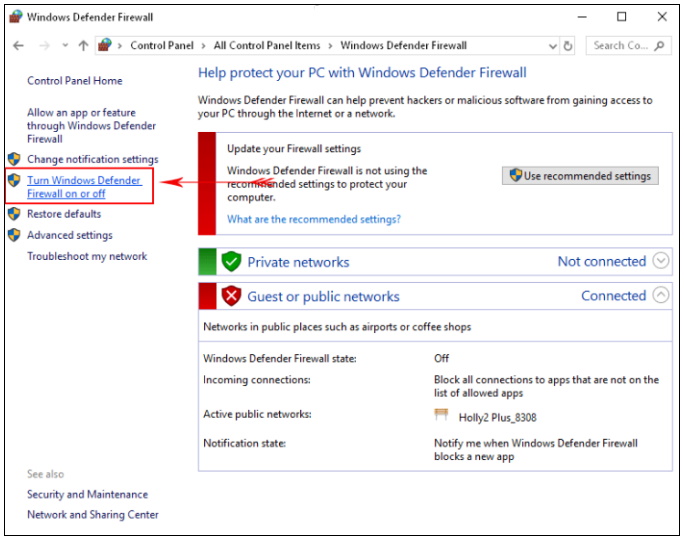
- Now, from the left side of menu option, Choose Turn Windows Defender Firewall on or off .
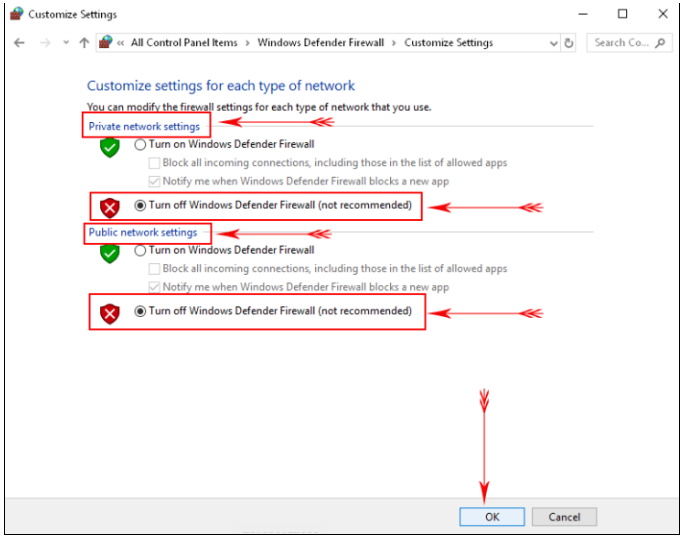
- See the below mentioned screenshot. Click on Private network settings, check the small round button before “Turn off Windows Defender Firewall (not recommended)”.
- Similarly, click on Turn off Windows Defender Firewall (not recommended) in the Public network settings section.
- Thereafter, Click on OK button to Disable Windows Defender Firewall in Windows 10.
- If you want it again enable, then come back to the previous window and click on Use recommended settings.
How to Scan with Microsoft Safety Scanner in Windows 10
Tips-2 : Enable or Disable Windows Defender Antivirus Through Taskbar
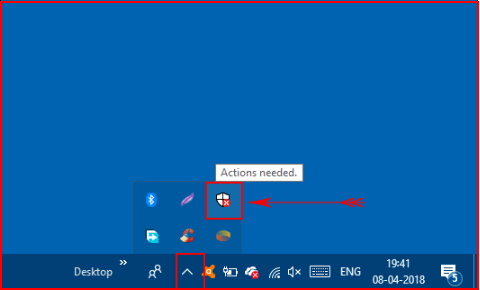
Step-1: Go to the System tray of Taskbar and hover the cursor to the taskbar.
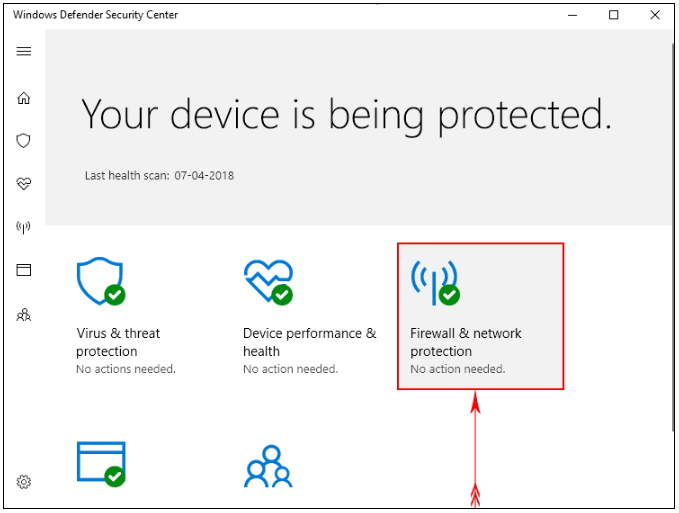
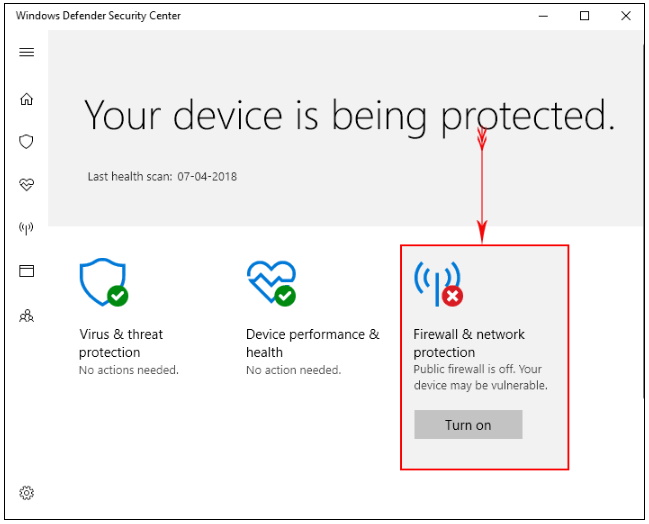
Step-2: A new page will appear and here you should click on Firewall & network protection to expand its options.
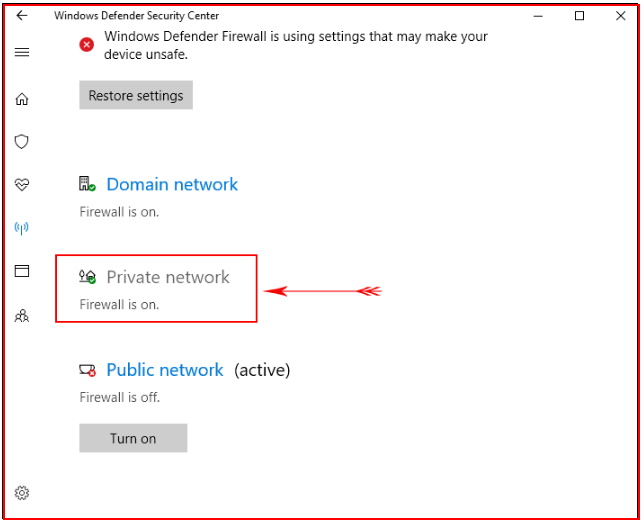
Step-3: Make a click on Private network.
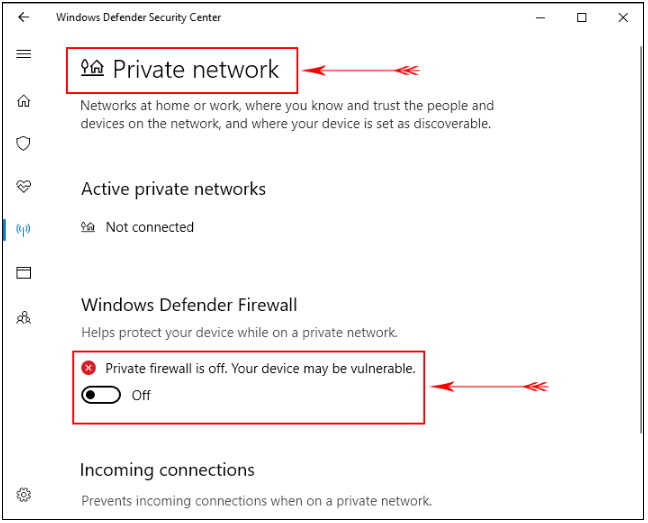
Step-4: To disable Firewall, toggle the button under Windows Defender Firewall to Off.
Step-5: A UAC dialog box will appear on your screen, click on Yes.
Step-6: Again go back to previous page and select Public Network.
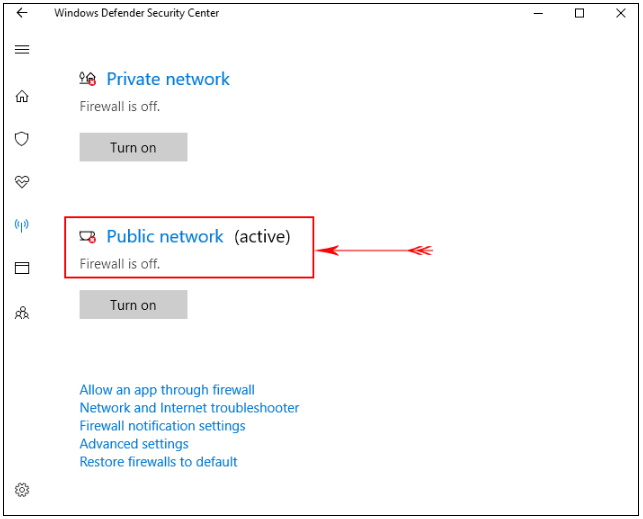 Step-7: As soon as a new page displays, toggle the switch of Windows Defender Firewall to Off.
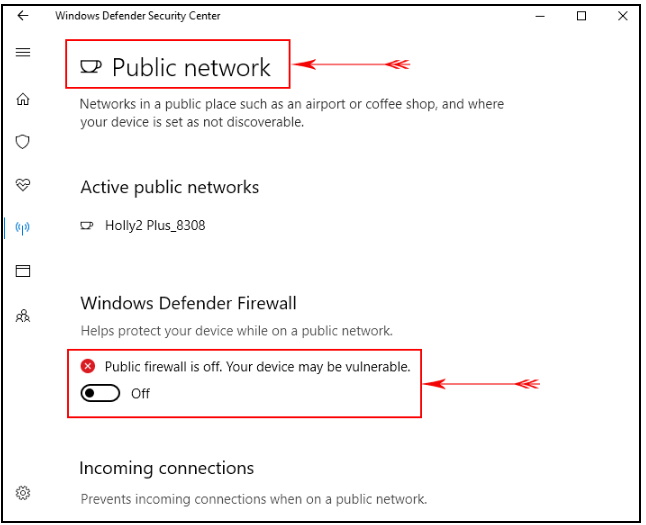
Step-8: Now you will receive a user account control locking your display. Select Yes.
To enable it again, follow the same procedure, press the Turn on underneath Firewall & network protection on the homepage of “Windows Defender Security Center”.
Tips-3 : Via Windows Setting
- Open Windows Setting by pressing “Win+I” hotkeys conjointly.
- Perform a click on Update & Security.
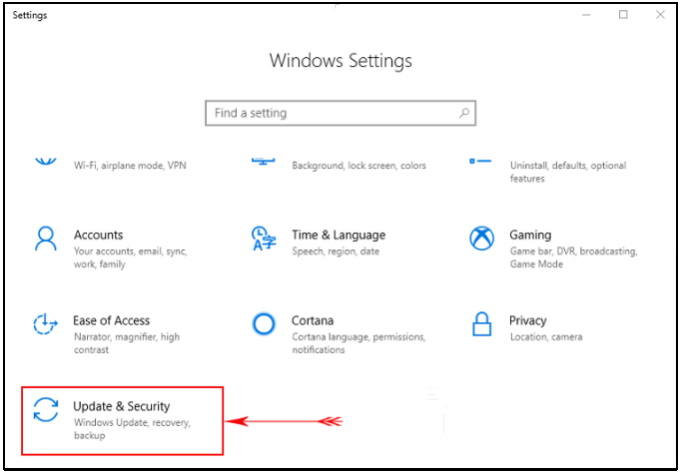
- Under new page, Select Windows Security from the left pane.
- Thereafter Make a click on Open Windows Defender Security Center from the right side of displaying menu.
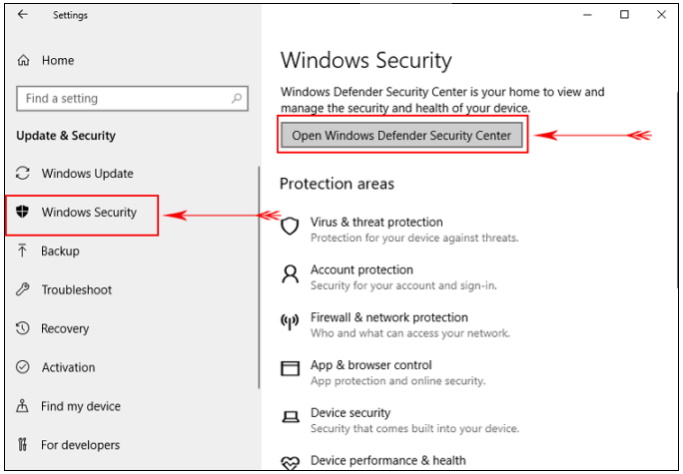
Note : A new window page will appear. You should adopt the same procedure as described in Tips-2, from Step 2 to 6 above.
Tips-4 : Using Cortana Search
- Under the blank text field of Cortana, type “Defender”
- Select Windows Defender Security Center from appearing results.
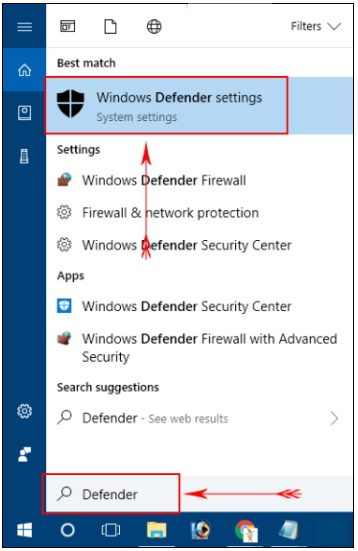
- When a new Window page displays, then apply same procedure as mentioned in Step 2 to 6 of Tips-2,
Tips-5 : From Start Menu Enable or Disable Windows Defender Antivirus in Windows 10
- Navigate Windows Defender Security Centre from the start menu under W alphabet from the list view and click on it.
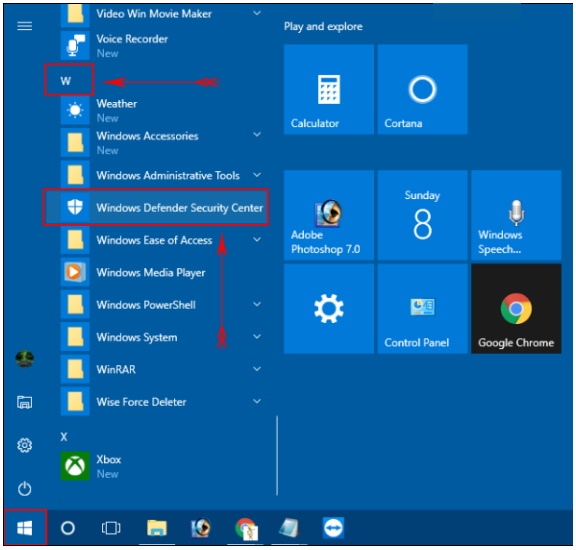
- Now, follow the same instructions as discussed in Step 2-6 from Tips-2.
Tips-6: Go through the Advance Setting
- Open “Windows Defender Firewall” using any of the above method applied.
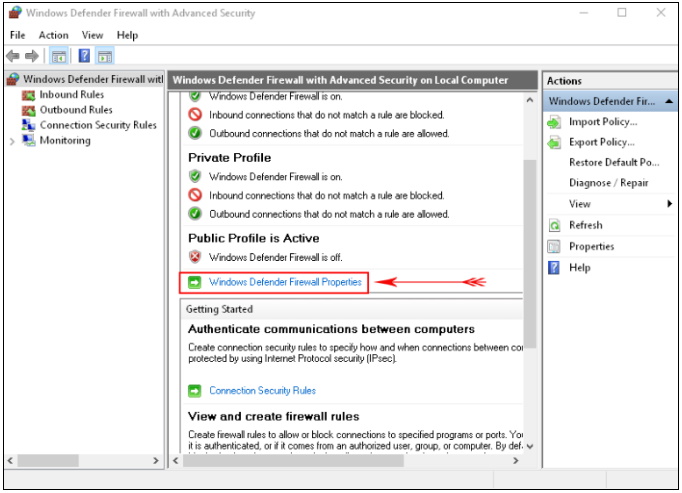
- Now click on Advanced settings from the left pane.
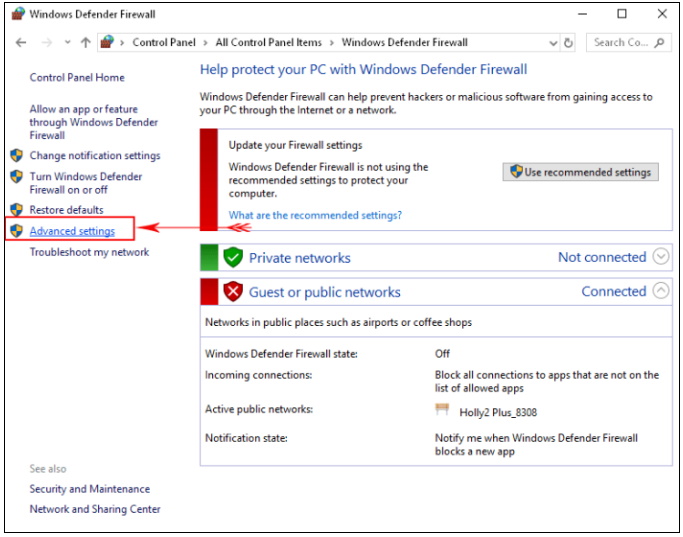
- Thereafter Select Windows Defender Firewall Properties. See screenshot below.
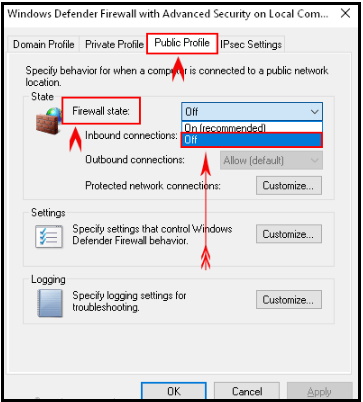
- Under “Windows Defender Firewall with Advanced Security on Local Computer wizard”, switch to the tab Public profile.
- Thereafter Click on the drop-down, adjacent to Firewall State and choose Off.
- Select OK.
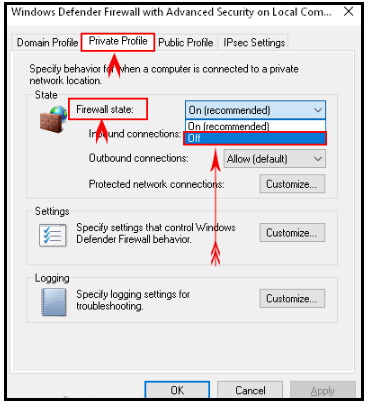
- Again repeat the same procedure and choose “Private profile” tab.
- Thereafter make a click on the “Firewall State” and press Off.
- Thereafter Select OK.
Thanx.

10 thoughts on “Tips : 06 Methods to Enable or Disable Windows Defender Antivirus in Windows 10”