How to Install Linux Subsystem in Windows 10. Linux is open-source free OS which provides a users in programming, organizations, profit and non-profit companies around the world to create Operating systems to suit their individual requirements. To prevent hacking attempts, many organizations keep their Linux operating systems private. Most of users are not well aware of Linux, Ubuntu and other Distribution OS and also don’t want to leave their existing windows 10 Operating System. But now dual boot options are also available.
The Linux Subsystem never acts as an individual operating system and also does not overwrite the existing Windows 10 files. It is just a unique version of Linux which is capable within the Windows 10 interface. So you must try to install Linux subsystem in your Windows 10 system. Even certain issues will appear while installing Linux subsystem, this article will help to get rid of them.
Also Read: How to Install Linux WSL2 Latest Version in Windows 10
Point to be Kept in mind while Installing Linux Subsystem in Windows 10
Some important points you must know before installing Linux subsystem in your windows 10 system.
1. Check Space and storage of your Windows 10 system : For installing as dual boot nature of Linux subsystem, your system must have enough space for storage. Even, Linux usually needs less storage space than Windows 10, but you’ll still need at least 8 GB of free storage.
2. Check Compatibility of your Windows 10 system : Your windows 10 system must have some basic or unique feature such as 64-bit version of windows 10 version 1607 (or higher). Here is how to know about your windows 10 version. If your system have 64-bit Windows 10 but version is lower than 1607, you’ll have to update Windows of higher version before proceeding with this installation. Because Windows subsystem for Linux will not install with this lower version of Windows 10 system.
3. Make enable Windows Subsystem for Linux option manually : However, Windows Subsystem for Linux is a in-built feature of Windows 10. But it may be turned off. So you must keep it enable manually. Here is how to Enable Windows Feature in Windows 10.
How to check version of your Windows 10 system to Install Linux
As we have discussed earlier, to install WSL, your system must have the 64-bit version of Windows 10 version 1607 (or higher) installed. For checking of this requirement, follow these steps: –
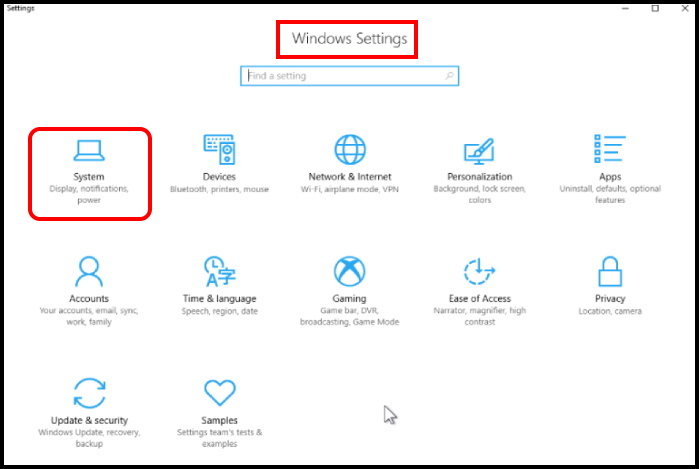
- Open Windows Setting.
- Make a click on System.

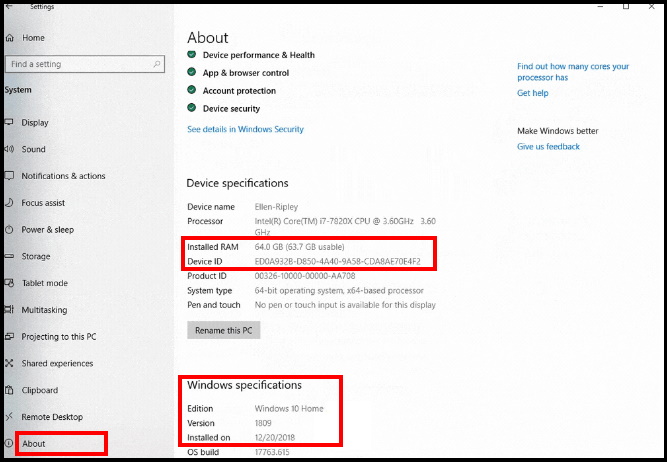
- Now select About option from the left pane of setting windows.
- Here you will see the device specification and Windows specification. Under device specification, you will find device name, Processor, Installed RAM, Device ID, Product ID, System type and Pen & Touch.
- Under Windows specification, you will find windows edition as well as its version and date of installation.

How to Enable Windows Feature in Windows 10
- Open Control Panel.
- Select Programs.
- Here, from the left pane, click on Turn Windows feature On or Off.
- A new window box will appear on your screen.
- Scroll down till finding of Windows subsystem for Linux (WSL) option.
- If find, make a check under box of WSL.
- While a new pop up prompts, choose the “Windows Subsystem for Linux”.
- Then press “OK” button to activate.
- You must restart your system for making changes effective.
02 Ways to Install Linux Subsystem in Windows 10
Here, we will discuss about two methods through which you may install Linux Subsystem in your Windows 10. The first one is through Windows PowerShell and second one is through Microsoft App store.
Ways-1 Through Windows PowerShell
- Make a right-click on the Start button
- Here select Windows PowerShell (Admin) from the appeared Power Menu.
- A UAC prompt will display.
- Click on Yes to proceed further.
- When Windows PowerShell appears on the screen, type the following command after blinking cursor: –
Enable-WindowsOptionalFeature -Online -FeatureName Microsoft-Windows-Subsystem-Linux
- Press Enter.

- After that, restart your computer to install Linux Subsystem on Windows 10.
Ways-2 : Install Linux Subsystem for Windows 10 through Microsoft Store
- Open Microsoft Store on Windows 10 by selecting the Microsoft Store icon from the taskbar.
- There is a possibility that the Microsoft Store icon not displaying on the taskbar. In this case you should pin it on the Taskbar.
- To Pin it, go to the Start button and type Microsoft Store.
- Make a right click on Microsoft Store icon.
- Choose More option.
- At last select Pin to taskbar option from the dropdown menu.

- Now open Microsoft Store from the taskbar.
- Here you will find a list of app.
- Navigate the Linux option.
- If Linux option found, go to the Linux for Windows.
- There are many Linux distribution such as Ubuntu are available in this list.
- Select the ‘Get’ or ‘Install’ option found next to the Linux distribution in the Microsoft store.
- After completion of downloading, you can run the application by pressing Launch option in the Microsoft store
- You may use Cortana search to obtain Linux subsystem for Windows in Windows 10.
- Now install the Linux subsystem for windows appearing in search result.
- Let the window complete the installation process.
- Here you will receive a reminder to enter your Linux user account.
- You may create a new account for Linux with a different user id and password.
Important Point to be kept in mind
While downloading or installing Linux subsystem for Window in Windows 10, You may face some error such as installation failed due to error 0x80070003. There are various reasons of this error. The first reason is, The app which you installed from the Microsoft store were not stored in system drive. The subsystem for Linux runs only when the applications are located in your system drive. To get rid of this issue follow these steps: –
- Open Windows Setting.
- Go to the Storage section.
- Here click on More Storage Settings.
- Now select Change where new content is saved for modifying the configuration.
That’s all.

5 thoughts on “Tips : 02 Ways to Install Linux Subsystem in Windows 10”