How to Screen Record Windows 10 by using Photos and Game bar. Windows 10 screen recorder: Most of the people are not aware about how to screen record on windows 10. Screen recording windows 10 becomes very simple if you use steps mentioned in this topic. Here, we will discuss and see step by step to enable this feature in your PC i.e windows 10.
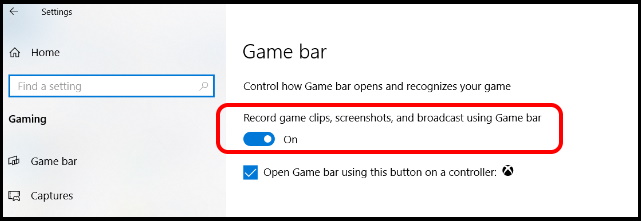
How to Enable Screen Record Windows 10
Firstly you should enable screen record app option by using the following steps:
- Open Settings.
- Click on Gaming.
- Make a click on Game Bar.
- Turn on the Record game clips, screenshots, and broadcast using Game bar toggle switch.

When above action completed, you should be able to use the Game bar experience to screen-record apps on Windows 10.
How to Screen record Windows 10 for app using Game bar
At first you have to choose the app which you want to capture for record a video, and then use the following steps:
- Go to Start.
- Search for Game bar, click the top result to open the source.
- Thereafter Click on Record option.
- Click anywhere to esc the Game bar interface.
- Continue with the screen capture.
- You may Click the microphone button using the available controllers to narrate while recording the video, but it is not required.
Note: Sometimes your privacy settings will block the app and a result you will not record the sound from the app. You can fix this issue using Settings > Privacy > Microphone, and then make sure to turn on the toggle switch for Game bar to allow access to your microphone.
- Click the Stop button to pause the recording.
After expiry of session, go to Captures folder, where your video will save under Videos library.
Also Read : Very Interesting App in Windows 10 known as People App
How to edit a video recording using Photos
Sometimes, the Game bar provides you limited functionality. In this situation, you can still edit some aspects of the screen recording with the Photos app in Windows 10.
For this kind of action, i.e to edit a screen capture using the Photos app, follow the under mentioned Tips:
- Open File Explorer.
- Type the following path in the address bar and click on Enter:
- %HOMEPATH%\Videos\Captures
- Right-click on the .mp4 capture file.
- Choose the option Open with, and click the Photos option.
- Thereafter Click the Edit & Create menu. It will provide you the following aspects of editing option:
- Trim — Shorten the recording.
- Add slo-mo — Adds slow motion to the video.
- Save photos — Saves a frame of the video as a photo.
- Draw — Annotates using touch.
- Create a video using text — Allows you to access various additional features to edit the video.
- Add 3D effects — Adds effects on top of the video.
- Select the Trim option (for example).
- Use the pins to choose the starting and end of the recording.
- Click the Save as button from the top-right corner.
- Choose the folder location.
- Click the Save button.
That’s all.

2 thoughts on “How to Screen Record on Windows 10 by using Photos and Game bar”