How to Share Files through LAN between Windows 11 and Windows 10 Computer. Local Area Network (LAN) is the best medium to share files or folders between two Windows PC. The another way such as Wi-Fi, Bluetooth etc are also available but, these are not more convenient than Ethernet. You can share / transfer all large files and folder through LAN using Ethernet connection. Most of the offices work on this program. Here in this article, we will see How to Share Files through LAN between Windows 11 and Windows 10 Computer.
How to Share Printer on another Computer in Windows 11/10.
How to Share Files through LAN between Windows 11 / 10
To share or transfer files to another PCs through LAN is very easy and requiring some peripherals’ You must have these two items to complete this process. These are: –
- Cat 5 or Cat 6 Ethernet Cable
- Ethernet Port
- Windows PC (Not required of same version)
Steps for Primary Computer
Step-1: Connect the Computers through Ethernet Cable
Use best quality Ethernet cable and connect both the PCs. If you have more than two PCs to share the files, use Ethernet port to connect all PCs.
Step-2: Modify Advance sharing settings through Control Panel
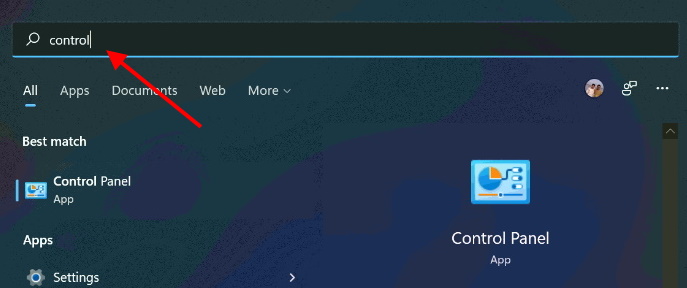
- Go to Windows Search box.
- Type cp or control.
- Open Control Panel.
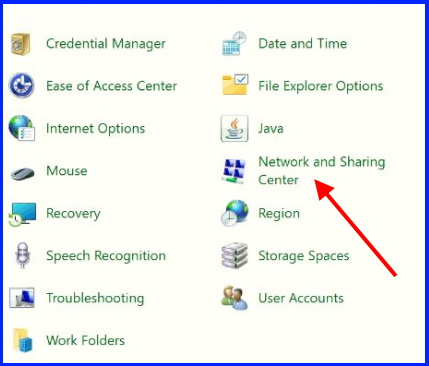
- Choose Network and sharing center.
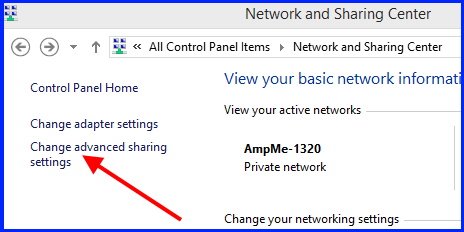
- Click on change advance sharing settings.
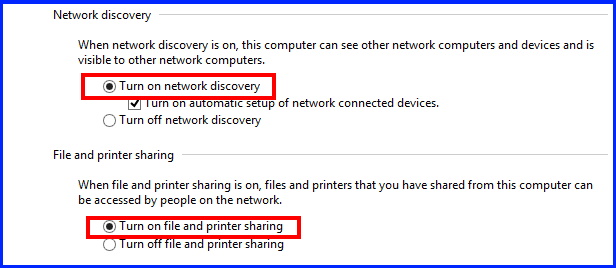
- Turn On both the option Network discovery and turn on File and printer sharing.
Step-2: Apply Static IP Settings
In 1st Computer
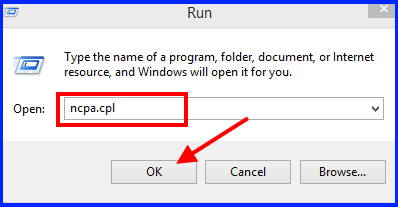
- Press Win + R shortcut key.
- Run Command will open.
- Type ncpa.cpl in search field.
- Press Ok or Enter key.
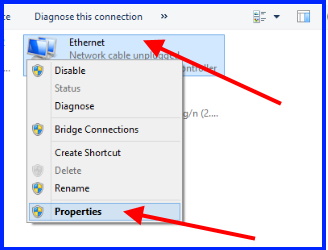
- Here apply a right click on Ethernet connection.
- Choose the option Properties.
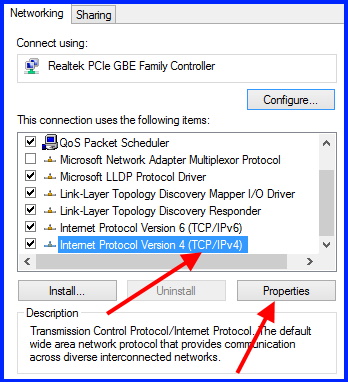
- Select Internet Protocol Version 4 (TCP/IPv4).
- Thereafter click on Properties.
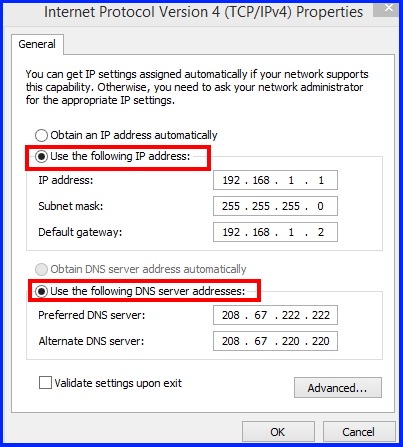
- Now enter the following IP address: –
- IP address – 192 . 168 . 1 . 1
- Subnet Mask – 255 . 255 . 255 . 0
- Default Gateway – 192 . 168 . 1 . 2
- Use the following DNS Server address: –
- Preferred DNS server – 208 . 67 . 222 . 222
- Alternate DNS server – 208 . 67 . 220 . 220
In 2nd Computer
Now go to second system and follow these steps: –
- Press Win + R shortcut key.
- Run Command will open.
- Type ncpa.cpl in search field.
- Press Ok or Enter key.
- Here apply a right click on Ethernet connection.
- Choose the option Properties.
- Select Internet Protocol Version 4 (TCP/IPv4).
- Thereafter click on Properties.
- Now enter the following IP address: –
- IP address – 192 . 168 . 1 . 2
- Subnet Mask – 255 . 255 . 255 . 0
- Default Gateway – 192 . 168 . 1 . 1
- Use the following DNS Server address: –
- Preferred DNS server – 208 . 67 . 222 . 222
- Alternate DNS server – 208 . 67 . 220 . 220
Step-3: Open File Explorer and check Network connection
- Press Win + E to launch File Explorer in Windows 11 and Windows 10.
- Choose Network option from the left pane.
- Here you will find all computer connected with your Primary computer.
- If you don’t find your all connected computer, Refresh the page once.
How to Share Files through LAN to another computer
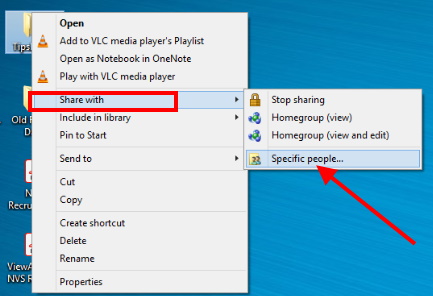
- Right click on File or folder which you want to share to another computer connected with LAN.
- Select share with.
- Here choose the option Specific people.
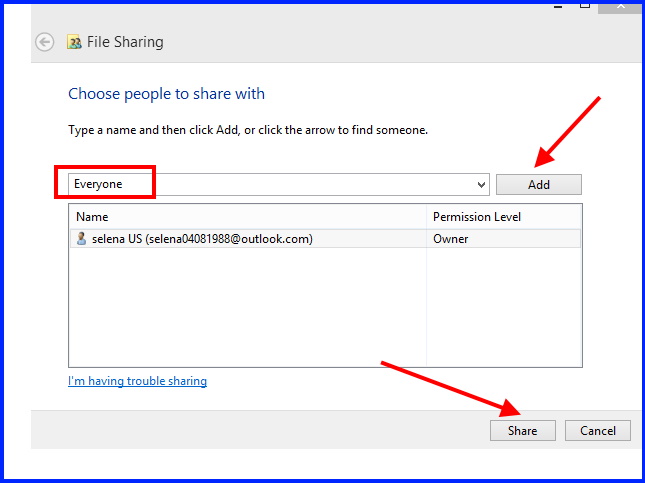
- Now type a name and then click Add or click the arrow to find some one.
- Enter the name as Everyone and click on Add bottom.
- Finally click on Share bottom from the bottom of the page to share files through LAN in Windows 11 and Windows 10.
You can also download this PC Repair tool to Locate and Fix any PC issue:
Step 1 – Download the Restoro PC Repair Tool
Step 2 – Click on Start Scan to find and Fix any PC issue automatically.
That’s all.
