How to fix Network Discovery Missing Error in Windows 10. Network Discovery feature is an essential part of Windows system that helps the users in searching of same network on other devices. This feature is used to sharing files or folders among devices on the same network. You can change network discovery settings. Through Network discovery, you can also share printers to one or more computers on same network.
When Network discovery feature is enable mode, your system IP address will public visible over the network and other users can also see the shared files or folders on their computer.
How To Share Files or Folders over Network in Windows 10 / 8
How to fix Network Discovery Missing Error in Windows 11/10
But sometimes users have to face network discovery missing error in their system and accordingly, they encounter problem in sharing files or folders over network. Today in this article we will discuss about Network discovery is turned off or missing error in windows 10.
1. Turn on Network Discovery Windows 10
Here is how to turn on Network Discovery in Windows 10.
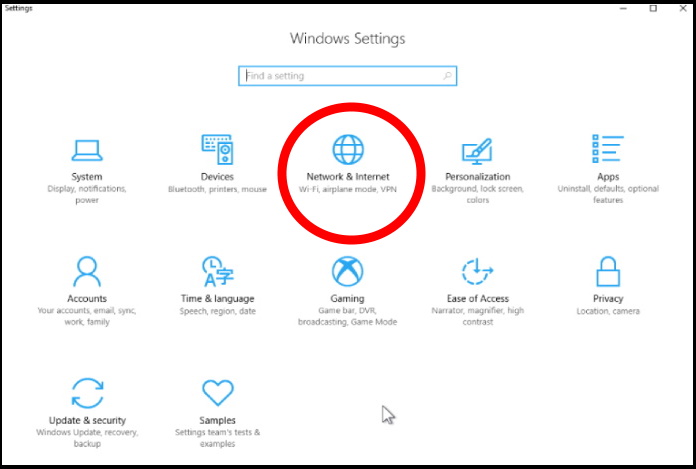
- Press Win + I shortcut key to open Windows Settings.
- Choose the option Network & Internet.
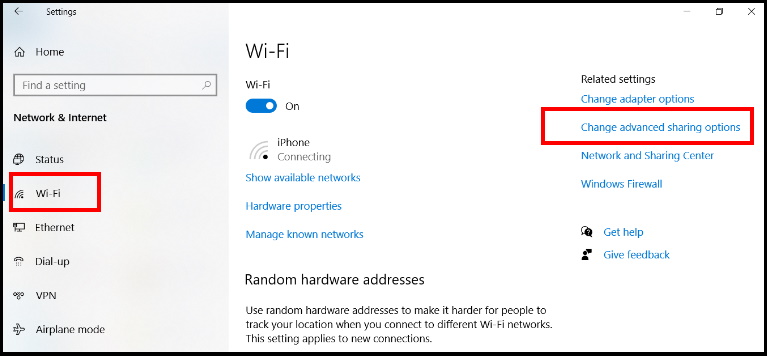
- Now from the left pane of settings window, select the option WiFi or Ethernet, you are using.
- Thereafter go to the right side of page.
- Select the option Change Advance Sharing.
- This will direct you to Control Panel window.
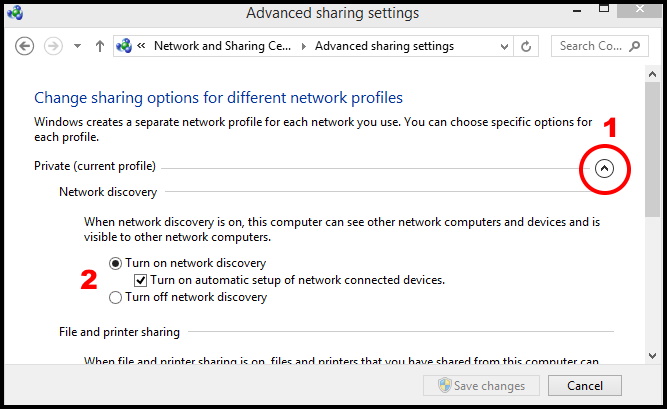
- Under Change sharing options for different network profiles, go to the Private (Current profile) section.
- Make a click on small arrow to expand Private option.
- Thereafter go to Network Discovery section.
- Select the option Turn on network discovery.
- Make the check against the box Turn on automatic setup of network connected devices.
- Click Save changes and exit the window
2. Use Command Prompt to Enable Network Discovery
Sometimes, Windows defender may stop to enabling Network Discovery. In this case, you should make enable Network Discovery through Command Prompt. Go through these steps: –
- Open Run Command box.
- Type cmd in it.
- Press Enter.
- Command Prompt window will open now.
- Make a right click on it and select the option Run as administrator.
- Thereafter type the following command and press Enter: –
- netsh advfirewall firewall set rule group=”Network Discovery” new enable=Yes
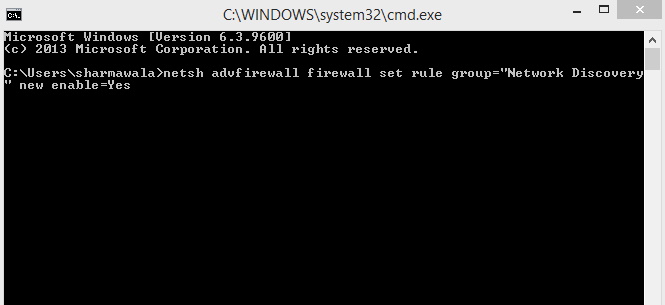
- This action will enable the Network Discovery feature in Firewall setting.
3. Start Dependency Services to fix Network Discovery Missing Error in Windows 10
The following dependency services must be activated in your system for well functioning of Networking discovery as well as to resolve the issue regarding Network discovery is turned off error in windows 10: –
- DNS Client Services
- Function Resources Publication
- SSDP Diwscovery services
- UPnP Device Host Services
To activate these services, follow these steps: –
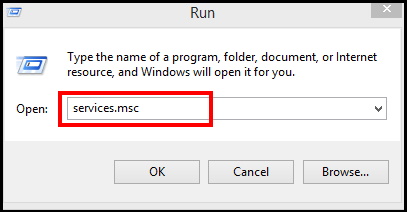
- Press Win + R shortcut key conjointly.
- Run Dialog box will open..
- Type services.msc in it and press Enter key.
- Now search for DNS Client service option from the list.
- If found, make a double click on it to open.
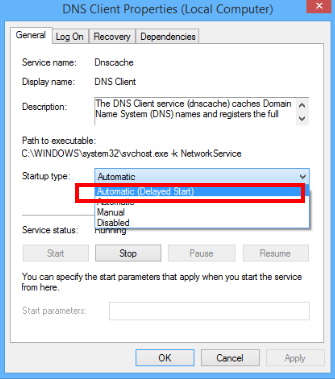
- DNS Client Properties Window will open now.
- Go to the General tab from the top menu bar.
- Here go to the Startup type section.
- Choose the option Automatic from the drop down menu.
- Again search for Function Discovery Resource Publication.
- Apply a double-click to open its Properties window.
- Now, go to the Startup type section and set it to Automatic.]
- Press Apply and then OK to save the changes and return to the Services window.
- Again find out the SSDP Discovery option.
- Apply a double-click on it to open its Properties window.
- Navigate to the Startup type area and and select Automatic from the drop-down menu.
- Press Apply and then OK to save the changes and return to the Services window.
- Now, look for the UPnP Device Host service under the Names column
- Make a double-click to open its Properties window.
- Thereafter go to the Startup type section and set the field to Automatic.
- Press Apply and then OK to save the changes and exit the Services window.
- At the end, Restart your Windows 10 system.
4. Enable Network Discovery in Firewall Settings
Your firewall settings may disrupt to network discovery feature. You should make enable Network discovery feature in Firewall settings. Firewall should give permission to function Network Discovery. Follow these steps: –
- Open Control Panel of your system.
- You can simply find Control panel under your computer start button.
- Choose the option System and Security.
- Click on Windows Firewall.
- From the left pane, select the option Allow an app or feature through Windows Firewall.
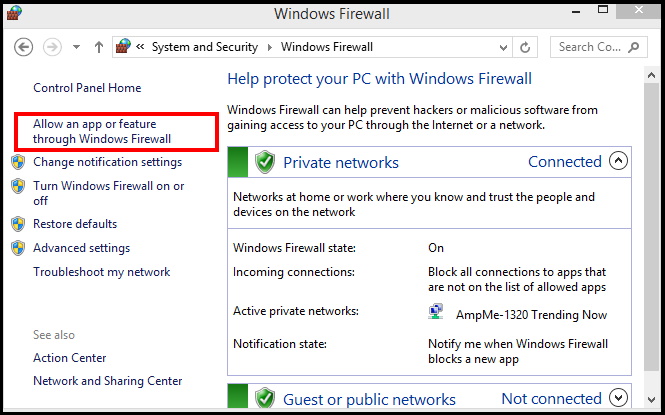
- A new window will open now.
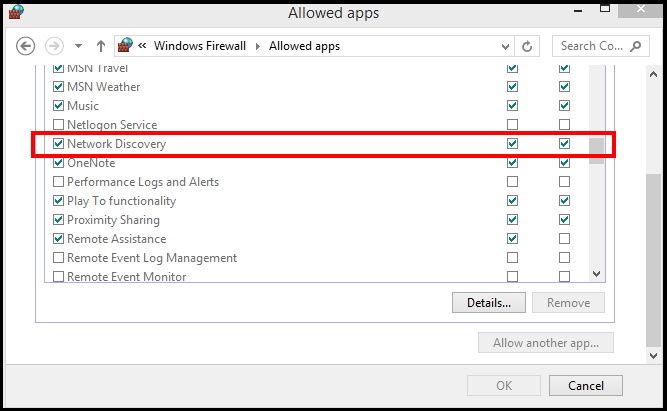
- Here navigate the option Network Discovery.
- Mark the check in the box against it.
- Also tick against both the option Public and Private.
- Also Configure any other firewalls on your Windows 10 computer to allow Network Discovery.
- Turn on Network Discovery from the Network and Sharing Center.
5. Turn On Windows SMB 1.0/CIFS File Sharing Support Feature
SMB Feature in windows 10 is important for file sharing. However, it is turned off in latest version of Windows 10. You should turn on this feature by following steps: –
- Open Run Dialog Box.
- Type appwiz.cpl in it and press Enter.
- Programs and Features window will open now.
- From the left side, click on the option Turn Windows features on or off.
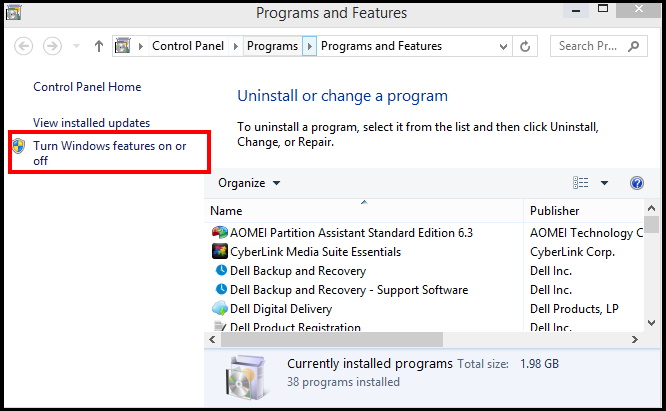
- A new page of Windows features will open now.
- Navigate the option SMB 1.0/CIFS File Sharing Support.
- Make the check against this feature.
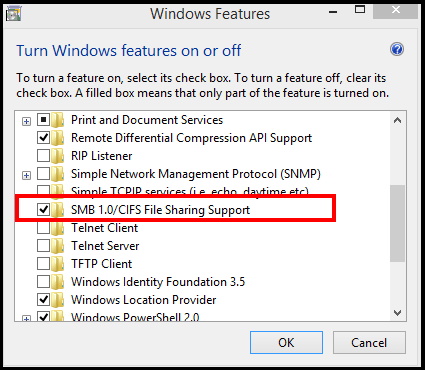
- Press Ok button to save the changes.
- Restart your PC and check whether the problem is resolved or not.
6. Run Windows inbuilt tool Troubleshooter to fix Network Discovery is turned off Error in Windows 10
- Press Win + I shortcut key altogether.
- Windows settings page will open now.
- Choose the option Update & Security.
- Now from the left pane of settings window, select the option Troubleshoot.
- Thereafter go to the right side of same settings window.
- Navigate the option Network Adaptor.
- Make a click on it to expand.
- Select the option Run the troubleshooter.
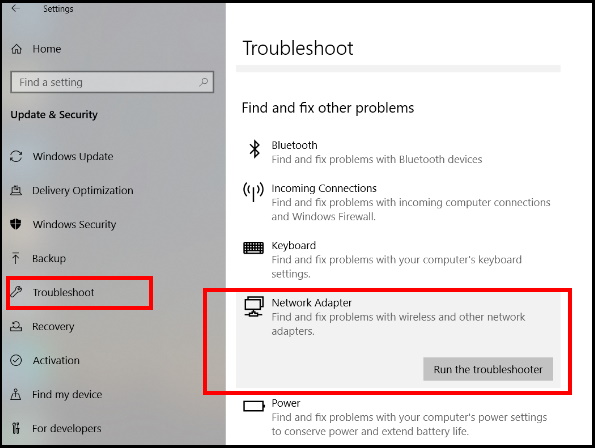
- The troubleshooter will now start detecting any issues and fix them accordingly.
- Troubleshooter will display some recommended settings.
- You should follow the on-screen instructions.
- Restart your PC and Network Discovery error will no anymore.
[adToAppearhere]
7. Apply a Network Reset
It is also a possible solution to fix the issue regarding Network Discovery missing error in Windows 10. Follow these steps to resetting the Network: –
- Open Windows setting.
- Choose the option Network & Internet.
- From the left pane, choose the option Status.
- Now go to the right page and select the option Network Reset.
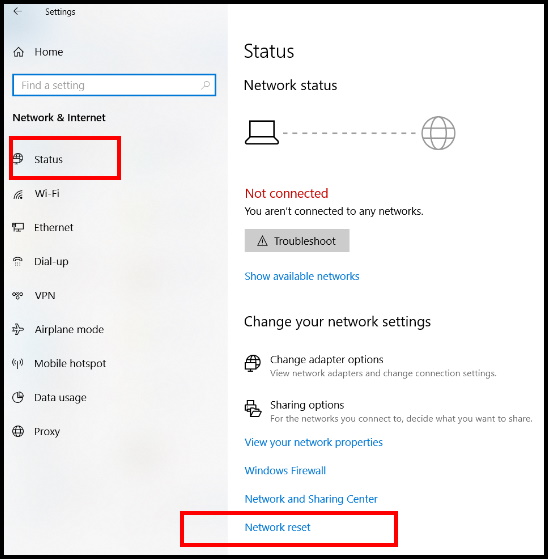
- In the Network Reset Window, click on Reset Now.
- Follow on-screen instruction to complete the process.
- Once resetting is completed, check whether the Network discovery error resolved or not.
8. Reset the Network Stack
To Reset the Network stack is another solution to fix this issue. Follow these steps: –
- Open Run Dialog Box.
- Type cmd in it and press Enter to open Command Prompt window.
- Make a right click on it and choose the option Run as Administrator.
- Now type the following command one by one followed by Enter each time: –
- ipconfig /release
- ipconfig /flushdns
- ipconfig/renew
- netsh int ip reset
- netsh winsock reset
- Once complete the process, you will easily share files or folders over network.
9. Update Network Adapter to fix Network Discovery Missing Error in Windows 10
Outdated Network Adaptor may be a cause of Network discovery is turned off error in windows 10. You must update Network Adaptor to resolve the issue by following these steps: –
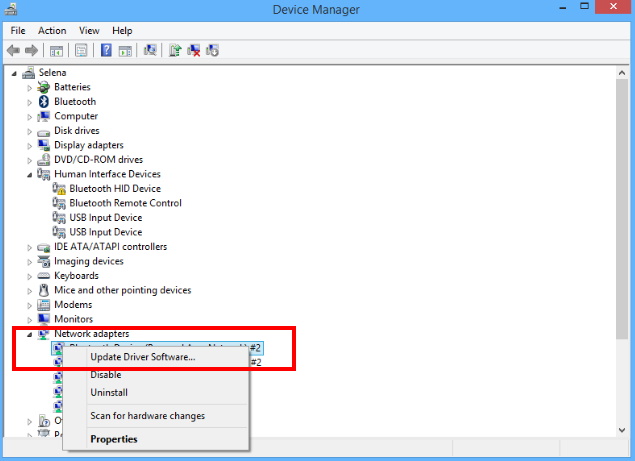
- Open Device Manager in Windows 10.
- Navigate the option Network Adaptor.
- Expand it.
- Make a right click on Network Adaptor.
- Choose the option Update driver.
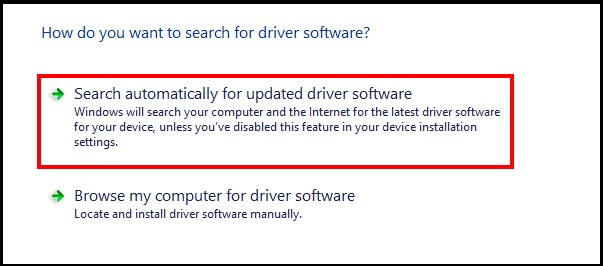
- A new window is open now, How do you want to search for driver software?
- Choose the option Search automatically for updated driver software.
- Let the window complete the process.
Now hopefully you will get rid of the Network discovery is turned off error in Windows 10.
That’s all.

2 thoughts on “How to fix Network Discovery Missing Error in Windows 10”