How to fix MoUsoCoreWorker.exe File restricts Windows 10 to Sleep. MoUsoCoreWorker.exe is basically a alternative file of wuauclt.exe pertains to Windows update and you can find such file type in C:\Windows\System32 in File Explorer. It is a system file contains a complicated nomenclature where Uso stands for Update Session Orchestrator.This file system works in background during update process of Windows 10.
Recently some users having complain that MoUSO Core Worker Process.exe stops the Windows 10 system to sleep mode. It constantly activate or wake up the Windows 10 system.
How to fix MoUsoCoreWorker.exe File restricts Windows 10 to Sleep
If your windows 10 system keeps waking up due to the MoUSO Core Worker Process.exe, here are the various workaround to resolve the issue easily.
Ways-1: Request Override process MoUso Core Worker execution
- Go to Windows search.
- Type cmd in it.
- Command Prompt option will appear on top result.
- From the right side, choose the option Run as Administrator.
- Now type the following command in Command prompt window and press Enter key to execute the command: –
- powercfg /requestsoverride process MoUsoCoreWorker.exe execution
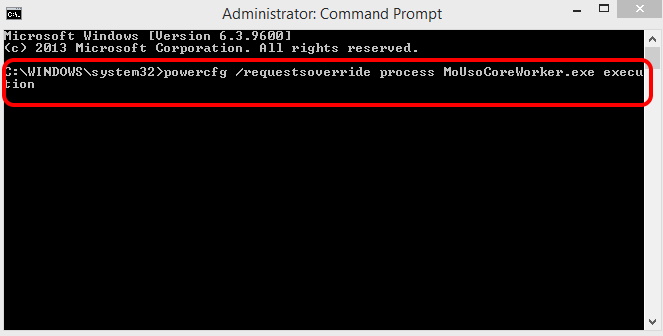
- This command will override the MoUsoCoreworker.exe process execution.
- Now confirm the overridden process by typing the following command in Command Prompt window:
- powercfg /requestsoverride
- Reboot your windows 10 system.
Ways-2: Resolve the issue through change the Registry file
Although changing registry file is not a good process, so you must keep Backup of Registry files before making any changes.
Follow these steps: –
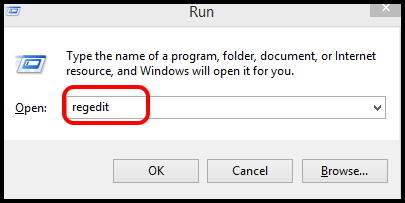
- Press Win + R shortcut key.
- Run Command will open now.
- Type regedit in it and press Ok button.
- Registry Editor window will open now.
- Navigate the following path in the Registry editor window: –
- HKEY_LOCAL_MACHINE\SOFTWARE\Policies\Microsoft\Windows\WindowsUpdate\ AU
- Thereafter go to the right side of page.
- Here you will find the option NoAutoRebootWithLoggedOnUsers.
- Apply a double click on it.
- Set the value of key as 1 and press Enter key.
- At the end, reboot your windows 10 system.
Ways-3: Install Windows latest updates to to fix MoUsoCoreWorker.exe File restricts Windows 10 to Sleep
- Go to Start button.
- Make a click on it.
- Choose the Setting cog.
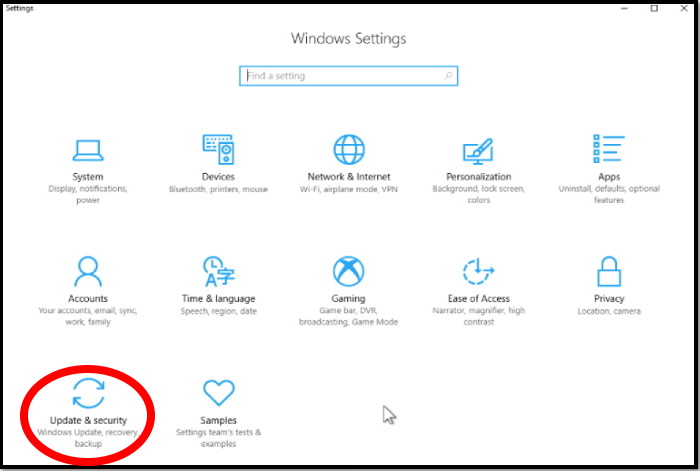
- Windows setting app will open.
- Here select the option Update & Security.
- Now from the left side of setting window, choose the option Windows update.
- Thereafter go to the right side and click on the option Check for updates.
- Windows will check the available updates for your windows 10 system and notify you accordingly.

- If no any updates available, you will see such screen, You’re up to date.
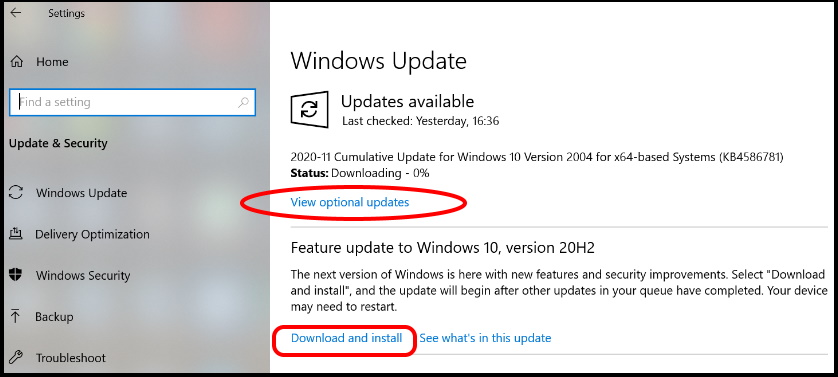
- You may go to the option View optional updates in addition to above.
- If any update available, it will appear on your windows screen.
- Make a click on the option Download and Install.
Thereafter Restart your system. Updates are installed automatically.
Ways-4: Change Power Plan setting to Disable Wake Timers in Windows 10
The issue regarding MoUsoCoreWorker.exe File restricts Windows 10 to Sleep may be due to enable mode of Wake timers in Windows 10. You should either extend the wake timers or permanently disable it to resolve this issue. To disable Wake timers in Windows 10, follow these steps: –
- Go to Windows search.
- Type cp in it.
- Control Panel window will open now.
- Under available list, find out the Power option.
- Make a click on it to open.
- Thereafter choose the option change Plan setting.
- Here click on Change Advance Power Setting option.
- Then under power saver option, navigate the option Sleep.
- Make a click on it to expand.
- Under Allow wake timers section, make a click on it and choose the option Disable.
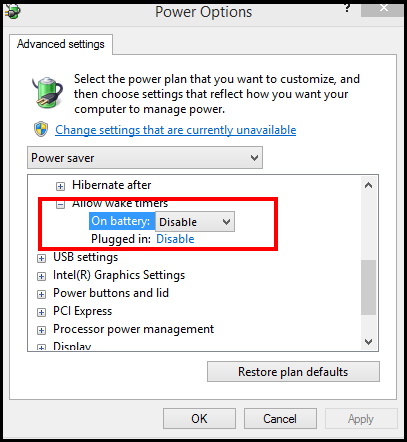
- At the end, click on Apply and Ok button to save the changes.
Now check whether the issue resolved or not. If not, go to the next method.
Ways-5: Disable Schedule scan under UpdateOrchestrator through Task Scheduler
- Press Win + R shortcut key altogether.
- Run Command will open.
- Type taskschd.msc in it and press Enter to open Task Scheduler window.
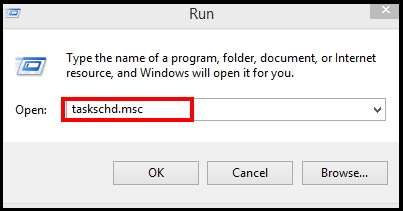
- Here navigate the following path: –
- Task Scheduler > Microsoft > Windows > UpdateOrchestrator
- Thereafter go to the right side of page.
- Apply a right click on the option Schedule Scan.
- Choose Disable option from the drop down menu.
- At the end, close the Task Scheduler window.
- After disabling schedule scan, USO Core Worker process will inactive in your windows 10 system.
- Check for the issue.
Ways-6: Disable Update Orchestrator service to fix MoUsoCoreWorker.exe File restricts Windows 10 to Sleep
- Open Run command by pressing Win + R shortcut key conjointly.
- Type services.msc in it and press Enter.
- Services window will open now.
- Here go to the option Update Orchestrator service.
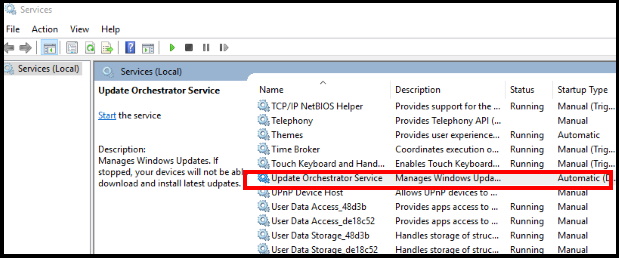
- Make a right click on it and select properties option from the drop down menu.
- Here go to the Startup type section.
- Make a click on small arrow and choose the option Disabled.
- At the end, click on Apply and then Ok button to save the changes.
- Don’t forget to restart your system.
Ways-7: End Process of MoUsoCoreWorker.exe through Task Manager
- Go to the Windows Search option.
- Type Tssk on it.
- Select the Task Manager appeared as top result.
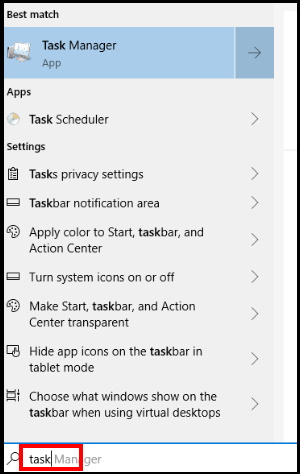
- Thereafter go to the Details tab from the top menu bar.
- Find out the option MoUsoCoreWorker.exe.
- Apply a right-click on it and click on the option End Process Tree.
- After that, close the Task Manager screen.
Ways-8: Restart Windows Update Service to fix MoUsoCoreWorker.exe File restricts Windows 10 to Sleep
- Open Run dialog box.
- Type services.msc in it and press Ok button.
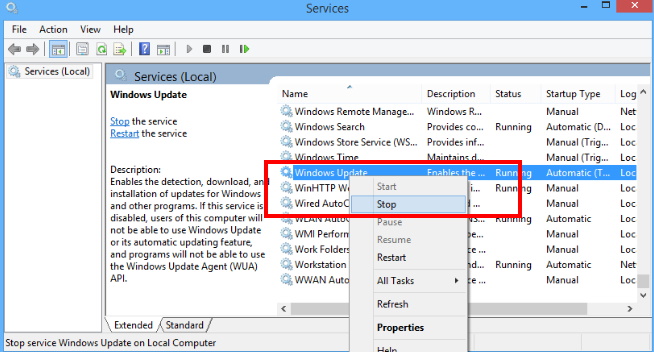
- In services window, go to the Windows update services option.
- Make a right click on it and select the option Stop.
- This will stop the Windows Update service.
- Thereafter close the services window.
- Wait a while, and again open the services window.
- Make a right click on Windows update services and choose the option Start.
Ways-9: Execute various Windows Update Command
- Go to Search option.
- Type cmd in it.
- Command prompt option will appear as top result.
- From the right side, choose the option Run as Administrator.
- Now type the following command one by one followed by Enter key each time: –

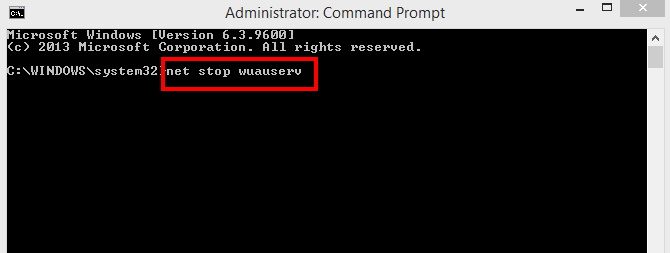
After executing Windows update command, put your windows 10 system to sleep.
Ways-10: Restore Default Power Settings
- Go to Cortana Search option.
- Type cmd in search field.
- Command prompt option will appear on top as best Match.
- Thereafter go to the right side, choose the option Run as Administrator.
- Now type the following command followed by Enter key: –
- powercfg -restoredefaultschemes

- Restart your system
Now Sleep settings won’t be affected by the MsoUSOCoreworker.exe process won’t affect Sleep settings of your Windows 10 system.
Ways-11: Enable Allow the computer to turn off this device to save power
First you should check which device is waking up your system and stop to be in sleep mode. For this, follow these steps: –
- Go to Cortana Search option.
- Type cmd in search field.
- Command prompt option will appear on top as best Match.
- Thereafter go to the right side, choose the option Run as Administrator.
- Now type the following command followed by Enter key: –
- Powercfg -devicequery wake_armed
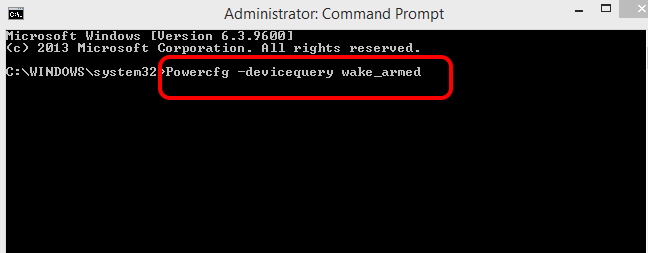
Now you will find a list of all such devices that are receiving power from the computer even when it is sleeping.
Thereafter, follow these steps for every such devices. For example, we will see for USB device.
- Open Run command box.
- Type devmgmt.msc in it and press Ok button.
- Device Manager Window is open.
- Here navigate the option Universal Serial Bus controllers.
- Make a right click on first USB device.
- Select the option Properties from the drop down menu.
- A new window box will open now.
- Now go to the Power Management tab from the top menu bar.
- Here You will find the option Allow the computer to turn off this device to save power.
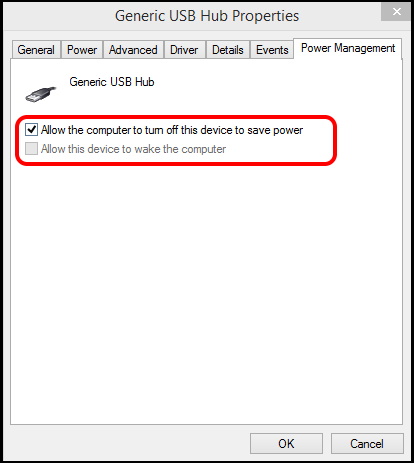
- Make a tick against this option.
- Thereafter click on Ok button.
- This process will applied for each USB device in your Windows 10 system.
- You can also apply this process to other hardware devices also.
Ways-12: Run Windows In-built tool Troubleshooter to fix MoUsoCoreWorker.exe File restricts Windows 10 to Sleep
As we have already discuss in first para that MoUsoCoreWorker.exe File related to Windows update component, so you should once apply in-built Windows Update troubleshooter to avoid waking up of your windows 10 system. Follow these steps: –
- Press Win + I shortcut key.
- Windows setting will open.
- Here select the option Update & Security.
- Now form the left pane of setting window, click on the option Troubleshoot.
- Thereafter go to the right side and find out the Windows update Troubleshoot.
- Make a click on it to expand.
- Click on Run the Troubleshooter.
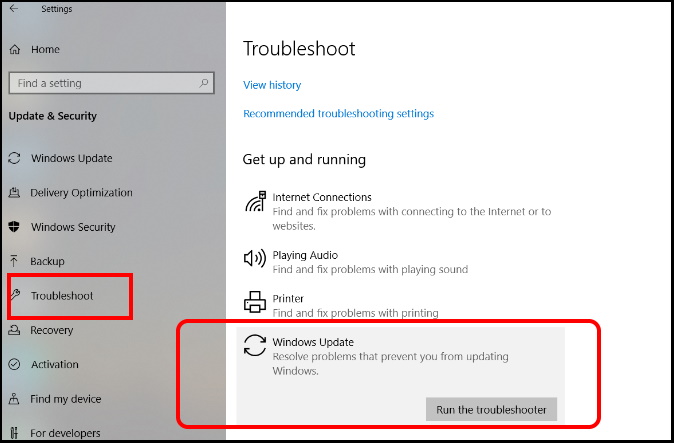
Windows will automatically detect the issue and resolve them accordingly.
People also look for: –
- What is MoUsoCoreWorker.exe
- Can I disable MoUsoCoreWorker.exe
- powercfgrequest MoUsoCoreWorker.exe
- MoUsoCoreWorker.exe preventing sleep
That’s all.
