How to Fix failed to mount ISO File in Windows 11 / 10. As we know, Windows 11 having ability to mount ISO file as well as VHD Virtual image files. You can easily mount ISO file to Windows 11 / 10 without supporting of any third party tools. You can download most of the software having large content in .ISO file format. you need not burn such large files on disk, you can use it through mounting. But sometimes users complaint regarding Mount issue of ISO file to their Windows 11 / 10 system and accordingly the under mentioned error messages appear on their screen: –
Couldn’t mount file, The disc image file is corrupted.
Sorry, there was a problem mounting the file message. The problem has only been reported with the built-in ISO file mount in Windows.
How to Create, Mount and Dismount Windows 10 ISO Image
How to Fix failed to mount ISO File in Windows 11 / 10
If you are also facing such issue and failed to mount ISO file to your Windows 11 / 10 PC, here are the various ways to fix this issue.
Ways-1: Eject Virtual Drives from Windows 11 / 10 system
- Go to This PC from the desktop.
- Under Devices & Drives section, apply right click the virtual drives.
- Choose Eject.
- Reboot your Windows system.
- Now try to mount ISO file.
Ways-2: Use File Explorer to open ISO File in Windows 11
- Press Win + E shortcut key to open Windows Explorer.
- Navigate ISO file and hover the cursor on the option Open with.
- Select the option Another App.
- Here select the option Windows Explorer.
- Also tick the box against option Always use this app to open .iso files.
- Click on Ok button.
Ways-3: Remove uninstalled Programs exist with ISO extension
Before editing your Registry, you must keep a full backup of Registry to avoid any unwanted happening to your Window11 / 10 system.
- Press Win + R to launch Run.
- Type regedit in this box and press Ok button.
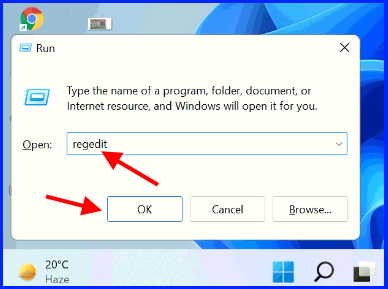
- In Registry Editor Window, Navigate the following path: –
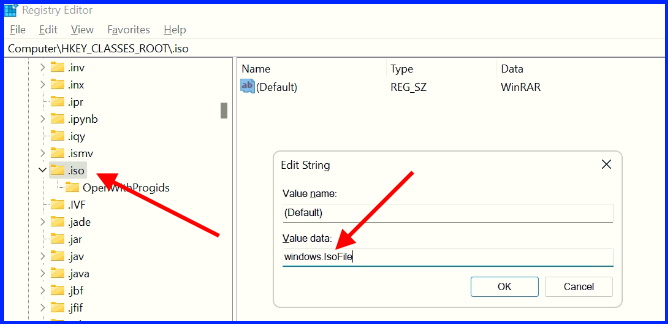
- HKEY_CLASSES_ROOT\.iso
- Apply a double click on .iso option.
- Under Value data field, enter the value name as Windows.Iso.File.
- Restart your system.
Ways-4: Open ISO File with .bat extension
- Open a new Text document by pressing right click on your Desktop.
- Now copy the following entries and paste it to the newly created Text document: –
- fsutil sparse queryflag %1
pause
fsutil sparse setflag %1 0
fsutil sparse queryflag %1
pause
- fsutil sparse queryflag %1
- Thereafter go to the file menu from the top menu bar.
- Click on it and choose the option Save as.
- Assign a name of this document and replace the .txt extension with .bat extension.
- Thereafter copy ISO file and paste it over the Batch file extension which you have just created.
- Reboot your Windows 11 / 10 system and Mount ISO file through Windows Explorer.
Ways-5: Install Windows 11 Update to Fix failed to mount ISO File
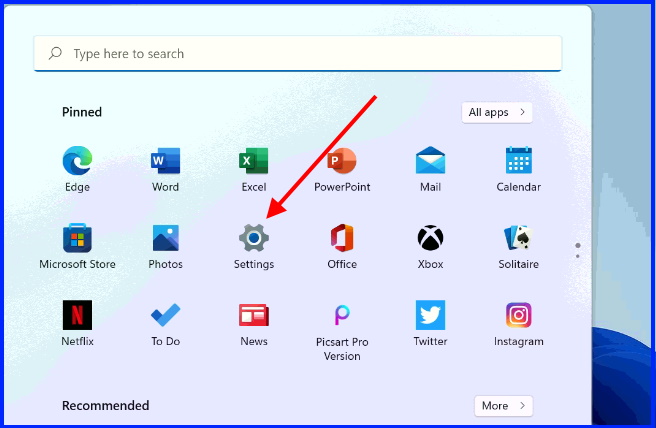
- Click on Start menu and choose Settings widget.
- In Windows 10, simply press Win + I shortcut key.
- From the left pane, click on Windows update.
- Thereafter go to right side and click on Check for updates.
- All the available updates will display here.
- Click on Download and further Install it.
Ways-6: Uninstall Security Updates in Windows 11 / 10
- Press Windows key + I key to launch Settings App in Windows 11 / 10.
- From the left pane, click on Windows update.
- Thereafter go to right side and click on Update History.
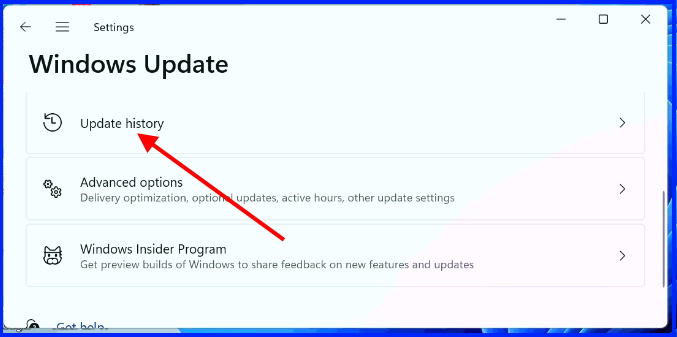
- Scroll down and click on Uninstall Updates.
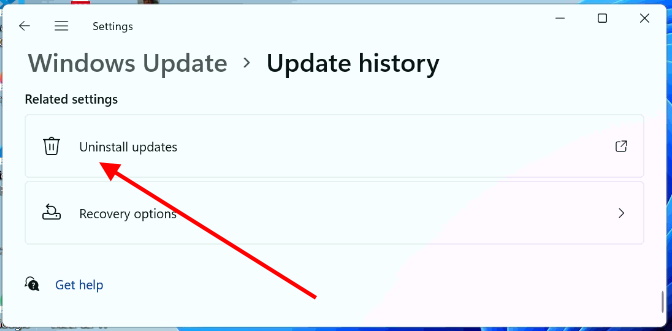
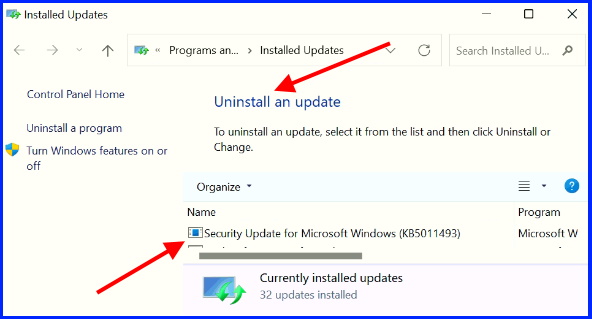
- It will bring you to the Control Panel window where you can uninstall windows update as well as Security update.
- Navigate the recently installed security updates and Uninstall it.
That’s all.
