How to Fix Mobile Hotspot not working properly in Windows 10. There are various methods to connect your windows 10 PC with Network. Either through broadband or through Wi-Fi and also through Mobile Hotspot. Mobile hotspot is very convenient to connect network in windows 10 PC. A mobile hotspot is a technology that lets you share your internet connection with other devices using the WiFi feature. But sometimes, users having complaint that Mobile Hotspot not working properly in Windows 10 even after proper network connection with a message We can’t set up mobile hotspot because your PC doesn’t have an Ethernet, Wi-Fi or cellular data connection.
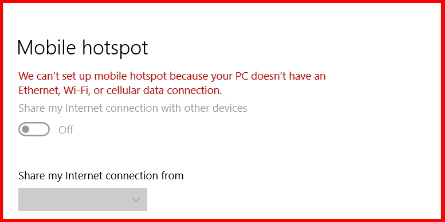
There are so many various causes which can lead to such errors while connecting through a mobile hotspot.Here, in this article, we will discuss in brief about How to Fix Mobile Hotspot not working properly in Windows 10. Be continue with this article.
Initial workaround
Before further proceeding to main content in brief, you must apply some initial workaround, so that your issue regarding mobile hotspot not working properly could be resolved an early stage without putting extra effort. Apply these methods first.
- Restart your Windows 10 PC and check whether mobile hotspot working or not. Sometimes restarting system resolves major windows 10 issue in a little bit.
- Try to connect with another Device. You should check the connection with some other device so that you know that the issue if with your hotspot settings in Windows PC or in the device you are connecting.
- Check Mobile data connection. You must reconnect your mobile data. There is a possibility of limited data available on your mobile device.
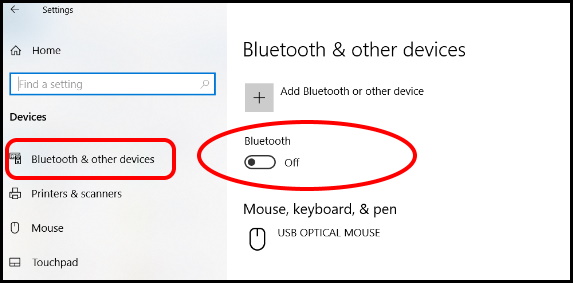
- Turn Off Bluetooth. Sometimes enabled Bluetooth option may interrupt the connection through Mobile Hotspot. So you should disable Bluetooth from your Windows 10 system. To disable Bluetooth, follow these steps: –
-
- Open Windows Setting by pressing Win + I shortcut key altogether.
- Select the option Devices.
- A new window will open now.
- From the left pane of Devices window, make a click on Bluetooth & other devices.
-
- Now go to the right side of setting page.
- Under the Bluetooth option, turn the toggle button off.
- Bluetooth will no longer be available in your Windows 10 device.
How to Fix Mobile Hotspot not working properly in Windows 10
If none of the above mentioned initial workarounds get effective, you should try the following tips to resolve the issue regarding Mobile Hotspot not working properly in Windows 10: –
Ways-1: Update the Network Adapter Driver
Outdated or obsolete driver may be a cause of Mobile hotspot not working properly. So you should update the network adapter driver to resolve this issue by following these steps: –
- Go to the Device manager from right click on Start menu.
- Navigate the option Network Adapter.
- Make a click on it to expand it.
- Now find out the option Microsoft Hosted Network Virtual Adapter under the Network Adapter option.
- If this option not found under Network Adapter option, go to the view button from the top menu bar.
- Make a right click on it and select Update driver from the drop down menu.
- A new window will open duly asking How do you want to search for drivers?
- Here, select the second option as Browse my computer for driver software.
- Select the Let me pick from a list of available drivers option, and then Microsoft Hosted Network Adapter.
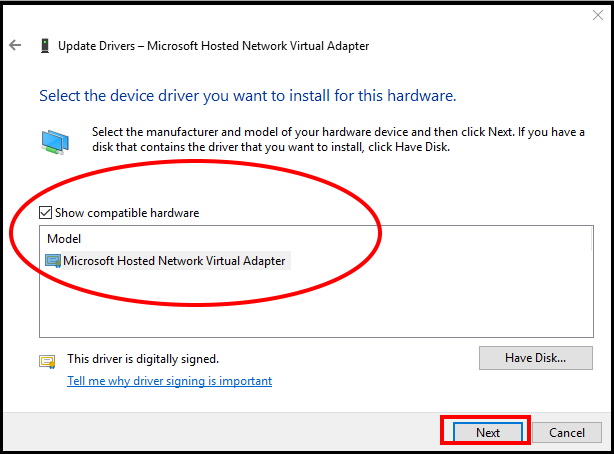
- Press the Next button to update the driver.
- Thereafter, make a right-click on Microsoft Wi-Fi Direct Virtual Adapter 2 from the Device Manager.
- Select Update driver option from the context menu.
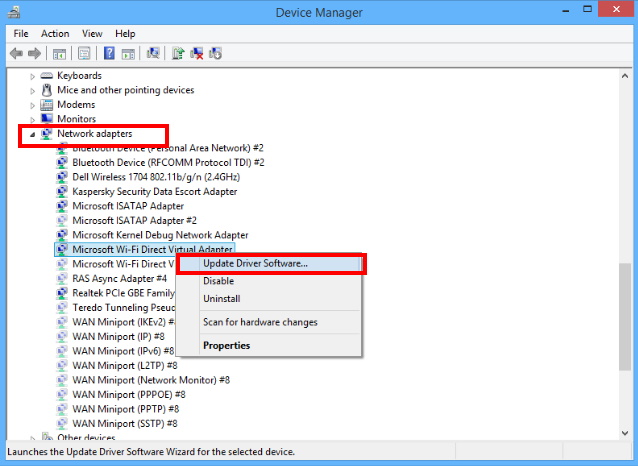
- Click Browse my computer for driver and Let me pick from a list of available drivers as before.
- Press Next button.
- Let the window be complete the updation process.
- Check whether the issue of Mobile hotspot resolved or not.
Ways-2: Use Third party Mobile Hotspot Software in Windows 10
You may add any mobile hotspot software to resolve the issue regarding mobile hotspot not working properly in windows 10. Many third party provide this software through which you can easily connect your PC with mobile hotspot or wi-fi. You may simply search these software and download it. This tool helps with extending the range of your wireless signal in your home by combining several Internet connections, either wired or wireless.
Ways-3: Go through Command Prompt
- open Run Dialog Box by pressing Win + R shortcut key altogether.
- Type cmd in it and press Enter.
- Command prompt window will open now.
- Thereafter Make a right click on it and select Run as Administrator option.
- Now type the following command after the blinking cursor in black screen command prompt window: –
- NETSH WLAN show drivers
- Press Enter key.
- Here you should check the Hosted Network Support details.
- It should be supported and mentioned as Yes.
Ways-4: Change Adapter setting to Fix Mobile Hotspot not working properly in Windows 10
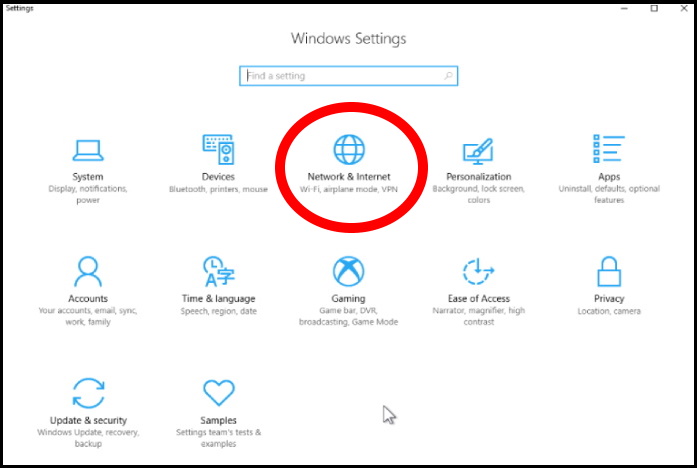
- Go to the Windows setting App in your Windows 10 PC.
- Select Network & Internet option from the available list of items.
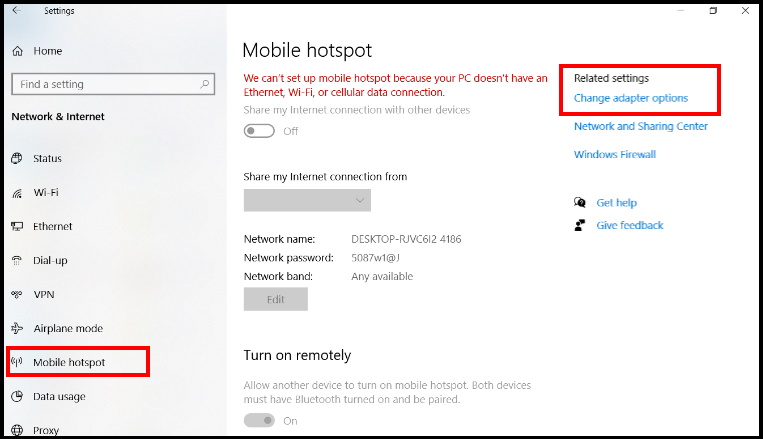
- From the setting window, select the option Mobile Hotspot.
- from the right side of page, make a click on Change adapter options.
- Choose your Mobile Hotspot adapter.
- Thereafter make a right click on it and go to its Properties.
- Now go to sharing tab and Uncheck Allow other network users to connect through this computer’s Internet connection.
Ways-5: Delete Hosted Network Settings through Registry Editor
- Press Win + R shortcut key conjointly.
- Run command will open.
- Type regedit in it and press Ok button.
- Registry Editor windows will open now.
- Navigate the following path under Registry Editor Window: –
- HKEY_LOCAL_MACHINE\SYSTEM\CurrentControlSet\Services\WlanSvc\Parameters\HostedNetworkSettings
- Make a right click on HostedNetworkSettings from the right pane of Registry window.
- Select delete from the drop down menu.
Ways-6: Apply Network Adapter Troubleshooter through Setting App
- Open Windows Setting.
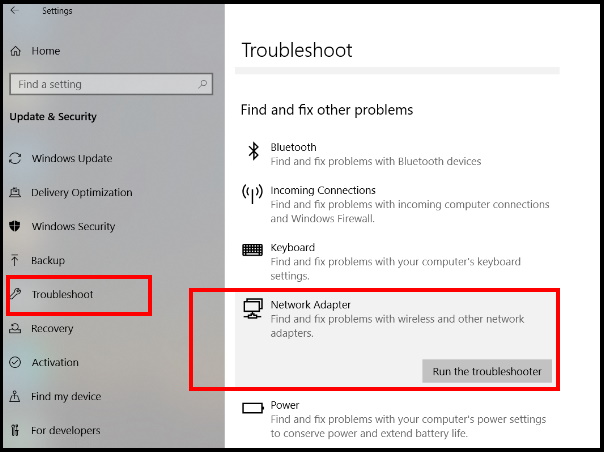
- Go to the Update and Security section.
- From the left pane of setting window, select The option Troubleshoot.
- Now from the right pane, navigate the option Network Adapter.
- If Found, make a click on it to expand.
- Select Run the troubleshooter.
- Windows will automatically detect any problem related with Network adapter and fix them accordingly.
- Follow on-screen instruction.
Ways-7: Set the Internet Connection Sharing as Automatic
- Type services.msc under the Run command dialog box.
- Press Enter.
- Services window will open.
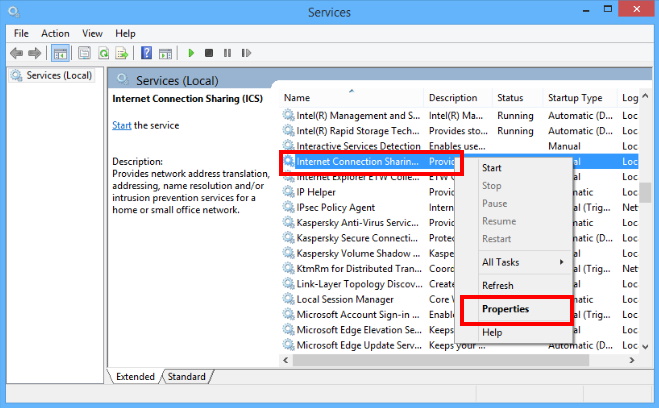
- Here, navigate the option Internet Connection Sharing.
- Now make a right click on it.
- Select properties option from the context menu.
- Internet Connection Sharing Properties window will open now.
- Thereafter go to startup type section.
- Make a click on small arrow and select Automatic option from the drop down menu.
- Just below the startup type option, make a click on Start option.
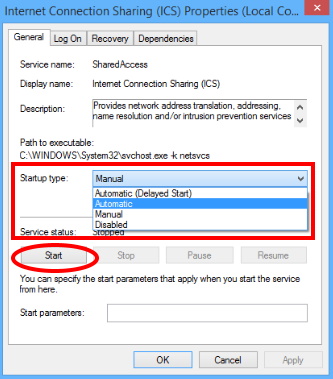
- At the end, click on Ok button to save the changes.
Ways-8: Disable Allow the computer to turn off this device to save power
- Open Device Manager.
- Navigate the Network Adapter option.
- Click on View button from the top menu bar of the Device Manager window.
- Here Select Show hidden devices.
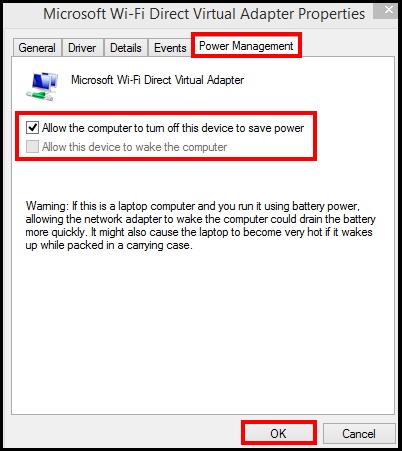
- Then, double-click the Microsoft Hosted Network Adapter to open its properties.
- Select the Power Management tab.
- Uncheck the Allow the computer to turn off this device to save power option if it’s currently selected.
- Thereafter Press the OK button to close the window.
People also search for: –
- Windows 11 mobile hotspot not working
- Mobile hotspot not working on laptop
- Why my laptop is not connecting to mobile hotspot windows 10
- Windows 11 not connecting to hotspot
- Windows 10 mobile hotspot not showing
- Hotspot not working on laptop
- Mobile hotspot not working windows 11
- Windows 10 hotspot not working
- Laptop hotspot not working
- Mobile hotspot windows 10 not working
- Windows hotspot not working
That’s all.
