How to Manage Function Key (Fn Key Lock) in Windows 10. Function keys always remain on top row of any keyboard of laptop or keyboard connected with USB on your Windows 10 system. These function keys are nominated with F1 to F12 of keyboard. Through these function keys, you can create or use various keyboard shortcuts to operate windows system smoothly as well as fast. But most of the users don’t well aware of use of these Function keys and Fn key lock system. It also help in functioning with keyboard shortcut. Here in this article we will discuss How to Manage Function Key (Fn Key Lock) in Windows 10.
How to enable Function key (Fn lock) in Windows 10
Fn key generally situated at the bottom of your keyboard. You you don’t find here, it may not available on your keyboard. We use Fn key usually for creating secondary key functions in windows 10. Such as setup volume or up and down arrow key.
- To enable it, simply hold Fn key and you can use F1, F2… F12.
How to lock or Unlock Function key in Keyboard
Users apply Fn key to create a secondary key. You may lock or unlock it as per your requirement. You might be able to press the Fn lock key on your keyboard. A Fn padlock is also available on your keyboard which help to lock your function key.
- Fn padlock is Esc key on your keyboard and sometimes it merges with Esc key. You should press and hold Fn key with Esc key to lock a function key. After that, you may not able to create a secondary function key.
- Now press Fn key and hold alongwith Esc to unlock the function key on your keyboard.
How to Enable / Disable Fn Key Lock in Windows 10
You may disable or turn off Fn key lock in windows 10 through Setting app. Go through these steps: –
- Open Windows setting.
- Go to the Update & Security section.
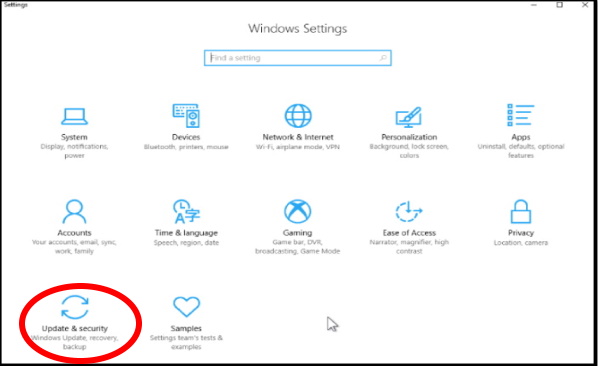
- Now click on the option Recovery from the left menu.
- Thereafter go to the right pane of the page, click on Restart now option located under Advance startup section.
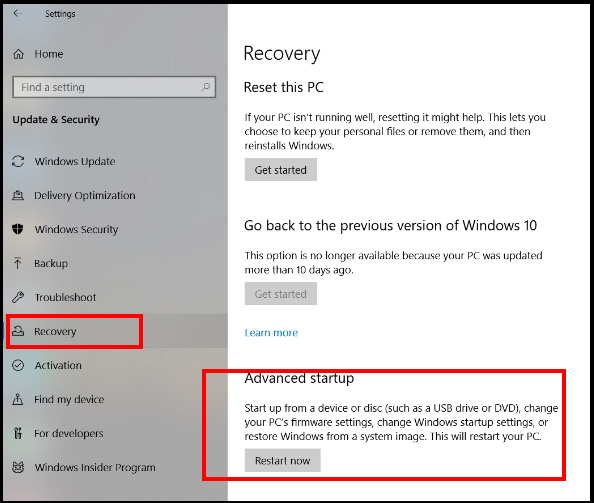
- It will now restart and bring you to the UEFI settings.
- Now your windows system will boot in recovery mode.
- Here make a click on Troubleshoot option.
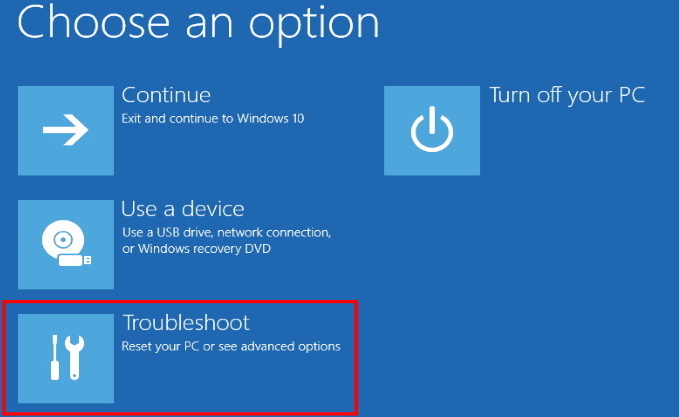
- Thereafter choose Advance option.
- Now select the option UEFI Firmware Setting.
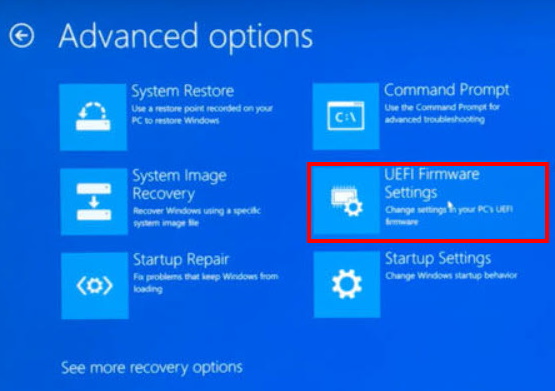
- Click on Restart.
- Now your system will restart and you will be on UEFI setting.
- Here find out the option Function key.
- Choose the option Enable / Disable as per your requirement.
In this method, you need not use the Fn key to enable or disable function key in windows 10.
Manage function key Through BIOS Setting in Windows 10
Microsoft allow to enable or disable function key through BIOS or UEFI setting in Windows 10. Follow theses steps: –
- Start your system by pressing Power button of your system
- As soon as it begin to start, in between press any key, it brings you to BIOS setting mode.
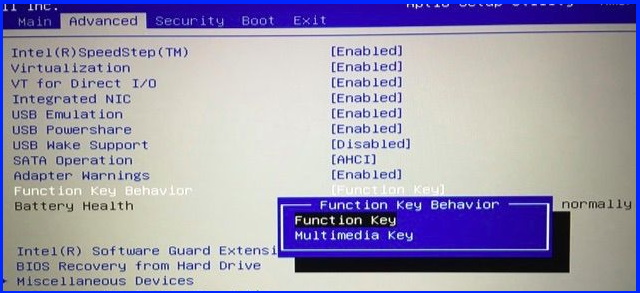
- When you start with BIOS or UEFI settings, Find out the function keys option in the system configuration or advanced settings.
- Then select the Function Key Behavior option there.
- Select Multimedia Key or Function Key depending on preference.
That’s all.

1 thought on “How to Manage Function Key (Fn Key Lock) in Windows 10”