How to Install Linux WSL2 Latest Version in Windows 10. Linux is an open-source free OS by which a user can operate in programming, organizations, profit and non-profit companies around the world to fix their individual requirements. But most of the users are not well aware about such type of operating system. Also they don’t know about dual boot options which are exist in Linux Distribution Operating system. It does not overwrite the existing Windows 10 files.
You can visit this link to know about How to Install Linux Subsystem in Windows 10.
How to Install Linux WSL2 Latest Version in Windows 10
Microsoft introduced a big update of Windows Subsystem for Linux and named it as WSL2. Through this updated version of WSL 2, Microsoft has tried to use a real Linux Kernel with faster and more kinetic. Future Linux kernel updates will be released as Windows 10 software updates.
You may divide the process of Installing Linux WSL2 into Seven parts. These are as under: –
- System Requirement
- Enable WSL
- Enable ‘Virtual Machine Platform’
- Download and Install WSL2
- Set WSL 2 as default
- Make a list of all your Installation
- Change the Version of Linux Installation
1. System Requirement for Linux WSL2 in Windows 10
If you want to install Linux WSL2 latest version in Windows 10, you must have the following system requirement: –
- For x64 systems: Version 1903 or higher, with Build 18362 or higher.
- For ARM64 systems: Version 2004 or higher, with Build 19041 or higher.
- A System of Hyper-V Virtualization support
You should go through the Windows Update through Windows Setting and search for available updates. Anyone on the 1903 or 1909 builds can install WSL 2 too. You must install Windows Update KB4566116 at first.
2. How to Enable Linux WSL in Windows 10
At first, you should make enable previous version of Windows Subsystem for Linux i.e WSL before installing WSL2 in your Windows 10 computer. If you have already WSL installed, then there is no any requirement of re-installation. Simply skip this process and proceed for installation procedure of WSL2.
Follow these steps to enable Linux WSL in Windows 10: –
- Perform a right-click on the Start button
- Then select Windows PowerShell (Admin) from the appeared Power Menu.
- A UAC prompt will appear.
- Click on Yes to confirm further.
- Type the following command and press Enter: –
- dism.exe /online /enable-feature /featurename:Microsoft-Windows-Subsystem-Linux / all /norestart
- Restart your Windows 10 System.
3. How to Enable Virtual Machine in Windows 10
Your Virtual machine Platform should be in enable mode during installation of Linux WSL2 in Windows 10. To enable Virtual Machine Platform on Windows 10 (2004) go through these steps: –
- Open PowerShell as Administrator.
- Type the following command to enable Virtual machine:
- dism.exe /online /enable-feature /featurename:VirtualMachinePlatform /all /norestart
- Press Enter to execute the command.
- Thereafter restart your Windows 10 System.
4. Download and Install Linux WSL2 in Windows 10
Now you are able to download as well as install Window Subsystem for Linux version 2 in your system.
- Just go through this link and download WSL2 Kernel Update.
- After that Run the installer to install it.
- You should click on Yes button if asked for your consent.
5. Set Linux WSL2 as default in windows 10
It is pertinent to mention that there is an important feature in WSL2, you must know. When you download and install WSL2, it does not replace the previous version of WSL Both the version of Windows Subsystem can work parallel. In this condition, you have an option to choose default version. Here is the process of how to set WSL2 as default: –
- Type the following command line into the PowerShell window: –
- wsl –set-default-version 2
- Press Enter.
- Reboot your system to save the changes.
6. How to make a list of all Versions of Installation
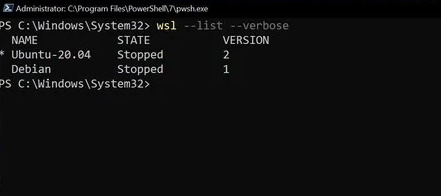
When you have set a default Linux WSL, all other installation will be used automatically. So if you want to know which version of WSL is in use, you should make a list of all your installed version of Linux subsystem in windows 10. Type the following command in PowerShell and press Enter key to execute the task: –
wsl –list –verbose

Through this verbose flag, you will able to identify which version of WSL is attached to which Linux installation. Without it, you’ll simply get a list of the versions of Linux you have installed.
7. How to change the version of Linux Installation
Once you have set WSL2 as default version, it will be effective even after installing next version of WSL in windows 10. If you’re already set up, you can manually convert the installed version of Linux distribution.
Such as, if you want to use between versions 1 and 2 or run a combined in your system, execute the following command: –
wsl –set-version <distribution name> <versionNumber>

That’s all.

5 thoughts on “How to Install Linux WSL2 Latest Version in Windows 10”