How to increase Wi-Fi range to boost weak Wi-Fi signal in Windows 10. Wireless network is a necessity of today’s fast moving world and Wi-Fi is the best example that connect you online anywhere without wire. But sometimes users having complain of Wi-Fi range or Wi-Fi signal related issues. Such as –
- Very low WiFi signal strength
- Weak Wi-Fi signal
- Low WiFi speed
- How to fix weak WiFi signal in Windows 10
- How to increase WiFi signal in Windows 10
- Failed to connect WiFi automatically
Today in this article, we will see how to increase WiFi range to boost WiFi signal in windows 10 by various methods. But before proceeding to main content, you must try these initial workarounds to resolve your issue in starting without putting extra effort.
Initial Workarounds
- Check Wireless Card: If you are using wireless adapter, you must check your card. sometimes loose Wi-Fi card may be a reason of poor network connection.
- Check Adapter slot: You must ensure that wireless card is properly inserted into the Wi-Fi adapter slot. It should be tight fitted in the slot.
How to increase Wi-Fi range to boost weak Wi-Fi signal in Windows 10
There are lot of reasons of slow WiFi signal issue. Installing windows update, Outdated driver, any card related issue may interrupt the WiFi signal. Here are the various ways to resolve this issue.
How to Automatic Switch to Stronger Wi-Fi Network in Windows 10
Ways-1: Update Network Adapter Driver
As we have discussed earlier that outdated network adapter driver may be a cause of slow Wi-Fi signal in Windows 10. You must update it by following these steps: –
- Go to start.
- Make a right click on it.
- Choose the option Device Manager from the list.
- Now go to the Network Adapter section.
- Click on it to expand.
- Here Find out the Wireless network driver.
- Make a right click on it.
- Choose the option update driver software.
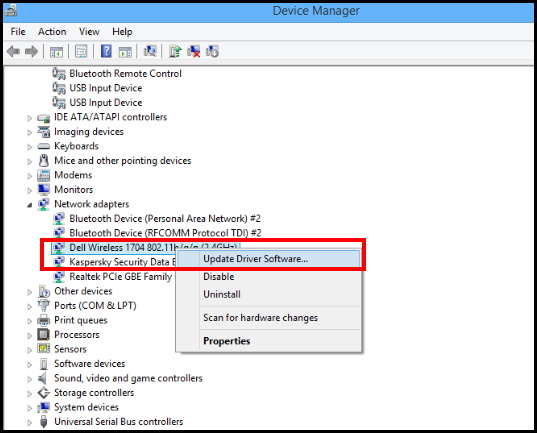
- A small update driver window will open now.
- Here click on the Search automatically for updated driver software option.
- Your PC will begin looking for an updated version of the Wi-Fi network driver.
- Once a new version is found, the Wi-Fi driver will be updated.
- Reboot your system.
Ways-2: Change the Wireless Adapter Setting to Boost Wi-Fi signal in Windows 10
You should set the wireless adapter Power saving mode upto maximum performance. Because sometimes this settings are in medium power saving mode by default. To set the wireless adapter to work in maximum performance mode, follow these steps: –
- Go to start.
- Type power option in the search bar.
- Select the Power option from the top result as Best Match.
- Power Option windows is open now.
- Here find out your current plan and make a click on Change plan settings.
- Thereafter click on Change advanced power settings.
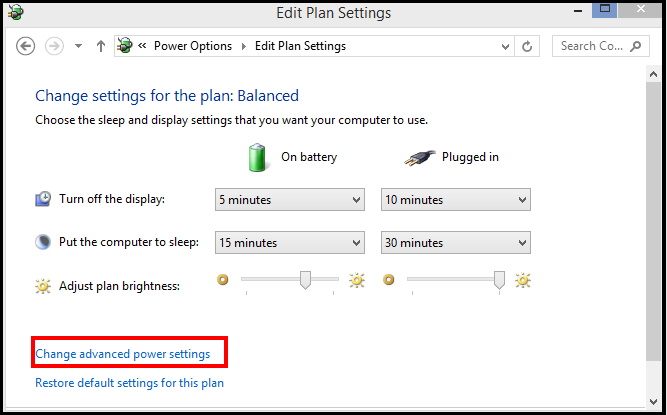
- A new Power option window will open.
- Here find out the option Wireless Adapter Settings.
- Make a click on it to expand.
- Here you will find two options under Power Saving mode: –
- On battery: Medium power saving
- Plugged in: Maximum Performance
- Set the Power Saving Mode to Maximum Performance.
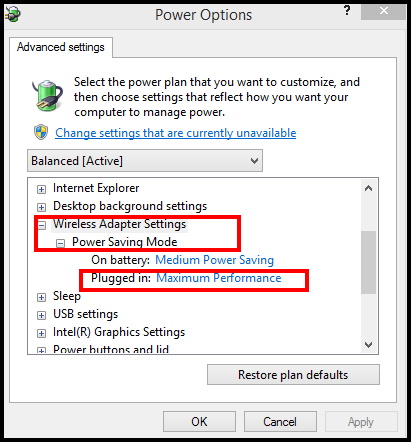
- Thereafter click on Apply and OK button to save the changes.
Ways-3: Change MTU value of Wi-Fi adaptor
Wi-Fi MTU (Maximum Transmission Unit) is a feature that permits you to find out the largest data size applicable for your connection. You should change MTU value of your Wi-Fi adapter by following these steps: –
- Open Run dialog box.
- Type cmd in it and Press Enter.
- Then, make a right click on the Command Prompt option.
- Select the option Run as Administrator.
- Thereafter type the following command and press Enter: –
- netsh interface ipv4 show subinterfaces
- Note down the name of your WiFi adapter that displays.
- It would be either Wireless Network Connection or Wi-Fi.
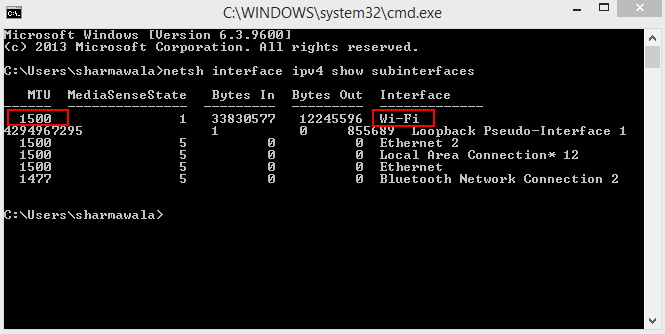
- Now type the following command and press Enter: –
- ipv4 set subinterface “Wi-Fi Adapter name” mtu=1400 store=persistent
Remarks: If your WiFi adapter name is Wireless Network Connection, type the following command: ipv4 set subinterface Wireless Network Connection mtu=1400 store=persistent
Ways-4: Reset the Wireless Adapter using Command Prompt
If you are still facing the issue of slow wifi speed even after reset the Wi-Fi MTU value, try to reset Wireless Adapter. Go through these steps: –
- Go to Start.
- Type cmd in the search box.
- Choose the Command Prompt option from the result appear on top.
- Now go to the right side and select Run as administrator option.
- Thereafter type following command one by one followed by Enter each time: –
- ipconfig /flushdns
- netsh winsock reset catalog
- netsh int ip reset
Ways-5: Change Wi-Fi Sensibility value to boost weak Wi-Fi signal in Windows 10
You should change the sensibility value of maximum capacity to boost Wi-Fi range or Wi-Fi signal on Laptop in windows 10. To change the value of sensibility, follow these steps: –
- Open Device Manager.
- Go to the option Network Adapters.
- Here find out your Wi-Fi adapter.
- Make a right click on it and select the option Properties.
- Now go to the top menu bar and choose Advanced tab.
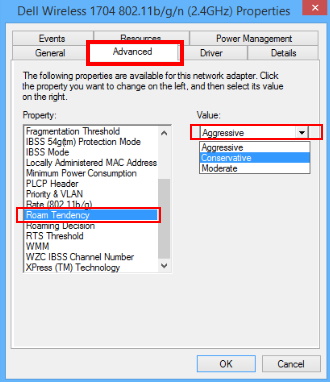
- Under Property section, find out the option Roaming sensitivity level or Roaming aggressiveness or Roam Tendency.
- Set the value Aggressive or Highest.
- Now go to the option Transmit Power.
- Set the level to the Highest.
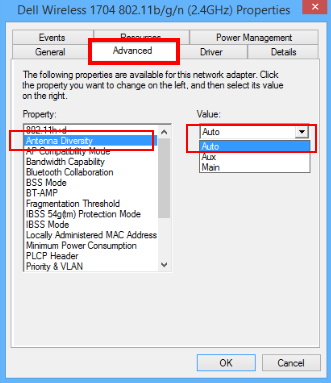
- Thereafter select the option Antenna Diversity.
- Set the value as Auto.
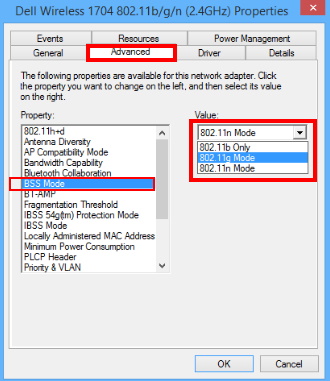
- Now choose Band Preference or BSS Mode option.
- If using a 5G connection, set the value to 802.11a. If using a normal 2.4GHz connection, set the value to 802.11g or 802.11b.
Remarks: The 802.11a value will only be applicable if your WiFi card having 5G supports.
- At the end, click on Ok button to save the changes.
- Restart your system.
Ways-6: Disable Bluetooth to fix Wi-Fi Range issue in Windows 10
Sometimes Bluetooth connection may interrupt the Wi-Fi range according to users report. S you should try to disable Bluetooth and check whether the issue is resolved or not.
- Press Win +X shortcut key altogether.
- Select Device Manager.
- Now go to the Bluetooth section.
- Expand it.
- Find out your Bluetooth Adapter.
- Make a right click on it and choose Disable option.
How to Fix Bluetooth not connecting in Windows 10
That’s all.

1 thought on “How to increase Wi-Fi range to boost weak Wi-Fi signal in Windows 10”