How to Start/Stop and Enable/Disable manage windows Services Manually in Windows 10. Services are hidden programming tool which run in background and support the windows to enable various feature such as printing, search, networking etc. Services also support in functioning of Apps installed in windows 10 system. All the system programs and its functions depend on its status as enable or disable. All are operated through background services automatically. But sometimes we need to control or manage these services manually as per our requirement. Microsoft allow us to make changes Start/Stop and Enable/Disable manually in services feature of windows 10. Here in this article we will discuss about various ways to manage Start/Stop and Enable/Disable manage windows Services Manually in Windows 10.
How to manage windows Services Manually in Windows 10
There are four methods by which we will manage windows Services in windows 10. These are as under: –
1. Through Service Console
How to Start / Stop Services Manually in Windows 10
Here is how to stop services manually in Windows 10 through Services console: –
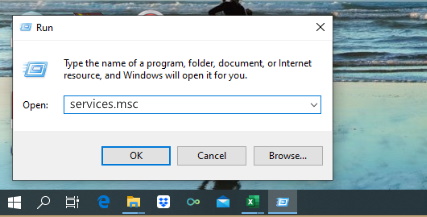
- Open Run Dialog Box.
- Type services.msc in it.

- Services Window will open.
- Search for Services and click the top result to open the console.
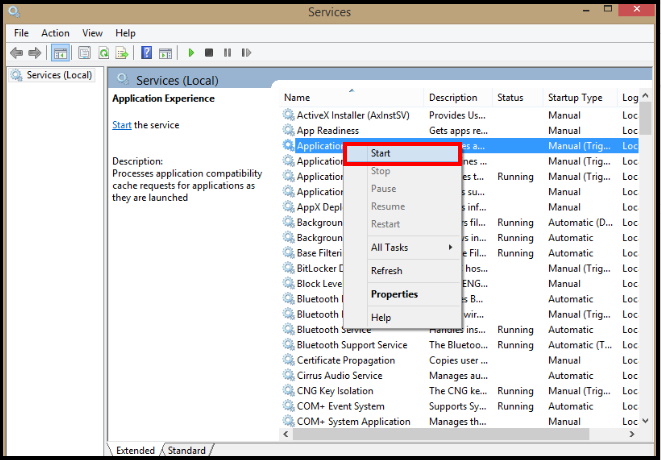
- Make a right click on the service that you intend to start.
- Click on the Start button.

- Click the Apply and OK button.
Now this service will function as usual. if you want to stop this service after sometimes, you should follow these steps to stop the service: –
- Again open Services Window through Run Dialog box.
- Make a right click on the service that you intend to stop.
- Click the Stop button.
- Click the Apply and OK button.
Once you complete the steps, the service will stop running on the device.
Note: Some of the services will never stop due to Operating system restrict them to stop.
How to Enable / Disable manage windows Services Manually in Windows 10
To make enable / disable the services follow these steps: –
- Open Start.
- Search for Services and click the top result to open the console.
- Double-click the service that you want to enable manually.
- Click the Start button.
- Use the “Startup type” drop-down menu.
- Following are the Startup types of services in Windows 10: –
- Automatic (Delayed Start)
- Automatic
- Manual
- Disabled
- Here select the Automatic option
- Click the Apply and Ok button.
Now this service will enable. Further to make disable this service follow these steps: –
- Again go to the Services window.
- Search for Services.
- Make a double-click on the service that you want to to disable.
- Click the Stop button.
- Use the “Start type” drop-down menu and select the Disabled option.
- Click the Apply and OK button.
Once you complete the steps, the service will no longer start automatically after restarting your device.
2. Using Task Manager
How to start/Stop Services using Task Manager in Windows 10
Windows let you permit to manage services through Task Manager also. Here we will operate the services through Task Manager. Follow these steps to complete the process: –
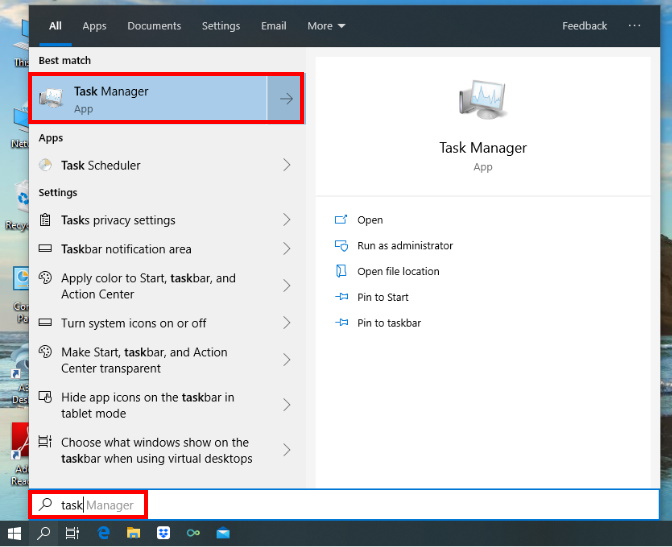
- Open Start.
- Search for Task Manager and click on the best match to open the app.

- In task Manager, go to the Services tab.
- you will find a list of services.
- Select the service which you want to Start or stop.
- Make a right click on them.
- Here you will find the option start/stop from the drop down menu.
- Select the desired option either start or stop.
Once you complete the steps, the service will respond to the option you selected.
3. By PowerShell
How to Start / Stop Services by PowerShell in Windows 10
You can also use PowerShell commands to start / Stop background services in Windows 10. You should follow these steps: –
- Go to Start option.
- Search for PowerShell.
- Make a right click on the best match and select the Run as administrator option.
- Type the following command under PowerShell window after blinking Cursor followed by Enter key: –
- To Start the services, type :
Get-Serviceand Press Enter. - To Stop the services, type :
Stop-Serviceand Press Enter.
- To Start the services, type :

- Let’s understand with example.
- Type the following command to start a service and press Enter:
- This command starts the TeamViewer service on Windows 10 :
Start-Service -Name "teamviewer" - Once you complete the steps, the service will start on your computer.
- Now for stop the service, this command stops the Teamviewer service in Windows 10:
Stop-Service -Name "TeamViewer"
- In the command, replace “SERVICE-NAME” for the name of the service that you intend to stop. If you want to use the display name, replace
-Namefor-DisplayNameand then specify the display name of the service. - After you complete the steps, the PowerShell command will stop the service on your device.
How to Enable / Disable Services by PowerShell in Windows 10
You may enable/disable manage windows Services by using PowerShell in windows 10. Follow these steps to complete the process: –
- Again access to PowerShell and select Run as administrator option.
- Type the following command to enable a service and press Enter:
Set-Service -Name "SERVICE-NAME" -Status running -StartupType automatic
Let’s try for teamviewer services, this command enables the TeamViewer service using PowerShell:
Set-Service -Name "TeamViewer" -Status running -StartupType automatic
Once you complete the steps, PowerShell will enable the service specified with the command. For disable, the following procedure will be adopted: –
- Type the following command to disable a service and press Enter:
Set-Service -Name "SERVICE-NAME" -Status stopped -StartupType disabled
- For example, this command disables the TeamViewer service on Windows 10:
Set-Service -Name "TeamViewer" -Status stopped -StartupType disabled
After you complete the steps, the PowerShell command will disable the specified service.
4. Through Command Prompt
How to Start / Stop manage windows Services through Command Prompt in Windows 10
There is a little difference in PowerShell and Command Prompt window. Both the windows having different command value. Now we will complete the procedure of Start/Stop and Enable/Disable Service in Windows 10 through Command Prompt option.
- Open Run Dialog Box.
- Type cmd in it.
- Command Prompt window will open.
- Make a right click on it and select Run as Administrator option.
- To view the list of services, Press Enter after typing the following command:
sc queryex state=all type=service
Start Services
- To start a service with the command line, use these steps:
- Type the following command to start a service and press Enter:
- This command starts the TeamViewer using the service name:
net start "TeamViewer" - Once you complete the steps, the command will execute and start the service you specified.
Stop Services
- This command stops the TeamViewer using the service name:
net stop "TeamViewer" - After you complete the steps, the command will stop the specified service on Windows 10.
How to Enable / Disable manage windows Services through Command Prompt in Windows 10
You may enable or disable manage windows Services through Command Prompt. Follow these steps: –
- Go to Command Prompt and select the Run as administrator option.
- The following command is used to enable a service :
sc config "SERVICE-NAME" start=auto - This command enables the TeamViewer service automatically :
sc config "TeamViewer" start=auto
You may also use the following command to enable a particular service in various stage:
- For manual changes type this command :
sc config "SERVICE-NAME" start=demand - For Automatic Delayed type :
sc config "SERVICE-NAME" start=delayed-auto - Once you complete the steps, the service will enable and start automatically on reboot according to the command you used.
To disable a service with Command Prompt, use these steps:
- This command disables TeamViewer :
sc config "TeamViewer" start=disabled
That’s all.
