How to Set Up and Manage VPN Connection in Windows 10/8. The word VPN stands for Virtual Private Network which permits you to create a secure connection to another network over the Internet. In another words, VPN allows a user to use internet through another computer network server. The important aspect of set up VPN connection is to Protect yourself from snooping on untrustworthy Wi-Fi hotspots in Windows 10 / 8. You may use streaming media such as Netflix and Hulu.

If a user connect to a VPN, the network behaves same as local network. All the network traffic of local network is transferred to VPN with a secure connection. From the VPN server, your traffic exits into the public internet. Unless you’re headed to a site that uses HTTPS, your traffic is no longer encrypted. If you connect the server which is abroad, no problem, the network access depends on VPN’s location. When you surf the web over network connected to a VPN, your computer contacts the website through the encrypted VPN ection. The VPN forwards the request for you and forwards the response from the website back through the secure connection. If you’re using a USA-based VPN to access Netflix, Netflix will see your connection as coming from USA.
How to Set Up and Manage VPN Connection in Windows 10
Here, in this article we will discuss about how to add a VPN in windows 10 as well as Windows 8. At first we will see in windows 10. Follow these steps to complete the adding procedure of VPN connection: –
- Open Windows Setting.
- Go to the Network & Internet section of setting page.
- From the left side of page, select VPN.
- Now go to right pane of setting page and select on Add a VPN connection.
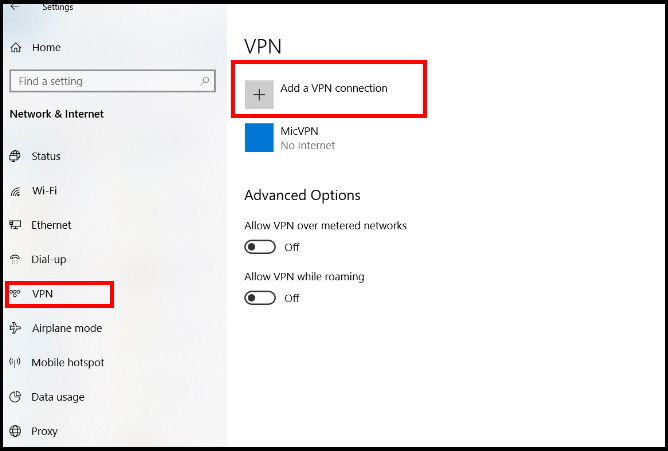
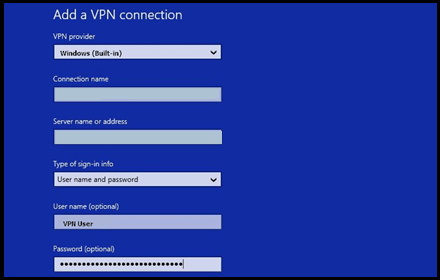
- A new window Add a VPN connection will open.
- Here you have to fill all data as per your requirement and system setting.
- Under VPN provider, click on the drop-down menu, and select Windows (built-in).
- Provide VPN a name under Connection name.
- Enter the server name or address, the VPN type, and the type of sign-in info.
- Then, add a user name and password for extra security (this is optional, but recommended).
- You may choose to have the computer remember your sign-in info.
- At last, click on Save button.
How to Connect VPN connection in Windows 10
- Start Search.
- Type setting.
- Select Windows setting from the best match result.
- Go to Network & Internet.
- Select VPN.
- Make a click on your VPN name.
- Select Connect and enter a password that you provided during set up.
How to disconnect or remove a VPN in Windows 10
If you don’t want to use a VPN anymore, or if you just want to remove a server from the list, you can disconnect or altogether remove it. There is a VPN button for quick on and off located in the Windows 10 action center (the small speech bubble in the bottom-right corner of your display). But you should follow these steps to remove VPN completely from Windows 10 system: –
- Open Windows Setting again.
- Click Network & Internet.
- Select VPN option from the left pane of Setting page.
- Now Click on a VPN connection you want to disconnect or remove.
- Then click on Disconnect option.
- And also click on Remove option.
- At last click on Remove button again to confirm.
How to Set up a VPN connection in Windows 8
As we have discussed earlier how to set up a VPN in Windows 10. VPN connection also available in Windows 8. But the procedure is different. Now we will set up VPN connection in Windows 8. Follow these steps: –
- Go to the Taskbar.
- Navigate the Network icon.
- Make a Right-click on the network icon.
- Two numbers of drop down menu will appear.
- Select Open Network and Sharing Center.
- In the Network and Sharing Center, select Setup a new connection or network.
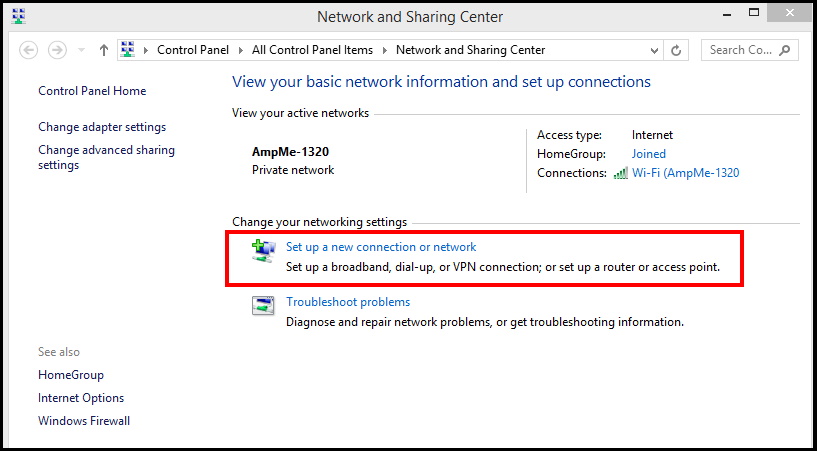
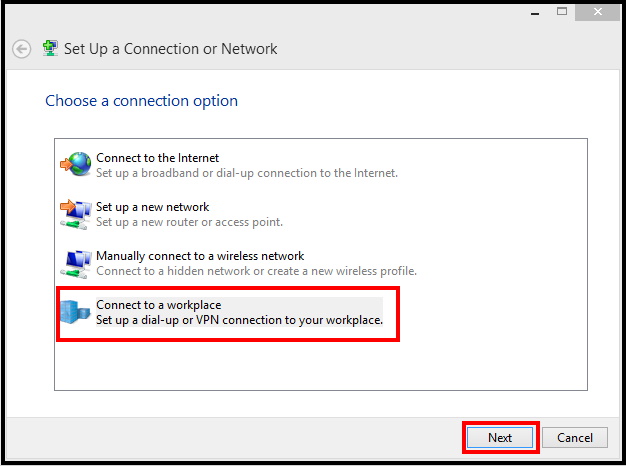
- Here you will find three option under Choose a connection option.
- Connect to the Internet
- Set up a new network
- Connect to a workplace
- Select Connect to a workplace option.
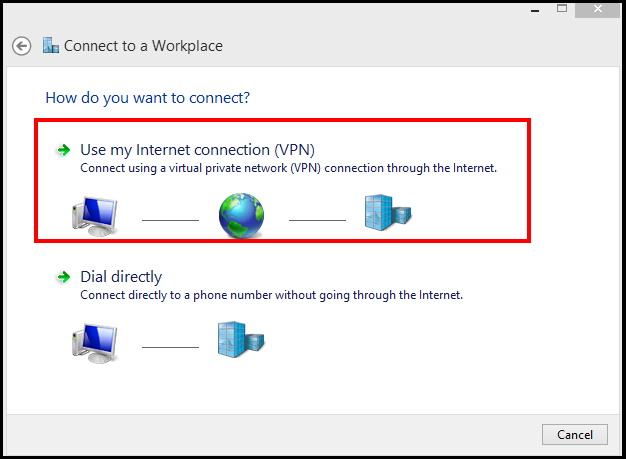
- Here you would asked How do you want to connect? with two option available: –
- Use my Internet connection (VPN)
- Dial directly
- Select Use my Internet connection (VPN).
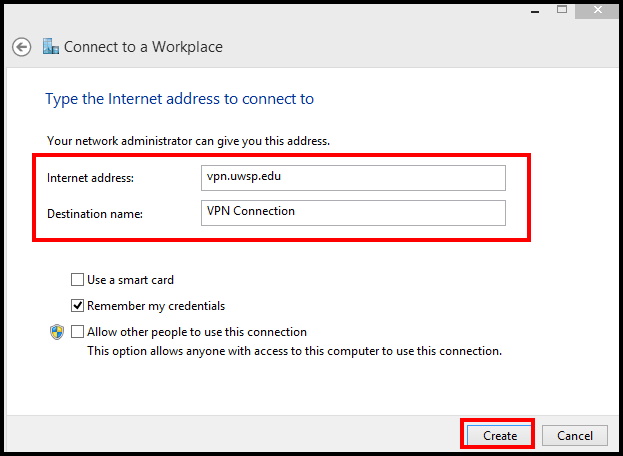
- Enter the information for the UWSP VPN network as shown below and click Create.
- Internet address: vpn.uwsp.edu
- Destination name: UWSP VPN
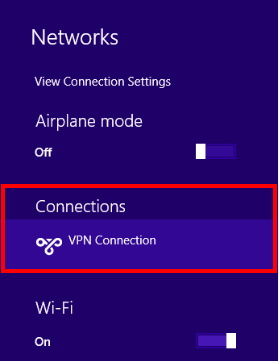
- You VPN connection will available under Network option.
- Make a right click on UWSP VPN and select View connection properties.
- Now go to the Networking tab.
- Here select Internet Protocol Version 6 (TCP/IPv6) and click on Properties.
- Thereafter select on option Advanced….
- You should uncheck the Use default gateway on remote network option.
- Select on Ok button.
- It will exit the Advanced TCP/IP Settings.
- Again click on OK to exit from Internet Protocol Version Properties.
- Now this process will also applied for the Internet Protocol Version 4 (TCP/IPv4).
- Follow the same procedure as above.
- Finish the process after marking uncheck on Use default gateway on remote network option.
- Select OK to exit UWSP VPN Properties.
How to Set up VPN in Windows 8
Now we will see how to connect VPN in windows 8. Follow these steps to complete the process: –
- Go to the Network icon located at the right bottom corner of Taskbar.
- Make a click on it.
- A list of available network will display here.
- You should select UWSP VPN and click on Connect option.
- You will be then prompted to type your UWSP username@uwsp.edu and your UWSP password.
- Enter user name and password under desired field and click OK.
- You are now connected to the VPN.
That’s all.
