How to Manage your Search via Setting in Windows 10. Whenever we talk about search in Windows 10, Cortana comes in our mind. Cortana and windows search both are very different each other. Microsoft occasionally improves windows search as well as Cortana via windows latest update release on every patchday as cumulative updates. Now there are lot of improvement and changes introduced by Microsoft. Today in this article we will discuss few customize search from windows setting, so that you could operate windows 10 very easily as well as save time without applying extra effort.
[adToappearHere]
How to Manage Search via Setting in Windows 10
Here are some search category of windows 10, you should change it through Windows setting. They will definitely help you in finding better result such as search history, finding content, filter search result, finding exact match etc
1. Select Enhanced Search option in Windows 10
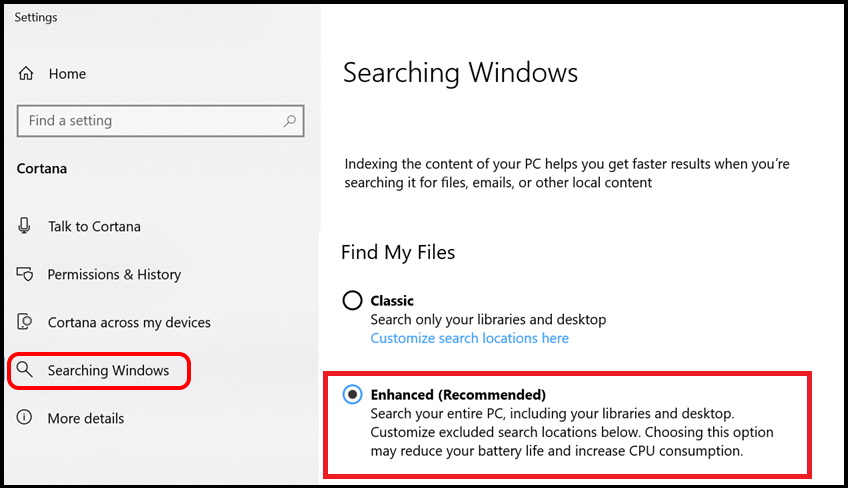
Microsoft has introduced an enhanced search option with regard to customize windows search. It acts into the depth of whole windows, not only files but includes folders, documents and images. Here is the procedure to make changes and choose enhanced search in windows 10.
- Open Windows setting.
- Go to Search option and subsequently under its sub section.
- Select Searching Windows from the left sidebar.
- From the right pane, go to the “Find My Files” option.
- Here, you will find two option, the first one is Classic and another is Enhanced.
- Choose the button before the option Enhanced (Recommended).
2. Turn on the Search History in Windows 10
As all your previous searches are stored in system, it may be used later. If they are available, there are no any requirement to search afresh. You may simply go through the search history and find it. For this, you should manage your search history. Follow these steps to turn on it: –
- Again open Windows Setting and go through the search option.
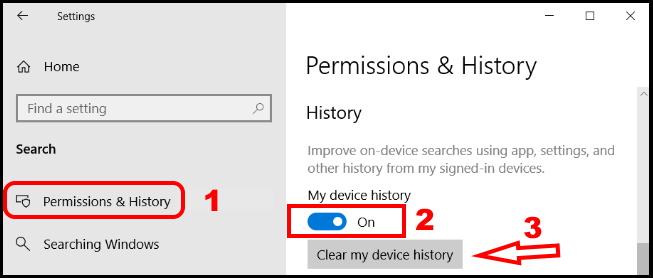
- From its subsection, select the option Permissions & History.
- Now go to the History option from the right side menu.
- Here, you will find My device history.
- Click on toggle button from turn OFF to ON.
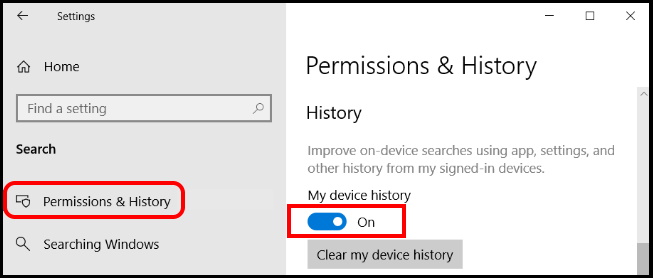
- If at later stage, you choose turn off button, all your search history will not save.
- In case you prefer to remove the already saved data, click on Clear my device history button.
- It will erase all your previous search history and you will not find it in future.
3. How to Resolve your search related issue in Windows 10
If you feel certain inconvenience in windows search option, Microsoft let you to resolve it and provides an in-built tool namely Troubleshooter. You may apply windows troubleshooter to resolve any type of search related issue. Follow these steps: –
- Open Windows Settings and go to the Search section.
- Under subsection of search, make a click on Searching Windows option.
- Here click on the link Run the indexer troubleshooter to resolve common search issues.
- The troubleshooter wizard will appear on your screen with list of search related issues.
- Choose the issue that you are facing and follow onscreen instruction.
- Once you complete with the scan, Restart Windows 10 PC and see if this fixes search-related issues.
[adToappearHere]
4. Improve Windows search by including Cloud Content
Users store Some items like photos, videos, documents, personal mails in cloud services such as One Drive or Outlook. When they try to search any element, such items which are stored in cloud services, does not appear in search result. So in view of the above, Microsoft introduced a higher level search option i.e include cloud content. If you change your search setting by including cloud content, all items which are store in cloud will appear in your search result. To include cloud content in the search, follow these steps: –
- Open Windows setting and go to Search option.
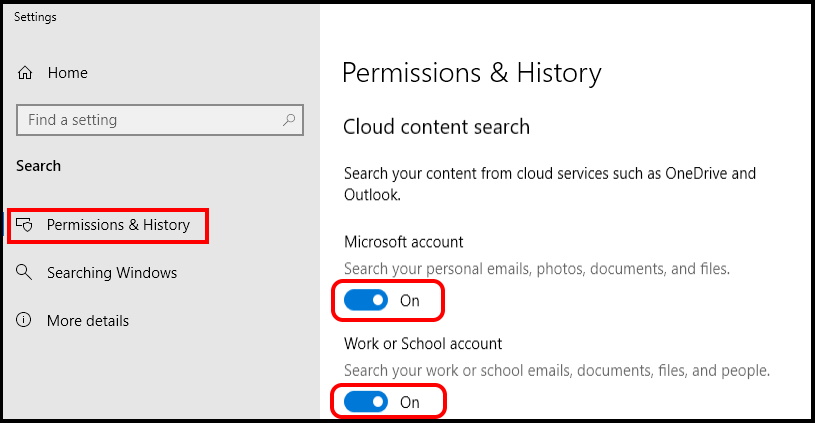
- Select Permissions & History from its subsection.
- Go to the right pane.
- Here under Cloud Content Search option, you will find two toggle button.
- The first one is Microsoft account which is personal and where searching files, images, and emails are stored.
- The second one is Work or School account which is general cloud and where exploring files, people, school emails, and content stored.
- From the options, choose to turn ON or OFF the switch as preferable to allow or deny your Windows 10 to access and search connected Cloud contents.
5. Apply Safe Search by limiting the Search Results
Some adult content which is un-appropriate in nature also stored in your system as web previews. When you apply search, these contents are also visible and divert from your actual search. In this case, you must filter your search by limiting search result. Safe search is another important feature by which you can avoid adult content from search result. Follow these steps: –
- Go to the windows Settings app.
- Click on the Search category.
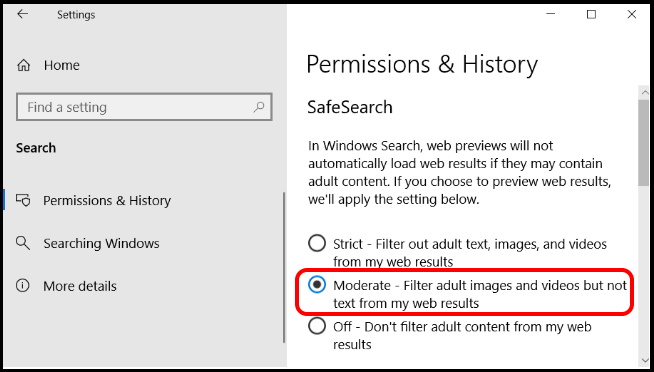
- Under Permission & History, you will find the option Safe Search.
- Here you will find three option. These are as under also shown in screenshot.
- Strict: For filtering out any adult content or inappropriate text, content, and files as well.
- Moderate: To filter out adult videos, images only and not text.
- Off: To list the search without any restrictions.
- By default, it would be set to moderate. You can change the restrictions as per your preference and Customize Search from Settings App accordingly.
6. Use Advance Search under Indexing option in Windows 10
Windows 10 let you to indexing option for better search result in windows 10. You will have to customize your file type as well as location for easily accessing during search.
- Go to the Search option through Windows Setting.
- Thereafter, choose Searching Windows.
- Make a click on Advanced Search Indexer Settings link from the right pane.
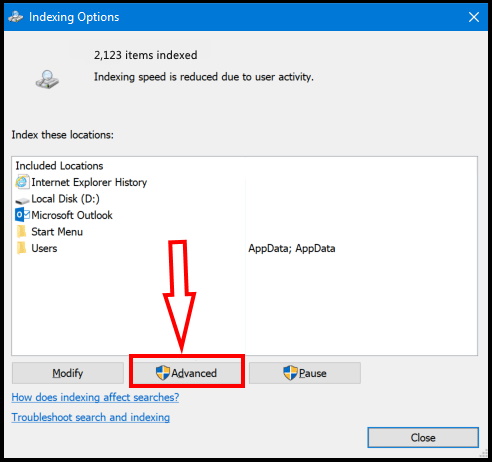
- Indexing Options wizard will appear on your screen.
- Here, click on the Advanced button.
- The displaying window box having two tabs.
- You should choose Index Settings located under File Settings.
- Under File setting, there are two options available.
- The first one is Index encrypted files which will search only encrypted files.
- The another one is Treat similar words with diacritics as different words which will differentiate similar words or content.
- There is a possibility of search option not working properly.
- In this condition press on the Rebuild button under Troubleshooting. This will delete and recreate the Index database.
- Now, proceed to the File Types tab.
- Go to the “How should this file be indexed?” section.
- You will find two options under this section.
- Index Properties: For indexing metadata information.
- Index Properties and File Contents: This is for indexing the metadata information as well as the file contents.
- Also a option is available by which you select new file format in search option i.e Add new extension to list.
[adToappearHere]
7. How to exclude certain Files or Folder from Search
Most of you having personal files or folder which is kept safe or secret in system. You all are fully aware of them. When you operate search any items, files or folders or content, you want to avoid that personal folder from search result list. So, to prevent the secret folders from showing in the Windows search, you can exclude them. All you just need to do is to eliminate a folder by mentioning its path in the Search settings page. Here is the procedure to complete the task: –
- Proceed to Search option via Windows setting.
- Then click on searching window option from the left pane.
- Under its sub section, go to the Excluded Folders option.
- Here, you will find a list of certain path.
- If you want to choose any folder from the given list then select the same. Otherwise, click the + Add an excluded folder button and choose the folder you want to avoid.
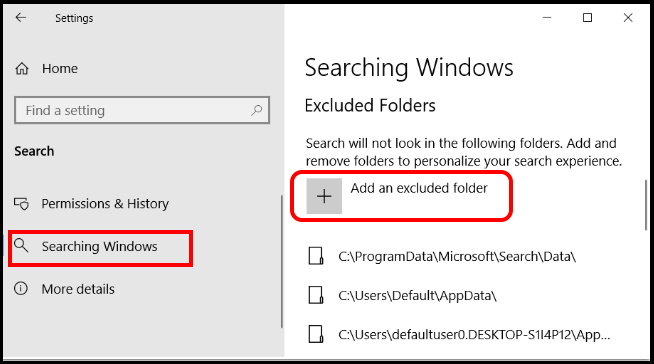
- Windows will not index the selected folder(s) in Search anymore.
- In future, if you want to include that folder in search result, simply click on Remove excluded folder.
That’s all.
