How to Manage Internet Time Setting in Windows 10. Time server enable you to display updated and accurate date and time. Accordingly your windows system uses date and time to update and modify your files. If your computer not displaying correct date and time, it may lead to update and sync problem in windows 10. You have to set date and time manually in few old model of windows system. But now a days, in modern system, there is no need to set it manually, it will get automatically update. All these happens due to Internet Time Server.
Your windows 10 system shows accurate date due to windows clock synced with Internet Time server. So in new era, your windows system must have Internet Time setting enabled to keep your internal files or log updated and synced with server.
In this article, we will discuss about how to enable / disable internet Time as well as how to add new server in windows 10. Be continue with this article.
How to Manage Internet Time Setting in Windows 10
As we all know we can make any changes against date and time setting in windows 10 system. This feature is available under Control Panel
- Open Control Panel.
- A list of items available here.
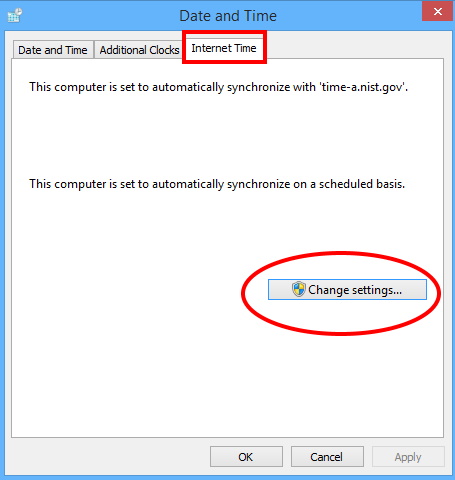
- Find out Date and Time and click on it to open.
- A new Date and Time wizard will open.
- Here, you will see three menu Tab. These are: –
- Date and Time
- Additional clocks
- Internet Time
- Go to Internet Time tab.
- Make a click on Change setting option.

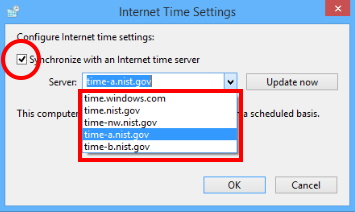
- A new window will open.
- Go to Configure Internet time settings option.
- Make a check against box Synchronize with an Internet ……. server.
- You may select a different server from the drop down menu.
- Use the list of Servers to pick up the one from which your clock will be synchronized.
- Now click the Update now button to synchronize the time with the new server.
- Press the Ok button to save the changes.
- Don’t forget to reboot your system.

At later stage, if you want to disable it, go through the same procedure and un-check the box against Synchronize with an …………… server. The server and the Update now will be immediately grayed out. Tap the Ok button.
How to add new time servers in Windows 10
You may add new time server beyond the available list. It’s also possible to include any NTP server you want. Follow these steps to complete the procedure: –
- Open Control Panel.
- Go to Clock, Language, and Region section.
- Here click on Date and Time option.
- Again make a click on the Internet Time tab.
- Click the Change settings button.
- Mark the check against the Synchronize with an internet ……… server option.
- Click the drop-down menu, and next to Server, and type the new address of the time server.
- Now click on the Update now button to re-synchronize.
- Click OK and then Apply button to save the changes.
- You must restart your system.
That’s all.
