How to Fix Windows Defender failed to Update in Windows 10. Most of users occasionally complain that even after a strong network, Windows defender failed to update in Windows 10 which may leads to security threats to the System. As we all know, Windows Defender is an in-built security feature by which our system is out of danger from external threat such as worms, Trojans, Rootkit, Backdoor, ransomware and spyware etc. Windows Defender works in the background and alert the users when any malware or threat found in Windows 10 system. But Windows defender can only perform properly when it will update on regular interval through authorized sources.
Basically, we try to update windows defender by three methods. These are: –
- Directly From Windows Update
- From the Windows Defender Update Interface
- From Manual Download through authorized website
Windows Defender Update either completely failed to update or hang in mid of update i.e stop at a certain percentage of progress. Today in this article, we will discuss about how to fix this issue through various methods. Be continue with this article till the end.
Initial Workaround
We will discuss in details about How to Fix Windows Defender failed to Update in Windows 10, but before proceeding towards discussion in brief, you should try to use initial workaround as mentioned below so that your problem could resolve without putting extra effort. Ensure the following: –
- Restart Windows 10. Sometimes a normal restart can resolve major issue without putting any extra effort. You must try this method. Restart your windows 10 system and try to update windows defender again.
- Check Internet connection. For any kind of update, a strong and continuous network is must. If network is disconnected in mid of updation process, you will never complete the windows defender update process. So you you should ensure proper internet connection before starting the update.
- Remove external peripherals. Remove all external HDD or SSD, USB, CD drivers etc. Reboot your system and try to re-plug all accessories.
How to Fix Windows Defender failed to Update in Windows 10
If none of the above mentioned initial workarounds get effective, and your problem is still remaining, here are the possible solutions of error Windows Defender failed to Update in Windows 10. You may apply any one of them: –
How to Fix Windows Defender Error 0x80073afc in Windows 10
Solution-1 : Check for available Updates
You should check for available updates. Because if updates are not available and you will try to update, it shows the update error. Follow these steps to check the available updates through Windows setting: –
- Open Windows Setting.
- Go to the Update & Security.
- From the left pane of Setting page select Windows Security.
- A new Windows Security will open.
- From the left pane of windows security page, choose Virus & threat protection.
- Move to the right pane and scroll down to reach the bottom.
- Click Check for updates button.
- If any available update found, try to update.
Solution-2: Try to update Windows Defender manually
You may update windows defender manually through official Microsoft web page. Once you download and install the file as well, it will reset the Defender and makes the updates to start working properly. To complete the procedure, follow these steps: –
- Go to this link for Security intelligence updates for Windows Defender Antivirus.
- Navigate Manually download the update section.
- If found, Click on the version that is compatible with your system.
- A pop-up will display, click on Save File option to start downloading process.
- After completion of downloading, visit the directory where your system saves all the downloaded items.
- Make a double-click on the mpam-fe.exe file.
- Again a pop-up will appear, click on the Run button to install the Definition Update.
Solution-3 : Apply sfc Command to Fix Windows Defender failed to Update in Windows 10
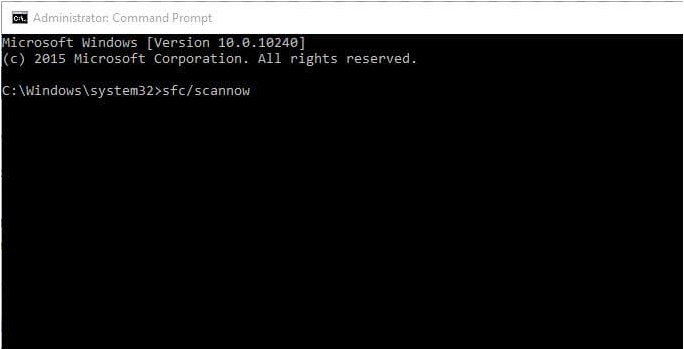
Corrupted and missing system files may be a cause of this update error in Windows 10. To get rid of this issue, you should apply system file checker through Command Prompt. It will resolve the issue. Follow these steps: –
- Launch Run Dialog Box.
- Write cmd in it,
- Command Prompt window will appear.
- Make a right click on it.
- Select Run as Administrator.
- Now type the following command after blinking cursor followed by Enter key: –
sfc /scannow

Windows will identify any faulty system files which is cause of windows defender failed to update error in windows 10. It will check as well as fix the issue.
Solution-4: Change Windows Defender Services Setting
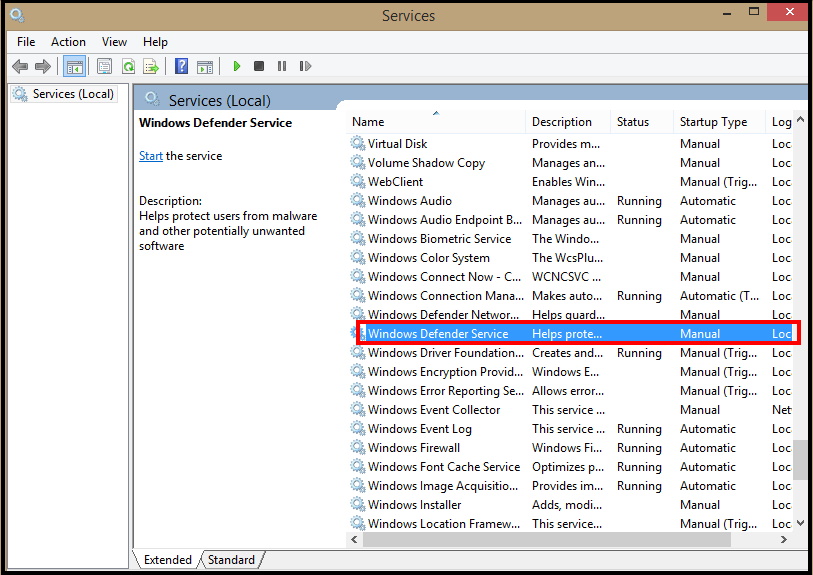
You should set Windows Defender Services as Automatic Startup. You should follow these steps: –
- Make a right click on Start button and select Run option.
- Type services.msc and press enter.
- Here navigate Windows Defender antivirus service.
- If found, make a right click on it and select Properties.

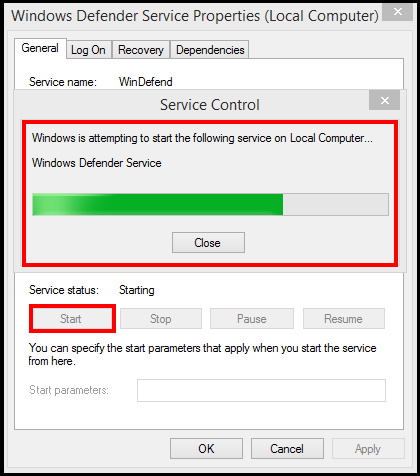
- You must Ensure that Service Status is in start mode.
- If not, click on Start option under Service status.
- Now a small popup window will appear and take a short while to start the services.

- Now windows Defender services is start.
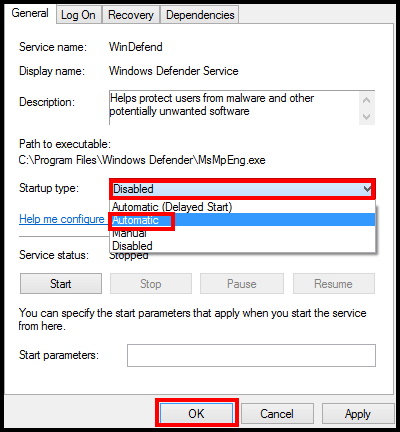
- Thereafter go to the Startup type section of properties window.
- Ensure Startup type is Automatic (if not, select Startup type as automatic and click Start)

- At last make a click on Apply then click on OK button to make the changes save properly.
- Don’t forget to reboot your system
Hopefully your problem pertains to windows defender in windows 10 will resolve now. You may try any one of the solution to resolve the issue. You must regularly update your windows defender so that your system could be safe from external threat.
That’s all.

1 thought on “Tips: How to Fix Windows Defender failed to Update in Windows 10”