How to Enable Recover and Create System Restore Point in Windows 10. System restore is a feature in Windows 10 that bring you back to previous point where your system is operating well. Whenever you install windows latest update, change device driver, install any app, using Registry, Change system setting and other changes made in your PC to Optimize the Windows 10 performance, system get interrupted and Windows 10 not working properly. In this situation you may use system restore to revert back on that position where your system was in working state.
System restore also resolves various error occurred in windows 10 time to time. It helps to fix problems that might be making your computer run slowly or stop responding. System Restore does not affect any of your documents, picture or other personal data, recently installed programs and drivers.
Most of the error appears when you installed windows latest update. Although this feature is enable by default in Windows 10. But sometimes due to various reason it becomes disable. Here in this article, we will discuss How to Enable and create System Restore Point as well as recover your system by using system restore in Windows 10.
How to Enable System Restore Point in Windows 10
You can enable system restore in windows 10 by various methods. Such as through File explorer, Control Panel, PC Context menu, Windows Setting as well as via keyboard shortcut.
- Go to the This PC icon located at the desktop or in File explorer.
- Make a right click on it.
- Select the option Properties from the context menu.
- Now select the option System Protection from the left pane of system window.
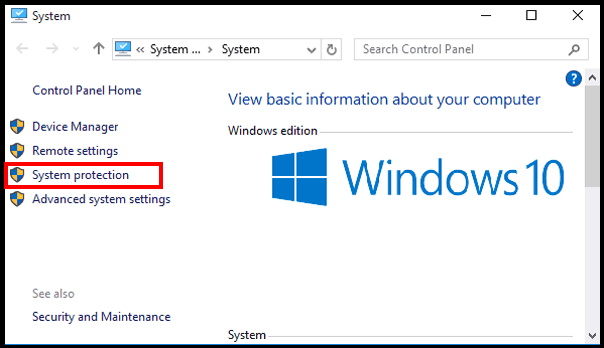
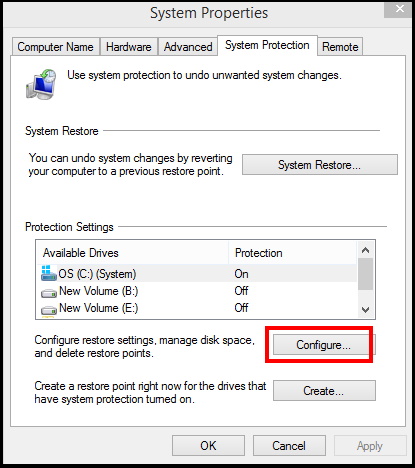
- System properties window will open now.
- Select the option Configure.
- Here make the check against option Turn on system protection.
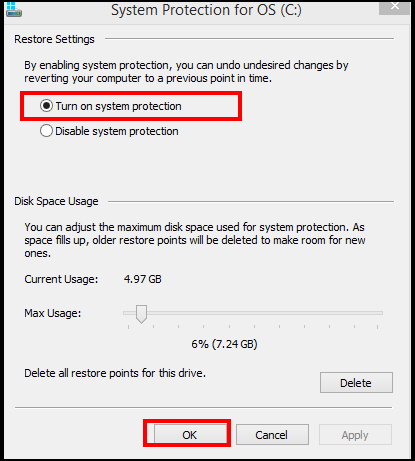
- Thereafter click on the Apply button and further on Ok button.
You should apply this process for each drives installed in your system. System restore is now enable on your device and protect your system from unwanted happening. This feature only helps you to bring back you in previous mode. It does not having back up facility.
How to Create System Restore Point in Windows 10
After enabling system protection in windows 10, now you will have to create system restore point from where you will come back in working state of your system. It detect the changes made in your system automatically. You may create a restore point manually by going through these steps: –
- Press Win logo + Pause/Break shortcut key conjointly.
- System window will open.
- Select System Protection option from the left menu.
- System Properties window will open.
- Here select the option Create.
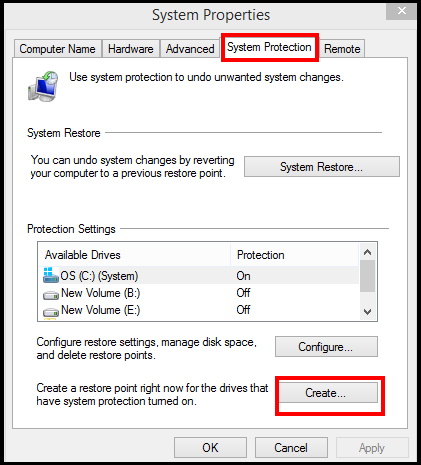
- A new small popup window will open.
- Here you should type a description to help you identify the restore point. The current date and time are added automatically.
- For example, Before installing windows latest update.
- Make a click on create button.
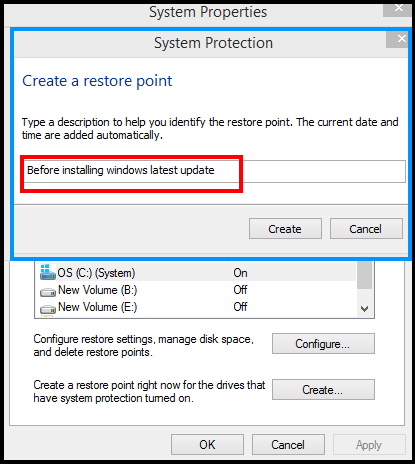
- Now window will initialize to create a restore point.
- Let the window be complete the process.
- As soon as it complete, a small popup confirmation window will appear on your screen.
- The restore point was created successfully.
- Click on Close option.

Now whenever you start to installing windows latest updates, update driver, or make changes in Registry, a system restore point will create to undo the changes.
How to Recover Windows 10 through System Restore Point
When something happens after modifying system settings on Windows 10, you can undo the changes by applying a previous restore point. You can complete this task from the desktop as well as through the advanced startup settings if the system failed to boot.
Recover your System through Desktop
- Open Windows Setting by pressing Win + I shortcut key altogether.
- Go to the system section.
- Now from the left menu, click on the about option located at the bottom.
- Thereafter go to the right side of same page and select on System info.
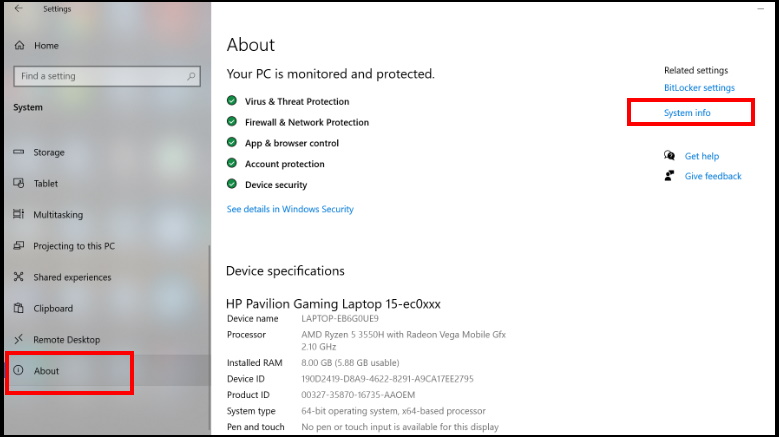
- Now system window is open.
- Here select the option System protection.
- System properties window will open now.
- Select the option System Restore.
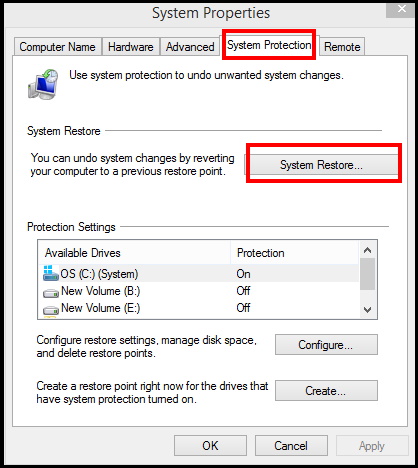
- Then click on the Next button.
- Select the restore point to revert changes.
- It will restore your computer to the state it was in before the selected event.
- You may click on scan for affected programs option.
- It will remove that program causing error.
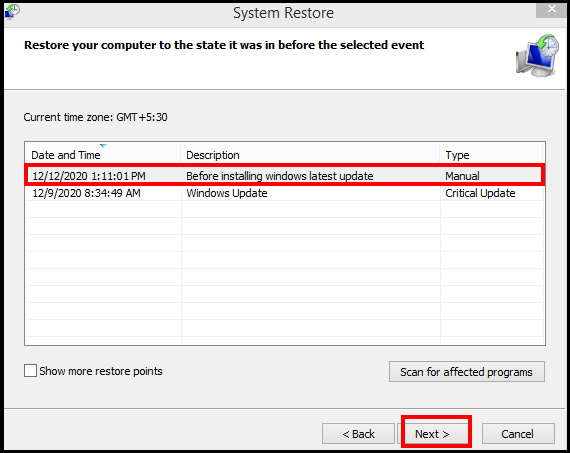
- Thereafter click on Next button.
- Select Finish button.
Recover Windows 10 through Windows Advance Startup option
If your system failed to boot to open Desktop version, you should go through the option Windows Advance Startup. Follow these steps: –
- Press and hold down the Shift key and restart the PC.
- Open the Start menu and click to open power options.
- Thereafter press and hold the Shift key and click on Restart.
- Windows will automatically start in advanced boot options after a short delay.
- Once your computer has booted, select Troubleshoot.
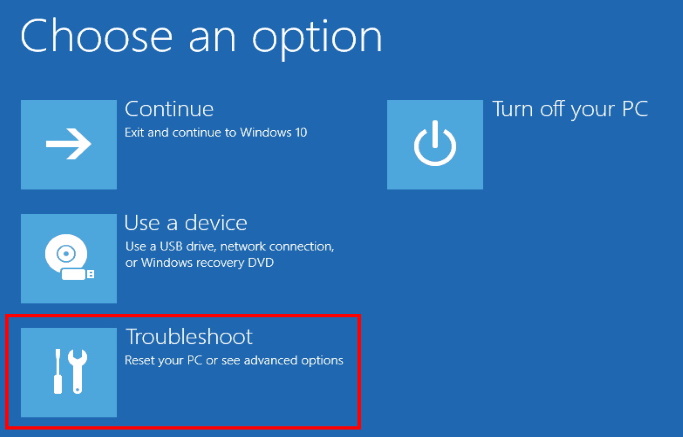
- After that click on Advanced options.
- Select System Restore.
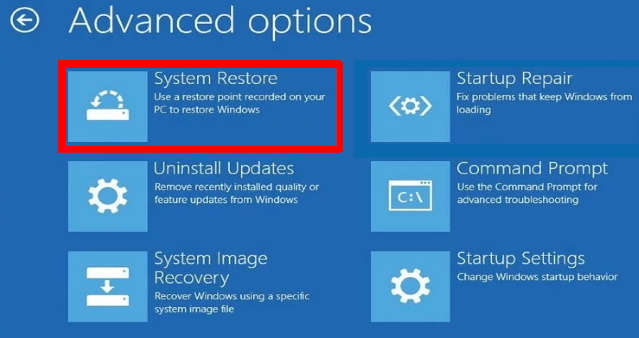
- The computer will start reboot.
- Select your username.
- Enter your password.
- Make a click on Continue button.
- Thereafter click on Next button.
- Select a restore point from the menu and follow the prompts.
- You may click the option stating Scan for affected programs.
- Windows will let you you previous point.
- Click on the Close button.
- Select the Next button.
- At the end, make a click on the Finish button.
Once the process is complete, you will access your system in the state it was in before the selected event. Now you should clear the reason causing error and try to resolve it.
That’s all.

1 thought on “How to Enable Recover and Create System Restore Point in Windows 10”