How to Create Mount and Dismount Windows 10 ISO Image. At first you should know what is an ISO image and how it works. ISO image related to Optical media file. It contains all the physical date of file in a Compact Disc, DVD or Blu-ray disc. These are used for back up optical discs, as well as for keeping large file sets, programming files, software application etc so that it could be burned to an optical disc. Many operating systems as well as Windows 10 and various Linux distributions operating system are also served in form of ISO images.
How to Create ISO Image or File for Windows 10
- Go to the Windows 10 download page.
- Make a click on Download tool now option.
- It will download the media creation tool.

- Make a click on it run.
- Thereafter, select Create installation media (USB flash drive, DVD, or ISO) for another PC.
- Click on Next button.
- Now Select the language, architecture, and edition of Windows that you want.
- Click on Next.
- Then Select ISO file and again click on Next button.
- The media creation tool will create your ISO file for you.
- To use the ISO file as a backup for your PC or on another PC, burn it onto a DVD.
How to Mount and Dismount Windows 10 ISO Image File
There are two ways to Mount and Unmount ISO Image file in Windows 10. The first one is through File explorer and the another one is by using PoweShell Command.
How to Fix DISM Error 0x800f081f in Windows 10 Computer
Ways-1: Mount Windows 10 ISO Image through File Explorer
In File Explorer, you can mount the content of image by Four methods.
Ist Method
- Go to the File Explorer.
- Navigate the .iso type File or folder having ISO image .
- Apply a simple double click on it.
- It will open with an another folder.
- Now you can extract or mount it as per your need.
2nd Method
- Open the File Explorer.
- Navigate the .iso type File or folder having ISO image .
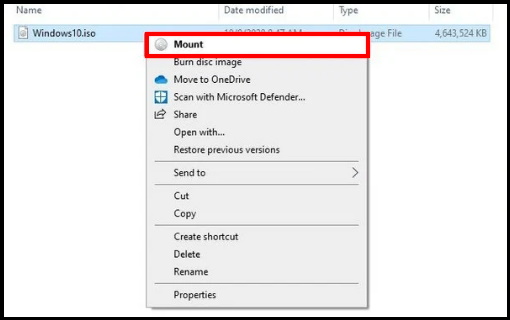
- Apply a right click on it.
- Select the option Mount from the top of Context menu.

Now you can easily access the file from the left menu bar of File Explorer.
3rd method
- Open File Explorer.
- Navigate the folder having the ISO image.
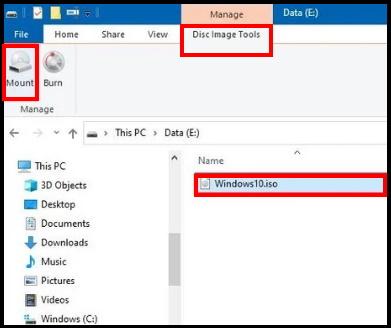
- Select the .iso file.
- Now from the top ribbon bar, click on the Disk Image Tools tab.
- Select the Mount button.

4th Method
Sometimes you have any third party tools like .zip, .tar, .rar, etc to compressed zip file. In this case, you would not see the option Mount in File Explorer. But don’t worry, here is the solution to Mount Windows 10 ISO image:
- Make a right click on the .iso file.
- Go to the option Open with from the context menu.
- Select the option Windows Explorer to Mount an ISO image file.
Ways-2: Through Windows PowerShell option
You may Mount or dismount an Windows 10 ISO image file by using Windows PowerShell. Go through these steps: –
Mount ISO Image
- Go to the Windows Search option.
- Type powershell in it.
- Select the option PowerShell as best result.
- Make a right click on it.
- Select Run as Administrator.
- Type the following command and press Enter: –
- Mount-DiskImage -ImagePath “E:Windows10.iso”
- You should select the image path as per your system requirement and choice.
After completion of above mentioned steps, you can easily mount Windows 10 ISO image as well as reach the contents so that you could install the application or extract the image contents from the newly-available drive letter.
Dismount ISO Image
- Open Windows Search.
- Type powershell in it.
- Choose the option PowerShell as best result.
- Apply a right click on it.
- Select Run as Administrator.
- Type the following command and press Enter: –
- Dismount-DiskImage -ImagePath “E:Windows10.iso”
- Select the image path as per your system requirement and choice.
That’s all.

1 thought on “How to Create, Mount and Dismount Windows 10 ISO Image”