How to Add New Internet Time Servers in Windows 10. Accurate date and time setting in any windows system is most important factor. Because some of the files or data updated or synced with time. If your system does not maintain accurate date and time, there is a possibility of some feature of windows 10 i.e upgradation of system, saving of files etc will not work properly. You may face several network issue as well. Windows 10 applies the Network Time Protocol (NTP) to connect with Internet time servers on the internet to provide accurate system time.
Network Time server helps to provide and update your time zone correctly. When you open Internet Time Setting page, a list of server you can see here. All these servers having different features and mode. If you want to add a new time server to your windows 10 system, here we will see how to add new Internet time server in windows 10 by two methods. Let’s start, be continue with this article.
How to Add New Internet Time Servers in Windows 10
We can add Internet time server by two methods. The first one is through Control Panel and the second one is through Registry.
Method-1: Add new Internet Time server by Control Panel
This is the easiest way to add new server in windows 10.Through Control panel you can easily manage Internet Time setting in windows 10. Follow these steps to complete the procedure: –
- Launch Control Panel by any methods as per your convenience.
- Go to Clock, Language, and Region section of Control Panel.
- Here select Date and Time option.
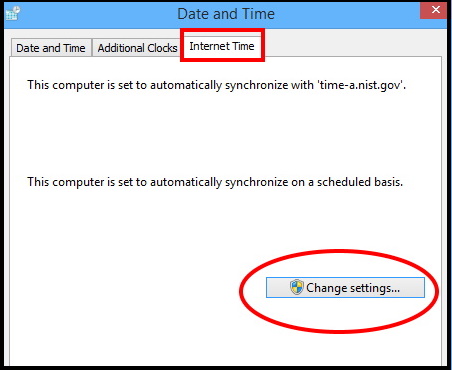
- From the top menu chart, click on the Internet Time tab.
- Now make a click on the Change settings button.

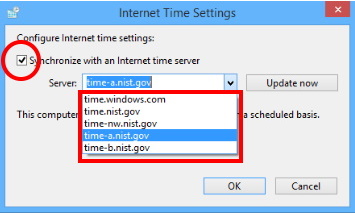
- Mark the tick against the option Synchronize with an internet time server to enable it first.
- Now go to the drop-down menu against server option.
- Type the new address of the time server.
- Click the Update now button to synchronize.
- Make a click on Apply and OK button to save the changes.

Method-2: Through Registry Editor
Going through Registry editor is highly risk. Your silly mistake can cause of grave damage to your system installation. So you should be more careful while going through the registry editor and before starting, create a full backup of your PC.
- Apply Windows key + R keyboard conjoitly to open the Run command.
- Type regedit, and click OK to open the Registry.
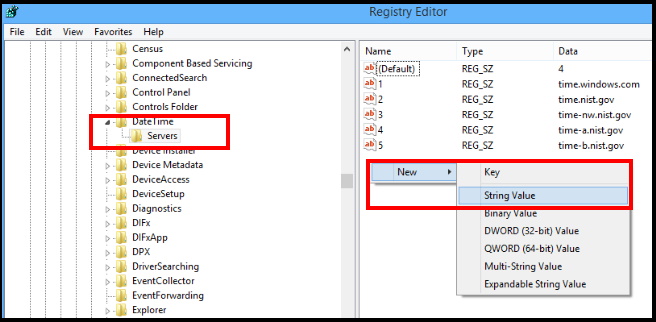
- Now navigate the following path from the left pane of Registry window:
HKEY_LOCAL_MACHINE\SOFTWARE\Microsoft\Windows\CurrentVersion\DateTime\Servers
- On the right side, right-click on the Servers (folder) key, select New, and click on String Value.

- Type a number that would be position of new entry located in the server drop-down menu from Control Panel.
- Apply double-click on the newly created String Value.
- Now type a address of your new server which you want to add.
- Address should be in form of time.abcd.com
- Click OK.
Resolve troubleshoot after new entry
If you change or customize your date and time setting or add new internet time server and accordingly error occurs, you should go through the command prompt to fix the issue. Follow these steps: –
- Open Run Command.
- Type cmd and press Ok.
- Command Prompt window will open.
- Make a right click on it and select Run as Administrator.
- At first disable window time. For this type the net stop w32time command in Command Prompt window.
- Press Enter.
- Now remove all entry of Registry pertains to windows time. For this type the w32tm /unregister command in Command Prompt window.
- Press Enter.
- Now you will have to register default internet time setting. For this type the w32tm /register command in Command Prompt window.It will restore the default setting.
- Press Enter.
- For start the Windows Time service type the following command and press Enter:
- net start w32time
- Type the following command to force your computer to synchronize your computer without waiting and press Enter:
- w32tm /resync /nowait
- Don’t forget to Restart your windows 10 system.
That’s all.
