How to Manage DNS Settings in Windows 10 System. At first we will have to know what is DNS setting? Domain Name System (DNS) is a service through which users achieve their access to Internet. Web browsers interact through Internet Protocol (IP) addresses. DNS translates domain names (www.tips-howto.com) to IP addresses so that browsers could load Internet resources.
Each device required an IP addresses (111,18.189.44) to connect through another device. But IP address are too complicated to remember. So, DNS servers provide the mechanism to communicate friendly domain names (tips-howto.com) into an IP address so that computers can understand.
How to Manage DNS Settings in Windows 10 System
You can improve the experience of internet browsing by change or manage the setting of your DNS server. After change in setting of DNS server, to operate Internet browsing becomes easy. Here is How to Manage DNS Settings in Windows 10 System: –
Change DNS Setting through Control Panel
You may change or manage DNS settings through Control Panel. Go through these steps: –
- Go to Search menu of your Windows 10 system
- Type CP on it.
- Select Control Panel from the top result under best match.
- Click on Network and Internet.
- Thereafter select Network and Sharing Center.
- Make a click on Change adapter settings option from the left pane.
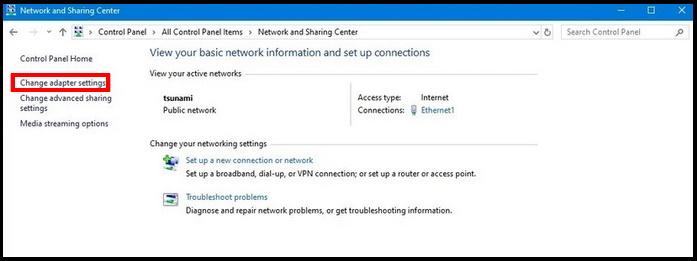
- Then apply a right-click on the network interface that connects Windows 10 to the internet.
- Here select the Properties option.
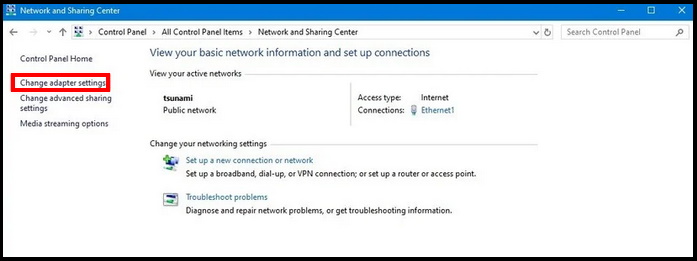
- Select and mark the check against the Internet Protocol Version 4 (TCP/IPv4) option.
- Click the Properties button.
- Select the Use the following DNS server addresses option.
- Type your preferred and alternate DNS addresses.
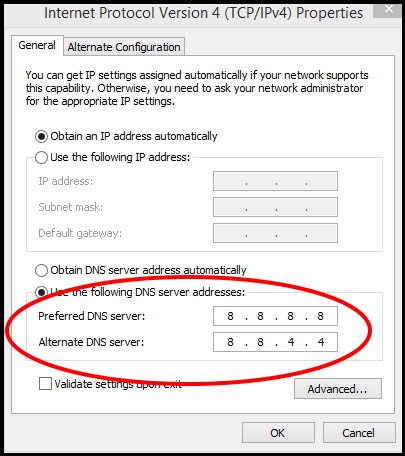
- You may Click the Advanced button.
- Thereafter make a click on the DNS tab from the top menu bar.
- Click the Add button.
- Specify the alternate DNS server address.
- Click the Add button.
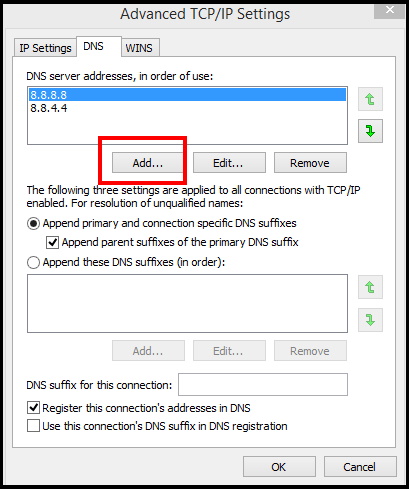
- Then click on the OK button.
- At the end, click on the Close button.
Through Windows Setting
Windows setting app also help in changing DNS settings. To change the DNS addresses go through the Setting app by following these steps: –
- Press Win + I key conjointly to open Windows Settings.
- Choose Network & Internet option from the available list.
- Then click on Wi-Fi (or Ethernet depending on your connection).
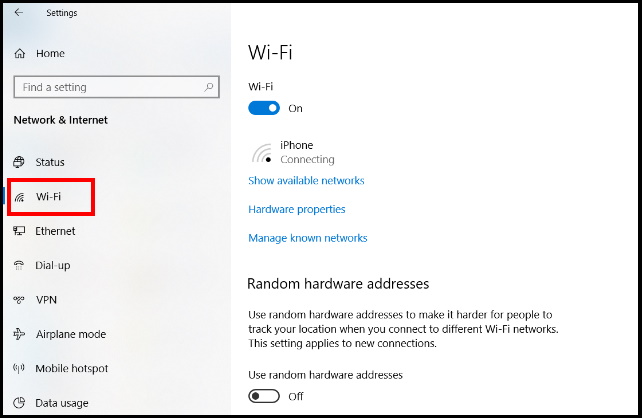
- Select your connection.
- Under the IP settings section, click the Edit button.
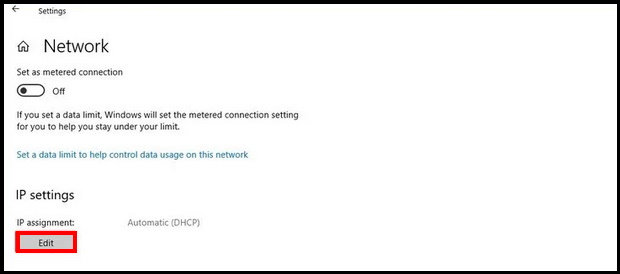
- Now go through the Edit IP settings from the drop-down menu and select the Manual option.
- Here you should turn the toggle button On against IPv4 toggle switch.
- Thereafter confirm your Preferred DNS and Alternate DNS addresses.
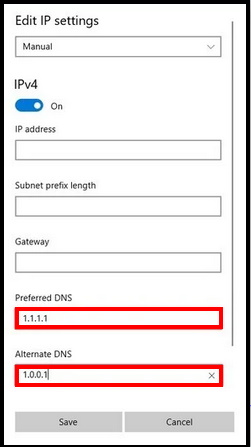
- Click on the Save button.
Use Command Prompt to change DNS Settings in Windows 10
You may also change DNS settings in Windows 10 through Command Prompt. Go through these steps: –
- Open Run Command.
- Type cmd in it and press Enter.
- Command Prompt window will open now.
- Make a right click on it and select Run as Administrator.
- Type the netsh command and press Enter.
- It will open the tool that change the network settings.
- Thereafter type the following command and press Enter: –
- interface show interface
- It will identify the name of network adapters.
Set the Primary DNS
- Type the following command to set the primary DNS IP address and press Enter:
- interface ip set dns name=”ADAPTER-NAME” source=”static” address=”IP address”
Set the Alternate DNS
- Type the following command to add an alternative DNS IP address and press Enter:
- interface ip add dns name=”ADAPTER-NAME” addr=”X.X.X.X” index=2
- In the command, remember to change ADAPTER-NAME with the name of your network adapter and change X.X.X.X with the secondary address that you want to use. Secondary address means, 1.0.0.1.
Reset DNS Settings in Windows 10 System
Sometimes users have to face error in DNS setting and accordingly Internet not working properly in windows 10. When you have issues with your computer not connecting to the Internet properly or if your computer is having difficulty finding websites, then you can try resetting your DNS settings to resolve the issue.
Here are the two ways to reset DNS settings in Windows 10. These are as under: –
By using Run Command
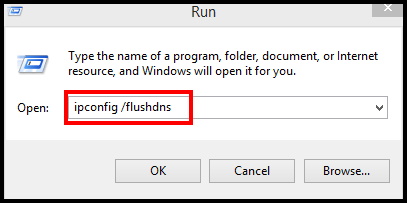
- Open Run dialog Box by pressing Win + R shortcut keys conjointly.
- Type ipconfig /flushdns in it.
- Press Enter.
- A new command window will just appear for few seconds and away soon.
- It will clear DNS resolver cache.
Through Command Prompt
- Open Run Command and Run as Administrator.
- Type the following command after blinking cursor followed by Enter: –
- ipconfig /flushdns
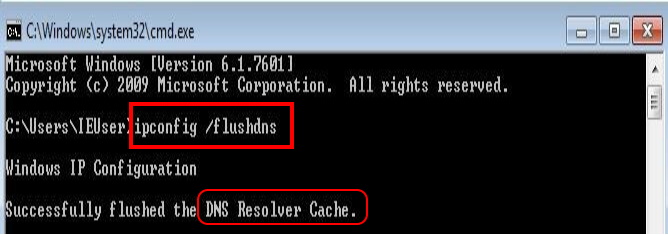
- A message will appear on Command prompt box that Successfully flushed the DNS Resolver Cache.
That’s all.

3 thoughts on “How to Manage DNS Settings in Windows 10 System”