How to Fix WiFi Network not displaying in Windows 10. It is necessary to view wifi network for obtaining internet connection. But, sometimes it happens that, wifi network not displaying in available network list of your system. Here, in this article we will discuss about how to solve this issue with various method. Apply any of these to get rid of this problem. But before further proceeding to its fixes, you must try few initial workaround, so that, if your problem is of minor nature, will be resolved from here.
- Restart your WiFi manually.
- Reboot your computer.
- Check if you can access the WiFi network from another device.
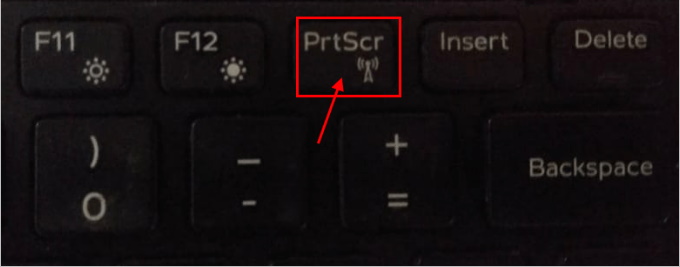
- You may open wifi network through Shortcut key. Press Fn+ the key WiFi assigned to on your keyboard (Ex- Fn+PrtScr on our computer) and check if you can access your network.
If you are still facing this problem after attempting initial workaround mentioned above, then apply these steps.
Once Disable Wifi Network and then Enable wifi
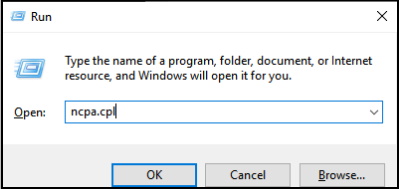
- Press Windows Key+R to launch Run.
- Type “ncpa.cpl” in typing field and press Enter.
- Make a Right click on the WiFi network.
- Choose Disable from the drop down menu.
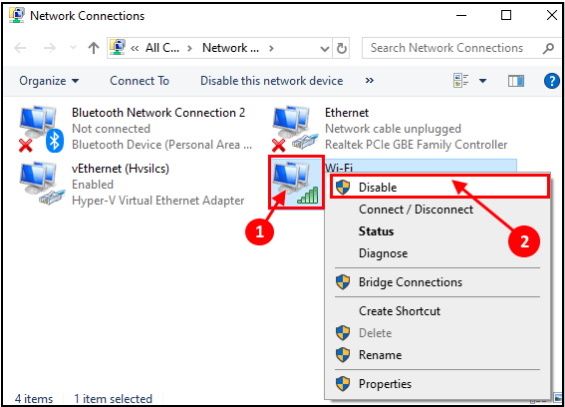
- Wait few seconds and then, again right click on Wifi network.
- Now select Enable from drop down menu.
Check if you can see and connect with the WiFi network. But, if not, proceed to another tips.
Apply Network Troubleshoot to fix WiFi Network not displaying in Windows 10
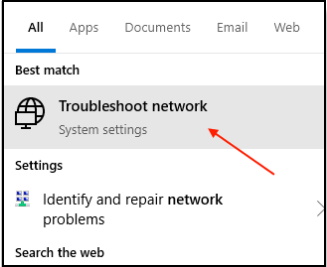
- Type “troubleshoot network” in the search box beside Windows icon.
- Click on “Troubleshoot network“.
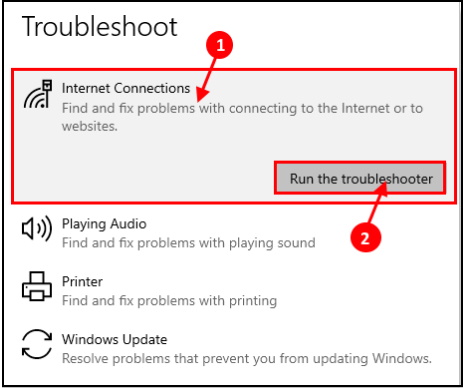
- Now, from the left side of Settings window, click on “Internet Connections“.
- Then click on “Run the troubleshooter“.
- Follow on screen instructions.
- It will automatically attempt fixes for your problem.
- When the process is complete click on “Close“.
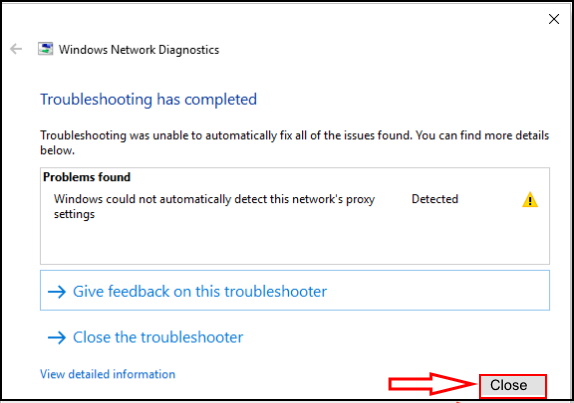
- Now connect to the WiFi network. If you can not connect to the network, you can try troubleshooting adapter for problems.
- From drop down menu, click on “Network Adapter”
- Here click on the “Run the troubleshooter“.
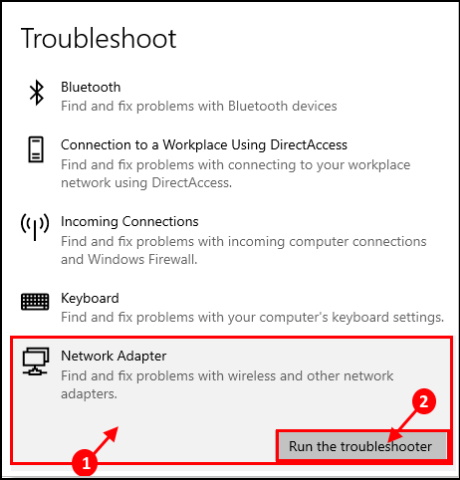
Wait for a while, till the Troubleshooter attempts a fix for your problem. Close the Troubleshooter window.
Reboot your computer and check if you can connect with the WiFi network. Your problem should be solved.
Check any Driver related issue and Update Network Driver
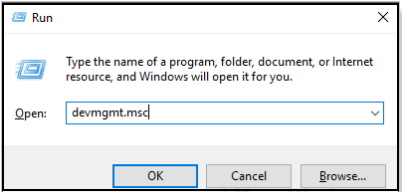
- Press Windows key+ R to open Run.
- Now, type “devmgmt.msc” and hit Enter.
- Device Manager utility will open.
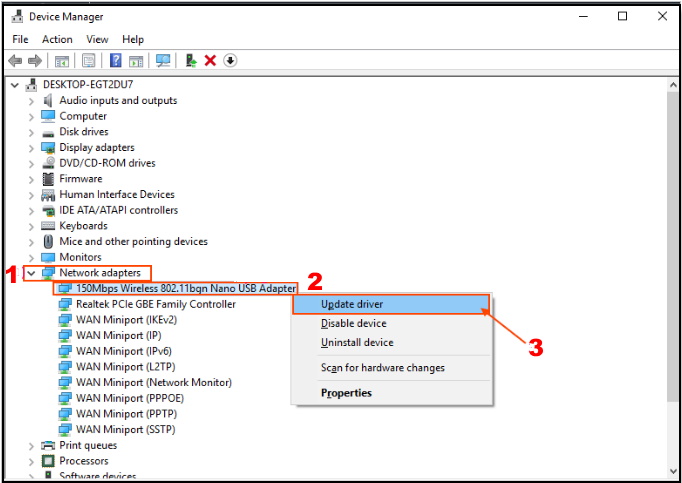
- Under Device Manager window, locate “Network Adapters” from the list.
- click on it to expand it.
- Now, from the drop-down select the driver which you are using .
- Right click on it and click on “Update driver”.
- Here, You will be asked “How do you want search for the drivers?“.
- Choose the option “Search automatically for updated driver software“.
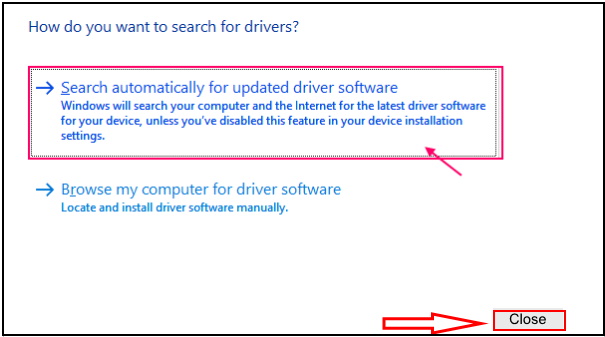
- You should wait till Windows searches for compatible driver for your WiFi driver, downloads it and installs it.
- Close Device Manger window. Then, reboot your computer.
- Check if you are able to see and connect to the network.
Disable Microsoft Wifi Direct Virtual Adapter
- Open Run Dialog Box.
- Type “devmgmt.msc” to open Device Manager window.

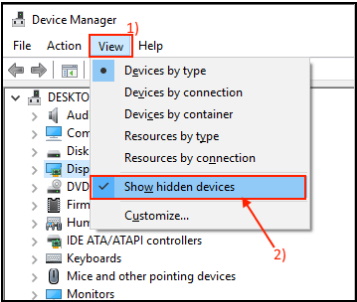
- Now, click on “View” option from Device Manager Menu bar located at top.
- Then click on “Show hidden devices“.
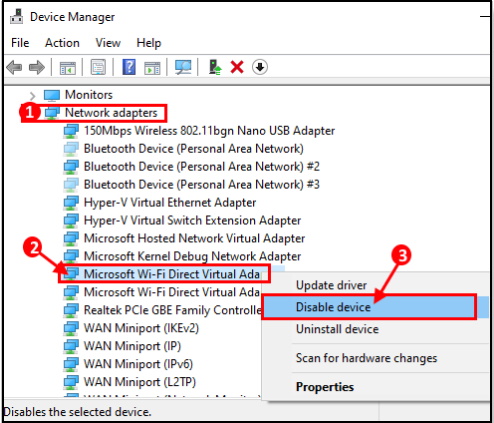
- From the list of the devices, expand “Network adapter”.
- Locate “Microsoft Wi-Fi Direct Virtual Adapter”.
- Make a right click on it.
- Here, click on “Disable device” to disable it.
- You must Reboot your computer and check if you can find the WiFi network on your device.
Reinstall Wifi Driver to Fix Wifi network not displaying in Windows 10
At first, you will have to Uninstall your Wifi driver, if already installed in your system. Follow these steps to uninstall your WiFi driver : –
- Open Run.
- Now, type “devmgmt.msc” and press Enter.
- Device Manager utility will open.

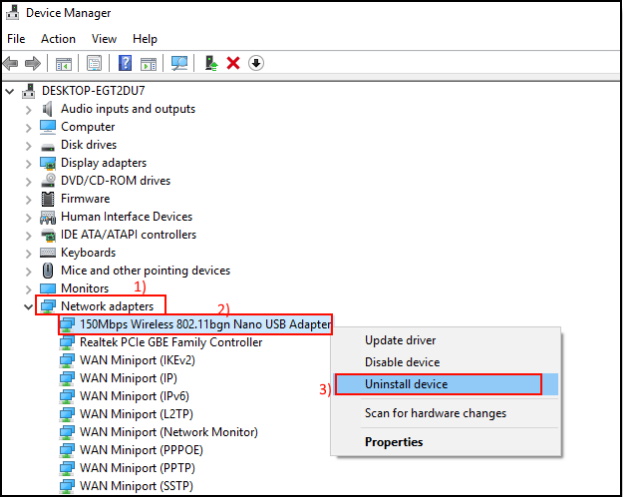
- In the Device Manager utility window, find out “Network Adapter” option.
- Select it to expand. It will show you available drivers.
- Right click on the WiFi driver you are using.
- Now click on “Uninstall device“. This will uninstall the driver.
Now, we will install the WiFi driver again by following steps. Here we will complete this task by three simple methods.
Method 1
Just reboot your computer and Windows will install the uninstalled driver itself. You will have your WiFi driver working fine again.
Method 2
If rebooting your computer didn’t install the driver then you have to install the driver yourself. Follow to install the driver manually :-
- Open Device manager window.
- Click on “Action”.
- Again click on “Scan for hardware changes“.
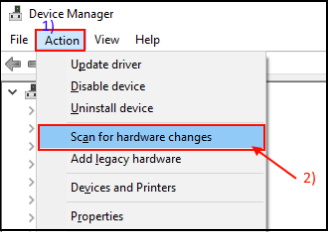
- This will locate the uninstalled driver.
- Install the driver again.
Method 3
- Open Device Manager.
- Click on “View” option from the menu bar of Device Manager.
- Then click on “Show hidden device“.
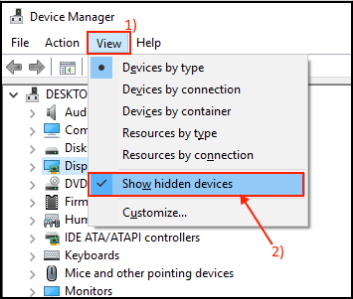
- Now all hidden drivers will be visible.
- Find out your WiFi driver.
- Your WiFi driver will have a yellow triangle with its name (as it has no installed driver).
- Right Click on the WiFi driver.
- At last click on the “Update driver software“.
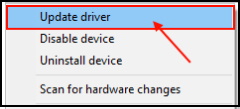
- You will be asked “How do you want search for the drivers?“.
- Choose the option “Search automatically for updated driver software“.
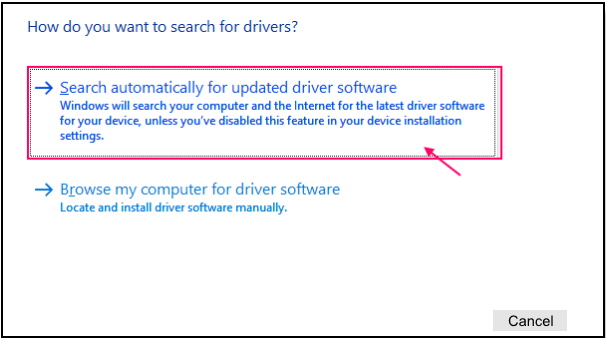
- Wait till Windows searches for compatible driver for your WiFi driver, downloads it and installs it.
- Close Device Manger window.
- Restart your computer to save the changes.
- Check if you can access the WiFi network.
Remove Wlansvc Service Files
- Press Windows Key+R to open “Run”.
- Type “services.msc” and click on “OK”.
- Services window will open.
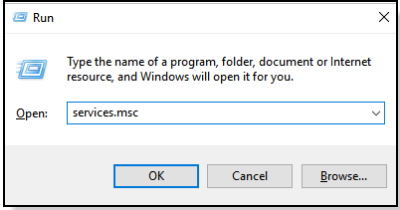
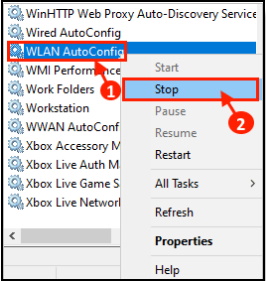
- Search “WLAN AutoConfig” service.
- If find, right click on it.
- Then click on “Stop” to stop the service. Close Services window.
- Now, press Windows key+R to open Run.
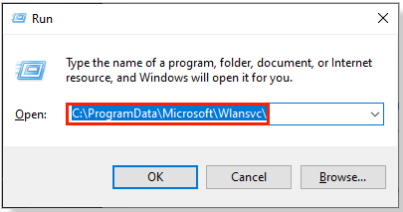
- Copy the below mentioned address and paste it in Run window.
C:\ProgramData\Microsoft\Wlansvc\
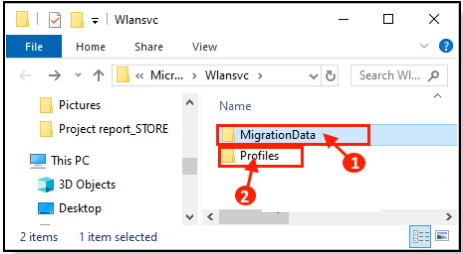
- Wlansvc windows will appear.
- Delete any folder except the folder named “Profiles“.
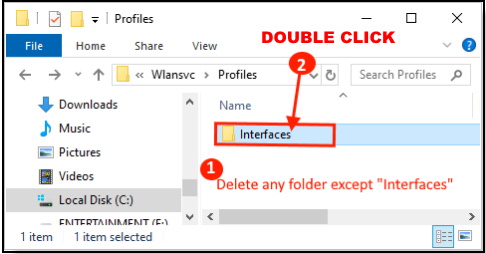
- Make a double click on “Profile folder” to open it.
- Now, under “Profile folder” delete any folder/files except “Interfaces” folder.
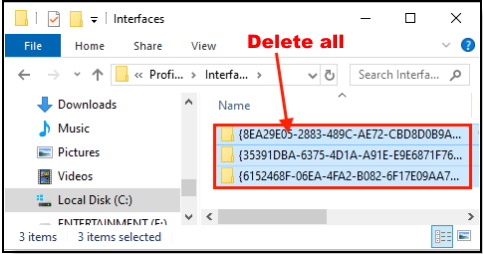
- Open “Interfaces” folder.
- In “Interfaces” folder, delete all folder.
- Now, again open RUN Dialog Box.
- Type services.msc in it.
- Press OK to continue.
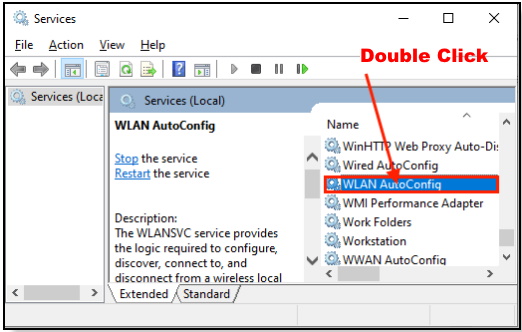
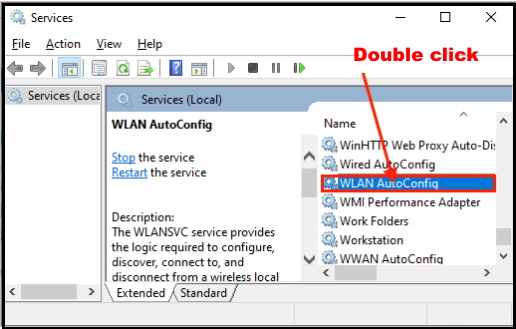
- Under services window, make a double click on WLAN AutoConfig to open its Properties.
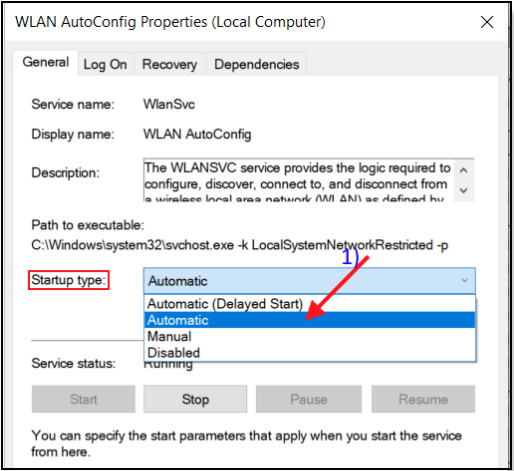
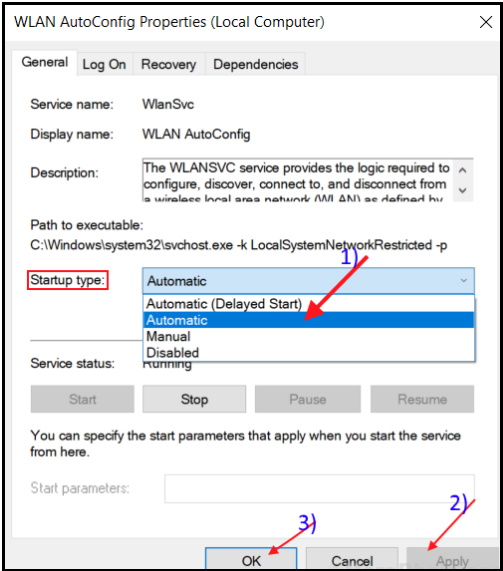
- After that, click on the option Startup type from the drop down menu appeared.
- Here, select Automatic.
- Then, click on Apply and OK.
- Now, reboot your computer.
After rebooting you should check if you can connect to the WiFi network or not.
Apply Clean Boot to fix Wifi network not displaying in windows 10
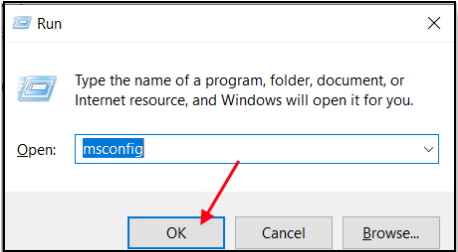
- Press Windows Key+R to launch Run.
- Type “msconfig” and click on “OK“.
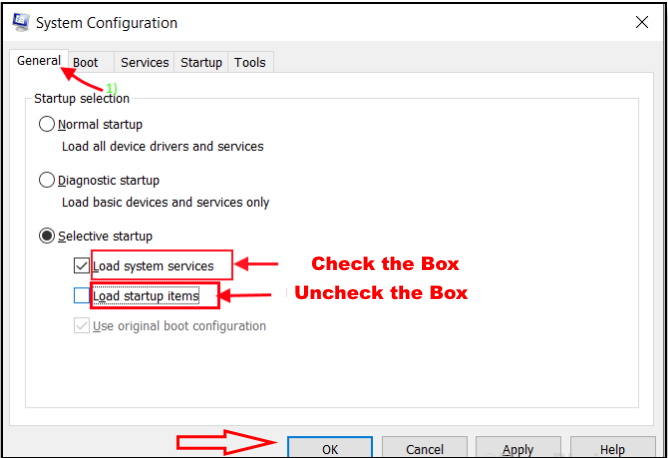
- System Configuration will open.
- Click on “General” tab and then uncheck the box beside the “Load startup items“.
- Ensure that the “Load system services” is duly checked.
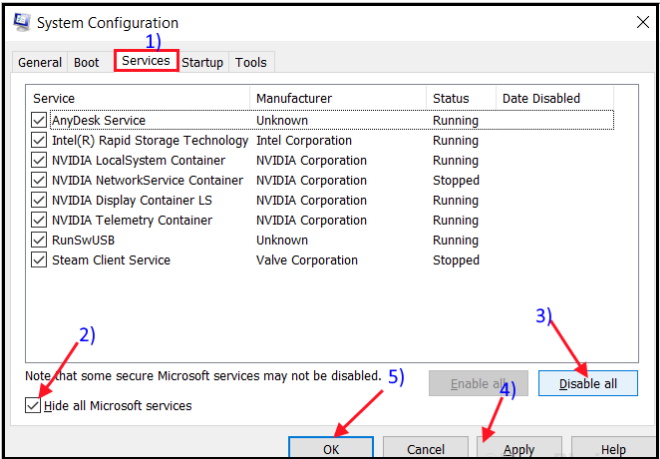
- Here, Click on the “Services” tab.
- Then check the “Hide all Microsoft services”
- After that click on the “Disable all” .
- Now, click on “Apply” and “OK“.
- You must Reboot your computer, it will be booted in clean mode.
- Check if the error is still happening or not. If the error is still there then go for the next fix.
Select Startup type as Automatic to fix Wifi network not displaying in windows 10
- Press Windows Key+R to open “Run”.
- Write “services.msc” and click on “OK”.
- Services window will display.

- Now, in the Services window, double click on “WLAN AutoConfig” to open its Properties.
- Check if the “Startup type:” set to “Automatic“.
- If not, then click on the drop down of “Startup type:”
- and set it to “Automatic“.
- Also, check if the “Service status:” is “Running“.
- If you see, the Service status is “Stopped” then click on “Start” to start the process.
- Now, click on “Apply” and then on “OK” to save the changes.
- Now, in the Services window, repeat as per step-3 above for these necessary services also-
DHCP Client
NetworkSetup ServiceNetwork Connected Devices Auto-Setup
Network Connection Broker
-Network Connections
=Network Connectivity Assistant
Network List Service
=Network Location Awareness
Network Store Interface Service
(For each of the services, you will have to double click on each of them, check their “Startup type:” and their “Service Status:“).
Hopefully, you will be able to view your Wifi network in windows 10.

