How to Fix “Webcam not working Properly” in Laptop in Windows 10. There are many reasons of webcam not working properly in Windows 10. Webcam driver or few changes in privacy setting may be a cause of this issue. In this article, we will discuss about its initial work around as well as as necessary solution to fix webcam not working properly in windows 10.
Initial Workaround
- If your webcam connects your PC through USB, Unplug it once and plug it in again. This may be a shortest and fastest way to resolve this issue.
- Powering the webcam off and on again will reset it.
- Try plugging it into a different USB port. If your Windows 10 device isn’t detecting your USB webcam at all, try another port.
- Restart your computer. Restarting a Windows 10 computer, laptop or tablet can often fix such a issue.
- Unplug and restart. Try a combination of the previous two solutions. Unplug the USB webcam, restart your computer, and then plug the webcam back in again.
- If you are using camera in your system via Bluetooth, you must check your Bluetooth connection. Make sure Bluetooth is enabled in Windows 10 so that your device can detect it.
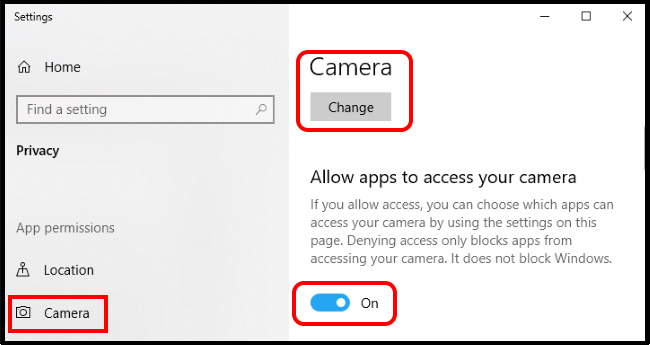
In Windows 10, the Settings app has a few switches that disable your webcam in all applications. If you disable your webcam here, even desktop applications won’t be able to use it.
- Open Setting app.
- Go to the Privacy.
- Here select Camera option.
- At the top of the window, ensure it says “Camera access for this device is on.”
- If it says camera access is off, click the “Change” button and set it to “On.”
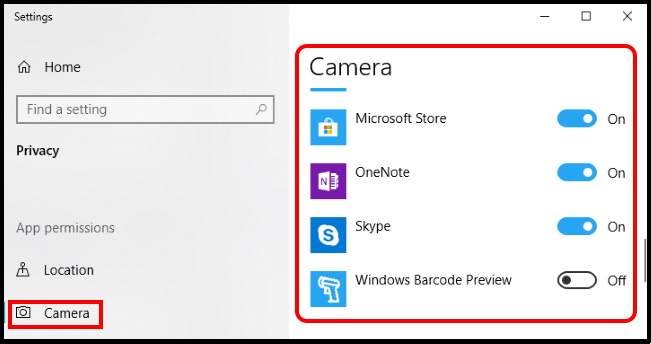
- Now go to the option “Choose which apps can access your camera,”.
- Here, you should ensure the app that wants to access your camera isn’t listed and set to “Off.”
- If it appears in this list, set it to “On.”
How to Fix “Webcam not working Properly” in Laptop in Windows 10
If none of the above initial work around effective, you should try to Reinstall Webcam driver in windows 10. At first, try to uninstall it and again install it. Device drivers keep things running correctly, and updates are often required to maintain compatibility with that latest versions of Windows. Follow these steps: –
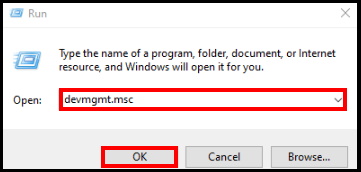
- Open Run Dialog Box.
- Type devmgmt.msc.
- Then, press enters or click on OK to open the Device manager.
- Here, find out the webcam driver in your system. It will available under the head ‘Cameras’ or ‘Sound, video and game controllers’ or ‘imaging devices’.
- Make a double click on it to expand.
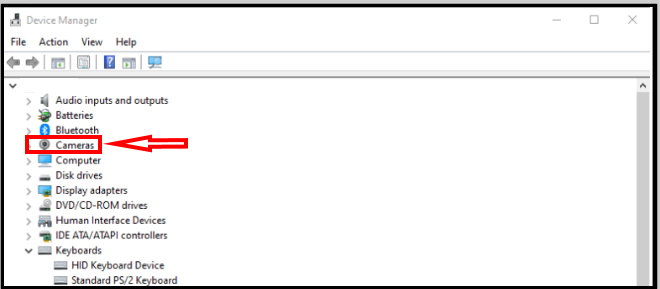
- Now, right click on the driver.
- Then, from the drop down menu, click on ‘Uninstall device’.
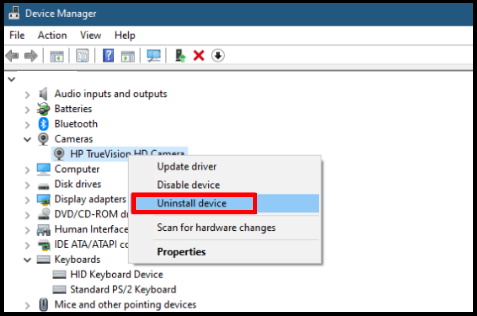
You must reboot your system after successfully uninstallation process.
For reinstallation of webcam driver, the system automatically installs the drivers bringing out from system files once you restart the system.
Thnx…

3 thoughts on “Tips : How to Fix “Webcam not working Properly” in Laptop in Windows 10”