How to Configure Local Group Policy Setting for Users in Windows 10. Local Group Policy Editor in windows 10 Pro edition provides the administrator a control over system to customize system setting for users which not covered through Setting app as well as control panel. If you share your windows 10 system with other users and create a group of users, all are bound with a Local Group Policy. Administrator keeps all control through Group Policy Editor. You can prohibit other users from using or operating such processes you want to keep with your command.
If administrator makes any changes, it affects all the users in the group. Now a question is arises, is it possible that group policy apply for only the specific user. Today we are going to discuss this point and will see how to Configure Local Group Policy Setting for a specific user in Windows 10.
How to Configure Local Group Policy Setting for Users in Windows 10
Here is the process to configure Local Group Policy for a specific users in Windows 10: –
To configure advanced settings for specific users on Windows 10, use these steps:
- Go to the Windows Search.
- Type Console in it.
- Microsoft Management console (MMC) option will display as top result.
- Select it to open.
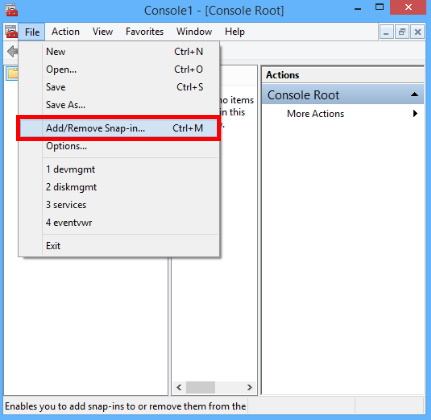
- Now make a click on the File menu from the top menu bar of Console Root window.
- Here, select the option Add/Remove Snap-in from the context menu

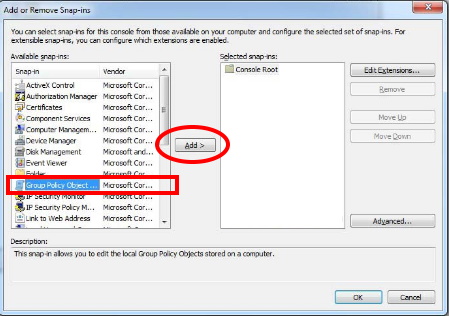
- Now Add or Remove snap-ins window will open.
- Navigate the option Group Policy Object Editor under the Available snap-ins section.
- Thereafter make a click on the Add button.

- Click on Ok button.
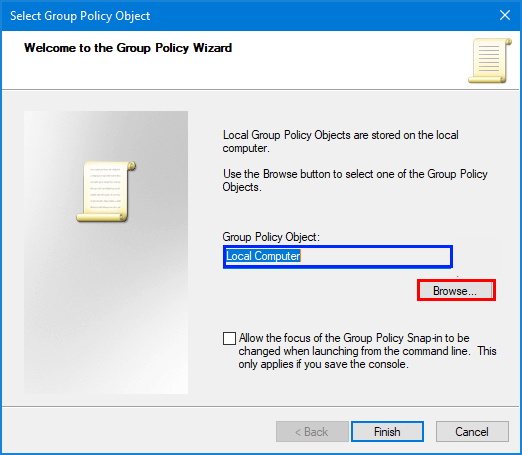
- Now Group policy wizard will open to select Group policy object.
- Make a click on the Browse button.

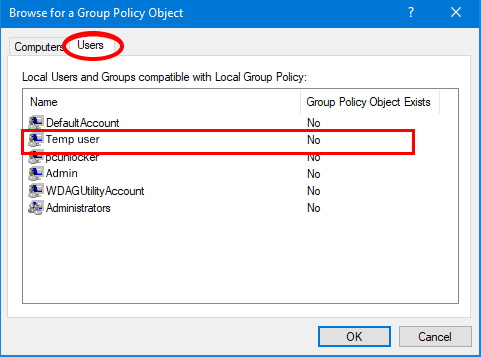
- Now Browse for a Group Policy Object window is open.
- Here click on the Users tab.
- Select the user or group you which you want to provide a specific setting.
- Click the OK button.

- To end the process, click the Finish button and then click on Ok button.
- Now go to the File menu again.
- Click on it and select the option Save as from the drop down menu.
- Provide a name for the snap-in.
- Also provide a location to store the console.
- Click the Save button.
Now setting is over for a specific user. Your changes will only be made for that specific user which you set a console.
That’s all.

1 thought on “How to Configure Local Group Policy Setting in Windows 10”