How to Fix Google Chrome Not Working Error in Windows 10. Today most of the users set Chrome as their default Browser. Because Google Chrome is the best browsing platform around the world. But after all, it is also a software and having bugs and errors like other software. Users reported the various forms of errors in respect of Google Chrome such as: –
- Google Chrome not responding in Windows 10, 8, 7.
- Chrome not opening in Windows 10 PC, Laptop.
- Chrome freezing while opening.
- Google Chrome not working in Windows 10
- Chrome web store not working.
- Chrome Extension not opening.
- Failed to chrome download.
- Google Chrome update not working.
- Chrome not opening but running in background
- Chrome not opening after windows update
Causes of “Chrome not Working error” in Windows 10
The following are the possible causes of “Google Chrome not working error” in windows 10. These are responsible to lead Chrome to crash, hang or non-responding: –
- Any RAM issue
- Outdated Chrome
- Affected by Viruses
- A lot of Extension added to Google Chrome
- Full with browsing history, cookies and caches
How to Fix Google Chrome Not Working Error in Windows 10
There are various methods that could help you to resolve the Chrome not working error in Windows 10. However, there are chances that not every solution would work for you. Depending on why Chrome has stopped responding, the solutions would work.
Ways-1: Clear Browsing History, Cache and Cookies
This is the first workaround, you should apply. Browsing History, Cookies, Cache consume a lot of memory and may be overloaded on Chrome browser. And as a result, Google Chrome not working error properly or responding very slow. Follow these steps to complete the process of deleting Browser history, cache and cookies:
- Open Google Chrome.
- Here you may apply two ways to proceed.
- The first one is, go through the three dot line at the top right corner of the page.
- The second one is, press Ctrl + H.
- The History page will open as under.
- Here select Clear Browsing data option.
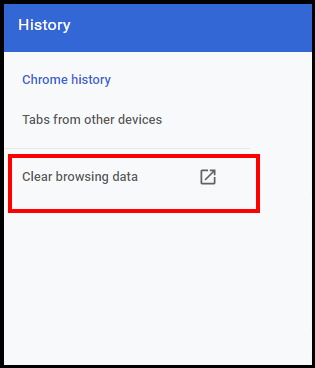
- A new window will open now.
- Here select Time range as All time.
- Thereafter click on Clear Data.
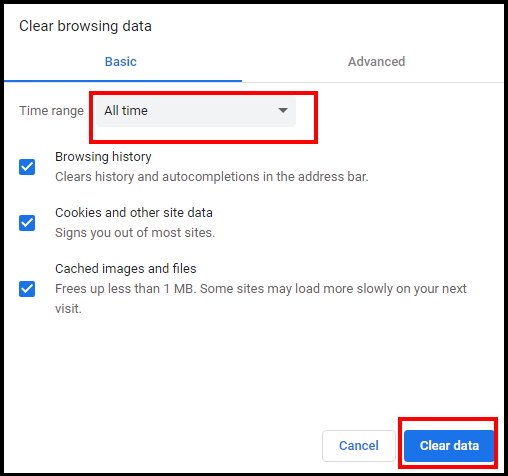
- It will clear your browsing history, Cookies and other site data, Caches images and files of Chrome.
- Restart Chrome. It will definitely resolve responding issue of Chrome Browser. If not, go through the next method.
Also Read: How to Delete Activity History of Google Account in Android
Ways-2: Update Google Chrome App to Fix Google Chrome Not Working Error in Windows 10
Outdated App may be a cause of not responding chrome App in Windows 10. So you must update the App with latest version to resolve the issue. Follow these steps: –
- Open Chrome browser.
- Go to the right top corner and click on three dot.
- Select the Help option from the drop down menu.
- Thereafter select the option About Google Chrome.
- A new window will open in your Chrome browser.
- Now, Chrome will start looking for the latest version.
- If a new version is available, it will automatically start updating Google Chrome.

- After completion of updating procedure, click on the option Relaunch.
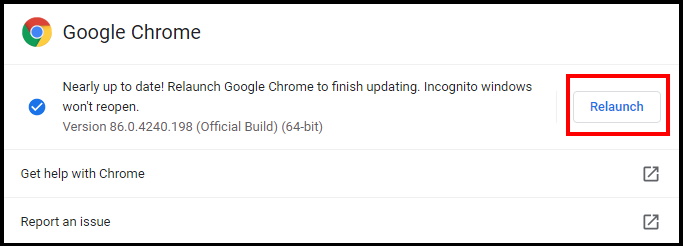
- Now Google Chrome will function as usual.
- If problem still, go through the next fix.
Ways-3: End Chrome Processes from Background through Task Manager
Even after closing of Chrome App, it keeps running in background and it may lead to generate error and a cause of Chrome not working error or responding in Windows 10. You should close its processing through Task Manager.Go through these steps: –
- Open Task Manager by pressing Ctrl+Shift+Esc shortcut keys conjointly.
- From the top menu bar, select the tab Process.
- Here, you will see all the processes running in Windows.
- Find out the Chrome App from the list.
- If found, select it and click on End Task button.
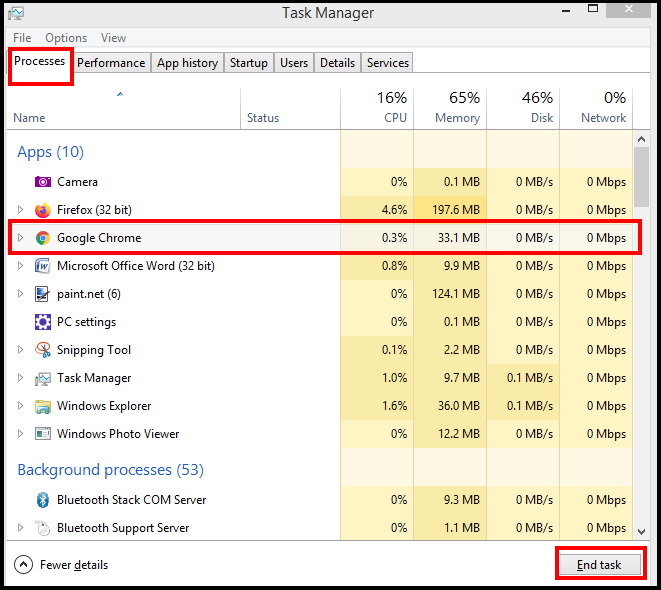
- This will eventually shut down all the Chrome processes running in the background.
- Now check the process list whether Chrome is appearing or not. If appear then apply this method once more by using the End Task button.
- You should repeat this process till the chrome fully closed.
- Start Google Chrome again and see if the Google Chrome is not working error occurs again.
If your issue was not fixed, then you can go for the next method.
Ways-4: Remove Unnecessary Extension from Chrome App
A lot of Extension may be a reason of Chrome app not working properly in Windows 10. There is a possibility of any extension having malware or corrupted and leads to error in responding Chrome App in Windows 10. If you find any unnecessary extension added in Chrome, which is no longer in use, simply remove it and resolve the issue. Here’s how to remove Chrome extensions: –
- Go to the three dot from the right top corner of Google Chrome Browser page.
- Select More tools from the drop down menu.
- Again a sub menu will open.
- Here you will find the option Extension.
- Make a click on it to open.
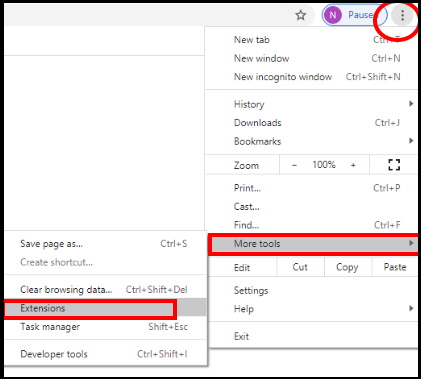
- The Extension menu will open in a new tab.
- Thereafter choose that extension which you want to remove and no longer in use.
- Make a click on the Remove option of those extensions to remove them from Chrome.
Now check whether your issue regarding Chrome not working resolved or not. If problem still exists, remove few more extensions from the App. It will definitely fix the issue. You should keep a point in mind that no more extension will be added till the Chrome began to respond smoothly.
Ways-5: Go to the Default Setting of Google Chrome
If you made any changes in Chrome App and sudden the error Chrome not responding appear, you must restore default setting. Apply these steps to set default setting of Chrome: –
- Make a click on the three dot from the right top corner of Google Chrome Browser page.
- Select Setting option from the drop down menu.
- Now a new setting window will open.
- Here, from the left menu, select the option Advance.
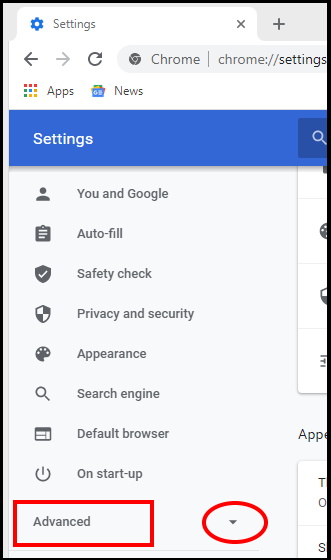
- A sub menu will open.
- Select the option Reset and clean up.
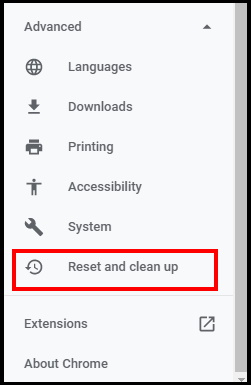
- Under Reset and Cleanup section, click on the Restore settings to their original defaults option.
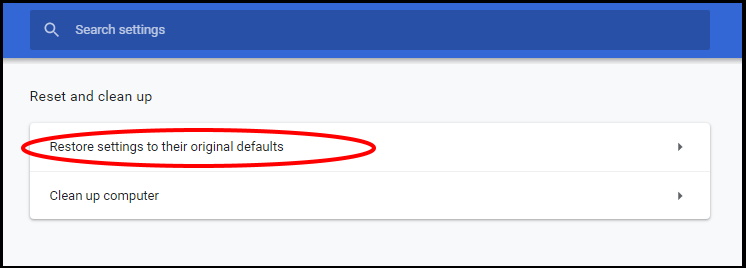
- Now a confirmation window will pop up on your screen.
- You should confirm the action to begin the reset.
- Once the reset is complete, restart Chrome browser.
Ways-6: Reinstall Chrome to Fix Google Chrome Not Working Error in Windows 10
Reinstalling Chrome App is also an another way to fix the issue regarding Chrome not working in Windows 10. Old Chrome app may be corrupted or having any issue that restrict to respond properly. For reinstalling, you should uninstall the old Chrome app from your system.
- Open Control Panel.
- Choose Programs & Feature option.
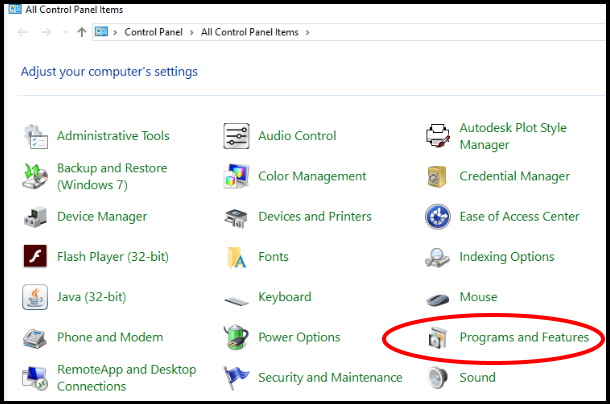
- Under Uninstall or Change a program section, navigate the Chrome app.
- If found, make a click on it and select the option Uninstall.
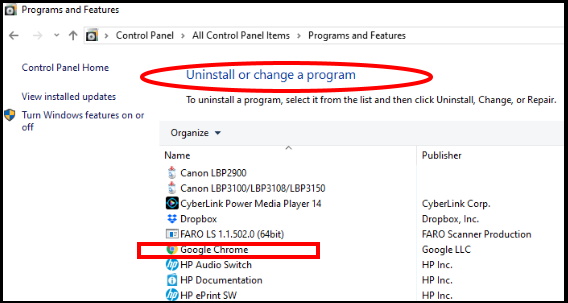
- Now Chrome will be uninstalled from your PC.
- Now, you will need to reinstall Chrome.
- For this, open any other alternate browser that you have on your PC.
- In the browser, open Google.com, and in Google, type “download Chrome“.
- From the search result, open the Chrome’s website and download Chrome.
- Thereafter Install it.
Ways-7: Apply System File Checker to Fix Google Chrome Not Working Error in Windows 10
Any corrupt file system in your windows 10 system may be a cause of Google Chrome not working error. SFC scan is the best option to check corrupt system file exists in your computer. If an error exists there, and when found, it automatically fixes those errors. If you are receiving an error while using Chrome browser, it is quite possible that it is due to any System File errors. You can try to run an SFC Scan to resolve the issue. Follow these steps: –
- Go to the search option from the Start menu.
- Write cmd under the search box.
- Select Command Prompt from the best result.
- Apply a right click on the Command Prompt.
- Select Run as Administrator option from the drop down menu.
- Type sfc /scannow and press Enter.
- Now above command will run and complete the scan of tour system.
- Restart your system.
- Check whether your issue still exist or not.
Ways-8: Run DISM Tool
Even after completion of sfc scan, you are facing the same issue again, you will have to run a DISM or Deployment Image & Servicing Management Scan on your PC. Through DISM scan, you can repair corrupt system files that was not scanned through SFC scan. To run a DISM scan,follow these steps: –
- Open Command Prompt window.
- Apply a right click on it and select Run as Administrator.
- Type the following command in black window after blinking cursor: –
- DISM /Online /Cleanup-Image /RestoreHealth
- Press Enter.
The DISM scan will also take some time to complete. When the scan is finished, you will have to run the SFC scan again.
Ways-9: Reset IP and Clear the DNS Cache to Fix Google Chrome Not Working Error in Windows 10
There is a possibility that your DNS Cache or IP settings is restricting Chrome app to access the Internet and accordingly performance of Chrome app affected. As a result, Google Chrome app not working error appears. In this case, you must apply flush the DNS Cache and Reset IP address. Here are the steps to do so:
- Open Command Prompt in Admin mode in Windows 10.
- For this, press the Windows + X keys together.
- Make a click on the Command Prompt (Admin) option.
- A confirmation window will open on your screen.
- Press Yes to give your permission.
- In the Command Prompt, you will have to run the following two commands followed by Enter key on each time: –
- ipconfig /flushdns
- netsh winsock reset
These two commands will flush DNS Cache and reset IP respectively. After this, run Chrome and check if you are able to access the internet without any kind of error.
Ways-10: Turn Off Proxy in your Windows 10 System
Your system proxy setting may be a cause of Chrome not working error. There is a possibility of conflict between Proxy settings and Chrome, so you must turn off Proxy settings if it is enabled.
- Press Win + I shortcut key to open Windows Settings.
- In the Settings menu, click on the Networks & Internet section.
- Now from the left pane of setting window, click on the Proxy option.
- Thereafter go to right pane of same page.
- Here, you will see the Proxy menu.
- There, disable the Automatically detect settings if enabled, then click on the Save option.
This will disable the Proxy settings on Windows 10. Now check if you are able to access internet on Chrome without any error.
Ways-11: Allow Chrome through Windows Defender Firewall
The tendency of firewall is to restrict Internet access to certain apps. In this situation, you should allow the Chrome app through Windows Defender Firewall.
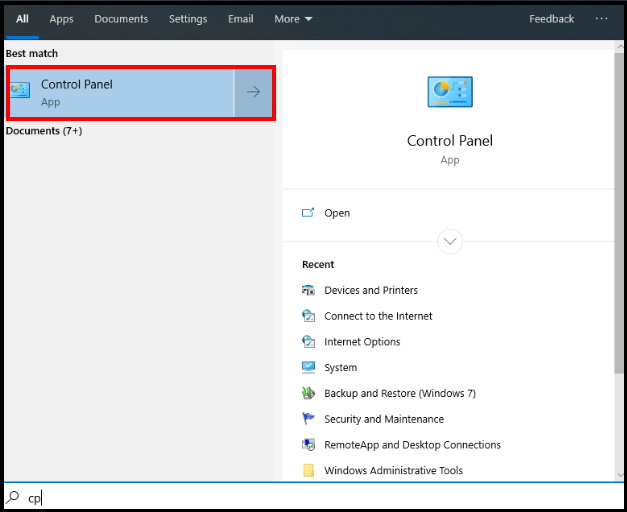
- Go to the Windows Search and type cp in it.
- Select Control Panel as the Best match.
- Now navigate the option Windows Defender Firewall.
- In Windows Defender Firewall, from the left pane of window, select the option Allow an app or feature through Windows Defender Firewall.
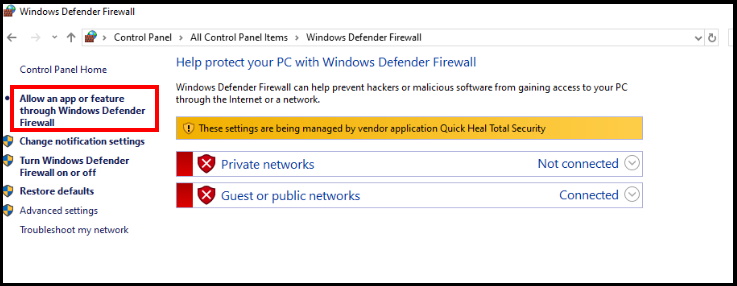
- A new window will open now.
- Here select the option Change Setting.
- And further go to bottom of the page and make a click on Allow another App.
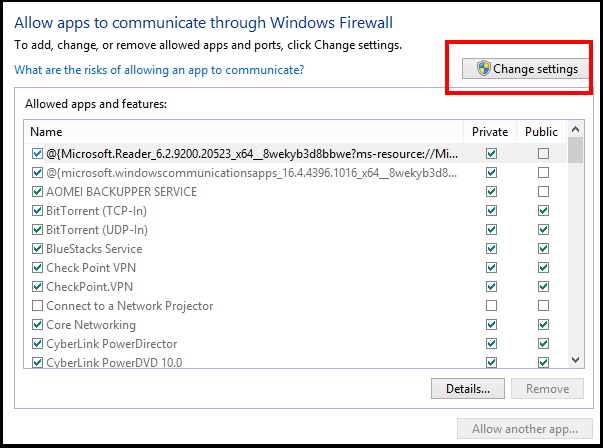
- Select Google Chrome and Press Ok button.
That’s all.
