How to fix Gamepad not connecting in Windows 10. You may call Gamepad as Joypad or Game Controller also. It helps in connecting the gamer for a console gaming system. Gamepad consisting two Joysticks and multiple types of buttons that controls the game. You can connect the Gamepad to the windows 10 system through USB or wireless or through Bluetooth. But Sometimes users have to face connection issue of Gamepad. Gamepad failed to recognise or connect to windows 10 PC. Here in this article we will see How to fix Gamepad not connecting in Windows 10.
How to Fix Various Xbox Game Bar Error in Windows 10
How to fix Gamepad not connecting in Windows 10
Here are the various ways to fix Gamepad not recognised or connecting in Windows 10.
Initial Workaround
Before putting extra effort, you should try initial workaround to fix the issue, so that your problem resolved at initial stage.
- Check Gamepad Controller. You must check your Gamepad or Joypad controller functionality. Check USB connection of controller. whether it is well connected or not.
- Change PC. You should check same device to another PC. There may be a possibility of PC issue. If the controller works on those systems, it means that the manufacturer hasn’t released a compatible Windows 10 driver.
If none of the above mentioned initial steps resolve your issue, try the following fixes: –
1. Install the latest Gamepad Driver
Outdated driver may be a cause of Gamepad not recognised or connected in Windows 10. You must download and install latest Gamepad driver to resolve the issue. Follow these steps to download latest Gamepad driver: –
- Download the latest driver from authorised Manufacturer.
- Apply a right-click on the setup file to locate Properties.
- Now go to the Compatibility tab from the top menu bar.
- Make a click on the option Run this program in compatibility mode for and choose the operating system prior to your Windows 10 upgrade from the drop-down menu.
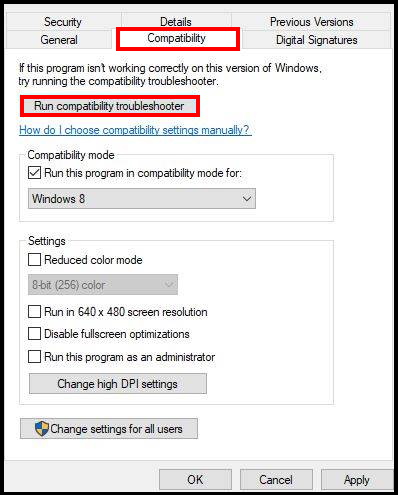
- Thereafter complete the installation process.
- Restart your system once installation process finished.
2. Run the Hardware and Devices Troubleshooter to fix Gamepad not connecting in Windows 10
You should apply Windows in-built tool Troubleshooter. It will detect the issue and fix them automatically. Go through these steps to complete the process: –
- Press Windows Key + I to open Windows Settings app.
- Go to Update & Security section.
- Choose Troubleshoot from the left menu.
- Now, in the right pane select Hardware and Devices and click Run the troubleshooter button.
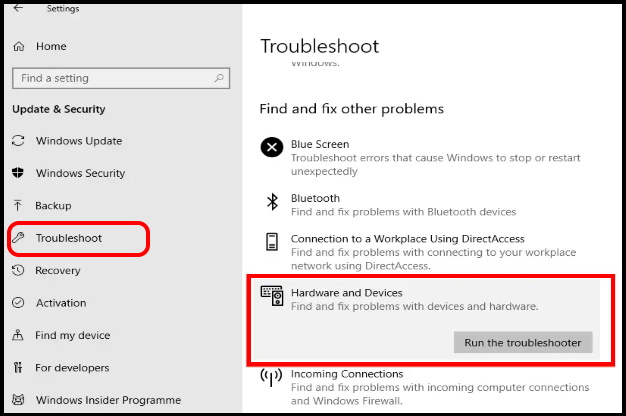
- Follow on-screen instructions to complete the process.
- Windows will automatically detect the issue and fix them accordingly.
3. Check the Power Management of USB Serial Bus Controllers
Sometimes for power saving of your system, some devices are disable in Device Manger. You should check it and make it enable. Follow these steps: –
- Open Device Manager.
- Navigate the option USB Serial Bus controllers.
- Make a click on it to expand.
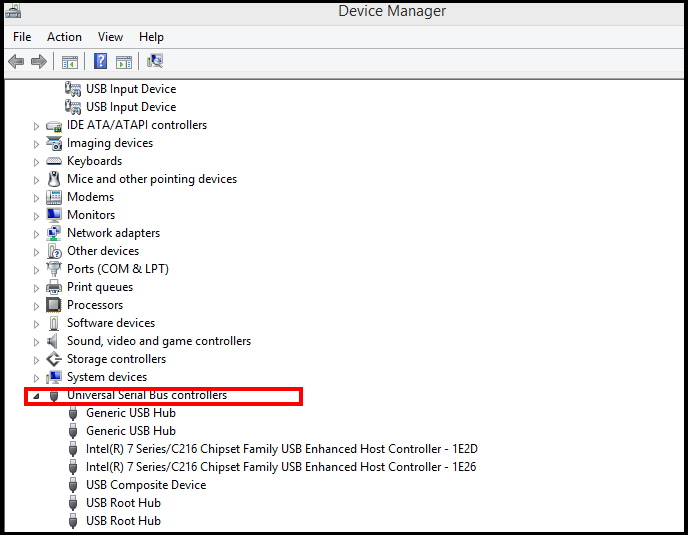
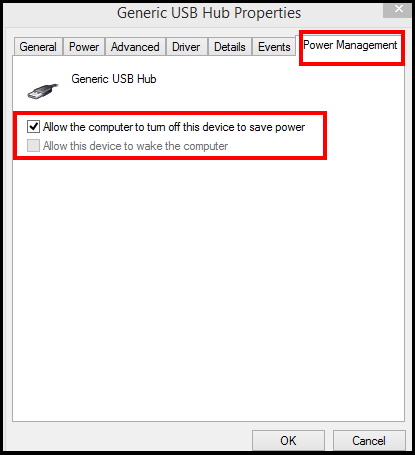
- Right-click the USB Root Hub and choose Properties / Power Management.
- Now go to the option Allow the computer to turn off this device to save power.
- Uncheck this box if it found checked.
4. Disable and Re-enable Gamepad to fix Gamepad not connecting in Windows 10
Re-enabling your Gamepad may resolve the issue. First disable it and again enable it by following these steps: –
- Open Device Manager and find out your gamepad.
- Make a right-click on it and choose Disable from the drop down menu.
- A confirmation dialog will now appear.
- Choose Yes to disable.
- Now wait for a few moments, right-click the disabled gamepad again and choose Enable from the menu.
- Once the gamepad is enabled, Windows will recognize it and try to install the necessary drivers for it.
5. Customize your system Power Plan Setting
- Go to start.
- Type power option in the search bar.
- Select the Power option from the top result as Best Match.
- Power Option windows is open now.
- Here find out your current plan and make a click on Change plan settings.
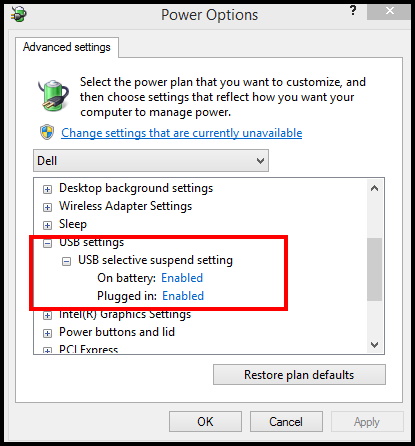
- Thereafter click on Change advanced power settings.
- Navigate to USB settings / USB selective suspend setting. Set it to Disabled and click Apply and OK to save changes.
6. Update Generic USB Hub Drivers to fix Gamepad not connecting in Windows 10
- Open Device Manager.
- Find out USB Root Hub device.
- Apply a right-click on the USB Root Hub device.
- Select Update driver.
- Select Browse my computer for driver software.
- Now click on Let me pick from a list of available drivers on my computer.
- Select USB Root Hub from the list and click Next.
- Repeat the same procedure for all USB Root Hub drivers.
7. Reinstall your Gamepad Device
- Open Device Manager
- Navigate your gamepad from the list.
- Make a right-click on it and choose Uninstall device.
- When the confirmation dialog appears, click on Uninstall.
- Once the driver is removed, restart your PC.
- After your PC restarts, Windows will install the missing drivers.
Hopefully the issue regarding gamepad not recognising or connecting in Windows 10 will resolve.
Users also reported for
- USB gamepad not recognized on Windows 10, 8, 7
- Gamepad not detected on Windows 10
- Xbox gamepad not recognized
- Gamepad not working in PC games
- Gamepad not in Device Manager
That’s all.

1 thought on “What to do if Gamepad not connecting in Windows 10”