15 Ways to Fix WHEA_INTERNAL_ERROR Blue Screen in Windows 10. There are various type of Blue screen error exist in Windows 10 and we have seen them in our previous article. “Windows Hardware Error Architecture” INTERNAL Error is one of them. It also related with Hardware Drive and mostly occurs when “Platform-Specific Hardware Error Driver” (PSHED) plug-in supplied by a supplier. It is also a similar BSOD error which is caused by various reason, we will see in succeeding paras.
How to Fix WHEA_INTERNAL_ERROR Blue Screen Error in Windows 10
You may resolve or fix this issue by the following 15 ways: –
- By Using System File Checker
- Uninstall Previously Windows Update Corrupted File
- Uncheck Automatic Re-start of Windows
- Complete System Scan
- Uninstall all Third Party Antivirus
- Boot the Window in Safe Mode
- Restore changes you made earlier
- By Clean up Windows Image Files
- By Latest Windows Updates
- Update Old Drivers
- Use Blue Screen Troubleshooter
- Change BIOS of your System
- Un-install duplicate Programme installed in your System
- Check Memory related Issue
- Clean your Hard Disk
1. By Using System File Checker
Any issue related to system file may be a cause of WHEA_INTERNAL_ERROR Blue screen error in windows 10. You should perform this action once by the following steps: –
- Open Run Dialog box.
- Type cmd.exe.
- Now press Ctrl+ Shift+ Enter keyboard shortcuts conjointly to access the Elevated Command Prompt.
- Enter the following command line at winking cursor –
Sfc /scannow
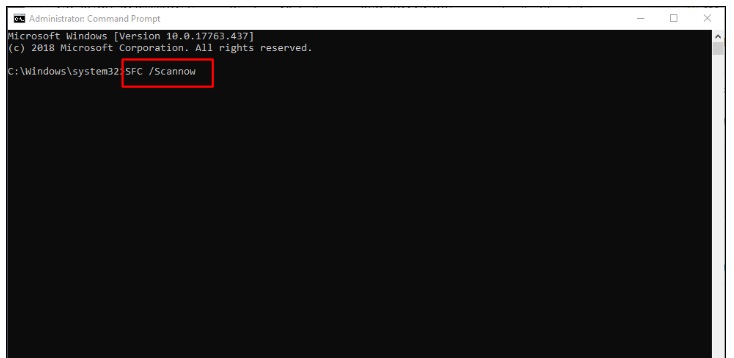
- Press Enter key now to activate the system file checker tool.
- This action will detect and fix corrupted files automatically.
- Reboot the system after ending the process.
- Once the desktop appears, carry out a check for the existence of this WHEA_INTERNAL_ERROR.
2. Uninstall Previously Windows Update Corrupted File
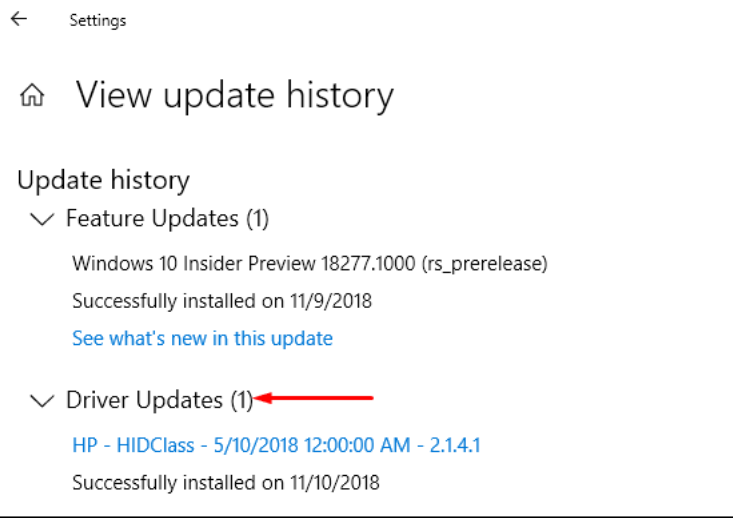
Whenever you update your Window, these updated file may be corrupted due to abnormal termination and make a cause of Blue screen error in Windows 10. So you should delete all these type of files by uninstalling the previous updates. Here is how to uninstall them –
- Locate Update & security from windows setting Menu.
- At the right side, click on View update history.
- Here select Uninstall updates link.
- By default, a new window “Installed Updates” will appear.
- Select it from there and hit the Uninstall button showing in the top ribbon.
- Keep following the tasks shown in desktop until these are deleted completely.
3. Uncheck Automatic Re-start of Windows
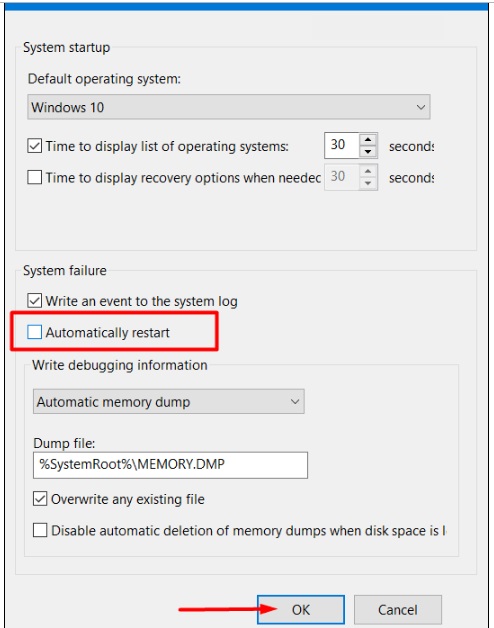
Automatic re-start of windows may be a cause of WHEA_INTERNAL_ERROR Blue screen error in windows 10. Here is the way you can try once: –
Step-1: Press Windows and D keys conjointly to open Desktop.
Step-2: Make a right-click on “This PC” icon and select Properties option.
Step-3: System window will appear, choose “Advanced system settings”.
Step-4: Now proceed to the Advanced tab from the popup wizard.
Step-5: Proceed to the Startup and Recovery page.
Step-6: Click on Settings button.
Step-7: Come down to system failure section in this page and remove the tick mark from the box “Automatically restart“.
4. Complete System Scan to Fix Blue Screen Error in Window 10
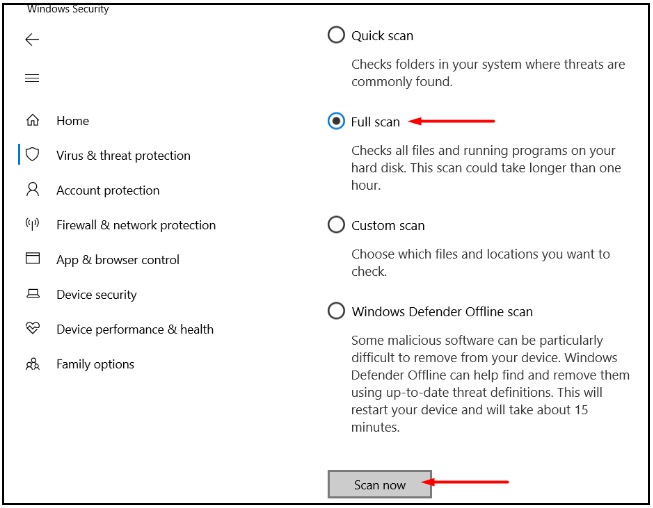
Virus affects your system and a result many issues such as BSOD error will occur. So a complete system scan becomes necessary for any users. Make this by the following steps: –
- Open Windows Security from typing in the search box.
- Click on Virus & threat protection from the left pane and move sideward right.
- On this side, click the link with title Scan options.
- Select the radio button before Full scan and also choose the Scan now option from down.
- If it detects some viruses, make a click on the Clean threats option and remove them from the system.
- To know more about the malware, press the See threat details link.
- Moving ahead to the following page, there will be three options available for you.
- Choose the Remove button and hit the Start actions option eventually.
5. Uninstall all Third Party Antivirus to Fix Blue Screen Error in Window 10
Third party anti malware programs may be not safe for your computer, You should uninstall them by the following steps –
- Open the Windows Settings.
- Go to the Apps area and make a click on it.
- On the next page, select Apps & features from the left pane.
- At the same right adjacent side, a list of Applications being loaded, Select the Anti-virus programs from the list and press the Uninstall button when appear.
- If UAC floats up asking permission, provide consent by clicking on Yes.
- Follow the guidelines and action appearing on screen to remove it from the device.
Before starting to do the clean installation, make sure you have saved all the necessary files in the backup document. We recommend saving these in an external drive preferable in USB storage. Don’t try unless being competent, better to ask help from professionals.
6. Boot the Window in Safe Mode
You may resolve or fix this issue with boot your device in safe mode. Now, we will try to perform this Safe Boot in the below process –
- Type msconfig in Cortana Search box and select System Configuration when it shows up in the result.
- Transfer to the Boot tab when the app hits on display.
- Proceed to Boot tab and click on Boot options segment.
- Check the box before Safe Boot and activate all the options below.
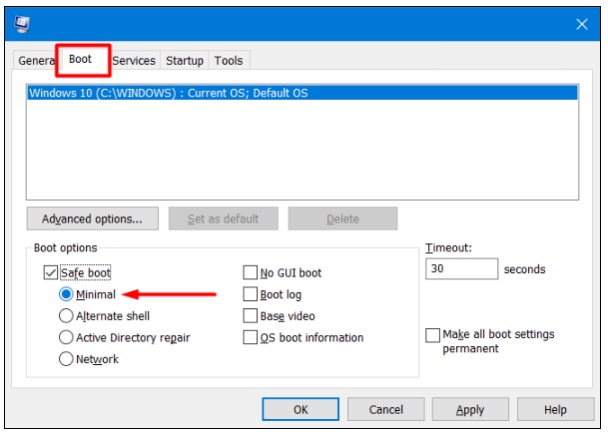
- Select the Apply button and Ok to save the changes.
- Leave the wizard and Restart Windows 10 PC.
- When the device will boot at the startup next, keep pressing F8 key continuously.
- Once headed to the Advanced boot menu, choose Safe boot from here.
7. Restore changes you made earlier to fix Blue Screen Error in Windows 10
Sometimes you make any changes in your system by installing or uninstalling any application, then correspondingly another changes may happen automatically in your system. This may be a reason of WHEA_INTERNAL_ERROR in Windows 10. You must restore changes by the following steps: –
- Open Run dialog box.
- Write the text ‘rstrui’ in the blank typing area.
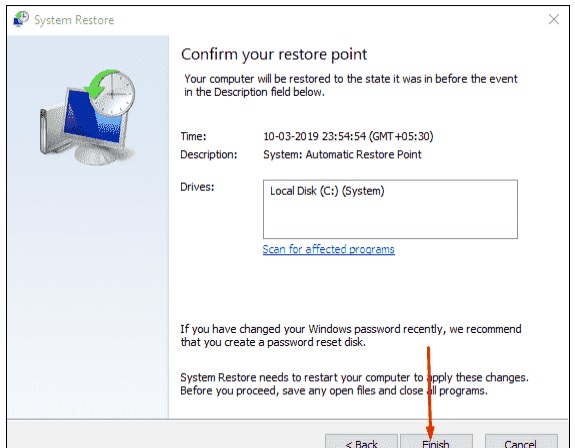
- Once the System Restore wizard appears, choose the Next option to unfold PC’s Restore points.
- From the wizard appearing, select “Show more restore points“.
- Choose the latest one and hit Next option in the process.
- Choose Finish to start restoring process.
8. By Clean up Windows Image Files to fix WHEA_INTERNAL_ ERROR in Windows 10
If Windows image files get corrupted, then there is chances to having Blue Screen error in Windows 10. To fix this issue we should take help of DISM tool. Follow the following instruction: –
-
- Open Command Prompt.
- Type the following command at the place where the cursor is blinking-
DISM.exe /Online /Cleanup-image /Restorehealth- Press the Enter key and wait till finish the process.
- Upon detecting all the defective windows image files, it will fix those automatically.
- Perform a fresh reboot to windows.
9. Fix Blue Screen Error in Windows 10 By Latest Windows Updates
Microsoft releases its latest windows updates which is known as Cumulative Updates on every patchday. You should update your OS on regularly basis. Because an outdated OS may be a cause of Blue Screen of Death Error in Windows 10.
- Open Windows Settings app by pressing “Win+I” shortcut keys Conjointly.
- Then make a Click on Update & Security.
- Windows Update at the right pane of menu will appear.
- Click on the button quoting Check for updates.
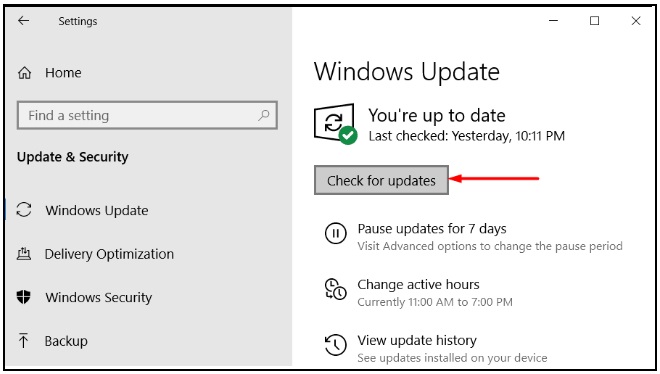
- All available patches will display here. Download it.
10. Update Old Drivers to Fix Blue Screen Error in Windows 10
Whenever there is WHEA_INTERNAL_ERROR detected, You may resolved this issue by updating drivers using Device Manager. Obsolete device drivers is one of the cause of this type of error. You should update your drivers by using Device Manager. Follow the under mentioned steps: –
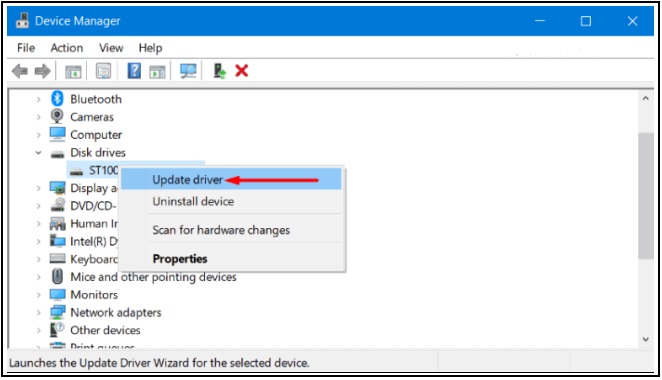
Step#-1: Open Taskbar Search by pressing the Win+S keys.
Step#-2: Device manager will appear after typing it in the search box.
Step#-3: In the new appearing window, look for exclamation mark in the console besides devices.
Step#-4: As soon as it found, expand it by selecting and also make a right click on Yellow indication.
Step#-5: Choose the Update driver option from list and Follow the on screen details.
Step#-6: You should Reboot the windows to make the changes effective.
Step#-7: Once sign back again, check for the occurrence of the error.
11. Use Blue Screen Troubleshooter
This tool is working as multitasking element in Windows. It will provide you a perfect way to fix any type of issue. Windows in-built help option Troubleshooter may be helpful to resolve WHEA_INTERNAL_ERROR in windows 10.
- Step-1: Open setting app by Pressing Win+I hotkey together.Step-2: Click on the Update & Security tile.Step-3: In the next page, choose Troubleshoot option from left pane and also further proceed to the adjacent right.Step-4: Select Blue Screen from here and when expanded, choose Run the Troubleshooter option from the extended pane.
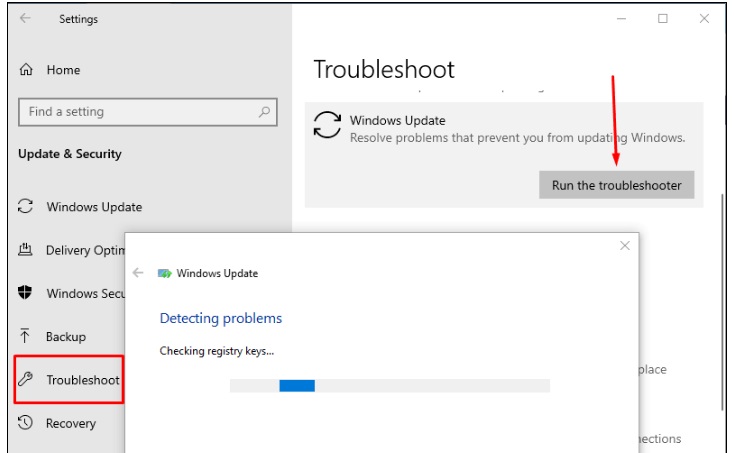
Now, the tool will start detecting WHEA_INTERNAL_ERROR in the system. If it finds the root cause, it will resolve them immediately.
12. Change BIOS of your System
We occasionally make changes in our BIOS System. While modification in BIOS system, there is a possibility of Corrupted BIOS will take place in your system. So we should more careful during any modification in BIOS. If any found, you should change it. It may be a cause reason of WHEA_INTERNAL_ERROR BSOD error in windows 10. To update this, here is the process to progress forward –
- Open Run dialog box.
- Type “msinfo32”.
- Let open the System Information page.
- Type “BIOS version” in the search box provided and press Enter key..
- Few information will display on your screen. Check BIOS version.
- Download the latest version from BIOS manufacturers website.
- After completion of downloading process, install it.
- Once all the processes finish up successfully, reboot the device.
13. Un-install duplicate Program installed in your System
Sometimes one or more application of same category were installed in your system. You should uninstall all those duplicate applications to get rid of WHEA_INTERNAL_ERROR BSOD Error in windows 10. Follow the below steps to uninstall an app-
- Press Win+R hotkeys conjointly to open the Run dialog box.
- Type appwiz.cpl and click on the OK button.
- Search the duplicate applications from Displaying Programs and Features which causing INVALID_MDL_RANGE BSOD Error.
- Uninstall it.
- Follow the on-screen guidelines shown afterward to accomplish this task.
- Re-boot your system and check for the trace of error in the system.
- When returning to the desktop, if you see the WHEA_INTERNAL_ERROR has already resolved, can step out for installing these programs again.
14. Check Memory related Issue
Make sure that any memory related issue exists in your system. It means either your infected RAM or having wrong allocation of it. Corrupted RAM may be a cause of Blue Screen Error in windows 10. You should apply Windows Memory Diagnostic Tools to get rid of WHEA_INTERNAL_ERROR in windows 10. To apply this tool, follow the below instruction: –
- Open setting app by Pressing Win+I hotkey together.
- Type memory in it.
- From the appearing results, “Diagnose your computer’s memory problems”.
- This action will lead to the opening of the “Windows Memory Diagnostic tool”.
- Moving to the wizard, select “Restart now and check for problems (recommended)”.
- Windows will complete the first cycle of rebooting now and then load the desktop, a blue screen will be visible and it will detect memory issues.
- Once the progress complete 100 %, Windows will prompt to reboot for the second time.
- When the computer loads desktop next, the result of carrying out diagnostic will be available in the System tray- notification area.
15. Clean your Hard Disk to Fix Blue screen error in windows 10
Your system Hard Disk Drive may be a reason for WHEA_INTERNAL_ERROR. You should try Disk Checking Utility to perform this action. Adopt the following steps to complete disk checking in HDD: –
- Make a right-click on empty space of your desktop and select Task Manager from displaying menu.
- Perform a click on File located at the top left corner and choose “Run new task” option from the dialog box.
- Type cmd into the Run dialog box
- Put a tick mark on the box before “Create this task with administrative privileges”
- Press enter key and get a pass to the Elevated Command Prompt directly.
- Here type the following command at the winking cursor –
chkdsk - When you press Enter key, the Disk Checking utility will start showing the disk status only. To detect and fix all other issues in it, arrange the command as follows-
chkdsk C: /f /r /x
In the above command line, the character we have added represents-
C:- Disk Drive where you have installed the Windows. Use D:, E: or any in case of using them for storing OS.
f- fixes the issues detected by the utility in the volume.
r- detects the abnormalities occurred in the Disk volume.
x- help in the detection process by splitting up the volume.
- After the task is finished, restart the windows at once.
- When getting back to operation, perform a check for the existence of error in the system.
Hopefully, you will take advantages of this article.
Thnx..
