Fix Hard Disk Space Figure displaying incorrect in Windows 10. Most of the users use Hard disk to transfer or keep files, folders, movie, picture etc. Each hard disk has a separate storage capacity, either 2 GB, 4 GB, 16, GB, 32 GB and more. To know how much space is left in the hard disk or how much space is free in a hard disk is important for any users. For this, windows provide a screen where you can see the used space of hard disk as well as free space of hard disk. But Users occasionally report about that window screen which show the space of hard disk . The figure mentioned at the Hard disk properties windows is incorrect. They do not match with the capacity of hard disk.
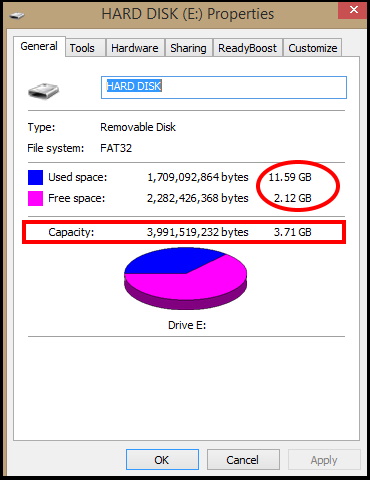
There are various reasons behind this error such as corrupted hard disk, outdated disk driver, obsolete windows 10 etc. Today through this article, We will discuss about how to fix Hard Disk Space Figure displaying incorrect in Windows 10.
How to Fix Hard Disk Space Figure displaying incorrect in Windows 10
Following are the various solutions of the error Hard Disk Space Figure displaying incorrect in Windows 10: –
- Install Windows Latest Update
- Set Max usages of System Restore Point
- Apply Disk Check for Errors
- Perform Maintenance Task
- Update Disk Driver
- Convert Hard Disk from MBR to GPT
- Show Hidden Files, Folders, Drives
Ways-1: Install Windows Latest Update
Now question is arises that how can be resolved the issue regarding Hard Disk Space Figure displaying incorrect in Windows 10 through windows latest update? and the answer is very simple, outdated window may create Explorer.exe bug. When such bug created, the utility can’t read metadata of file types correctly and as a result it fails to calculate the actual size of disk. To get rid of this issue, you must install latest windows update in your windows 10 system. Follow these steps to complete the process: –
- Open Windows Setting.
- Go to Update & Security Section.
- Select Windows Update option from the left side of Setting windows.
- Now go to right pane of setting windows and click on Check for Updates option.
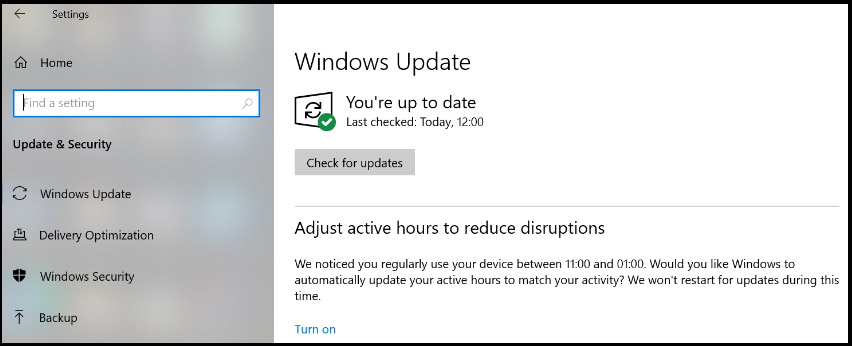
- Let the Window display all the available updates.
- Click on download option.
- You should follow on-screen instruction
- After completion of Installation of windows latest updates, check for Hard disk properties.
- Now you will see correct figure of hard disk space in windows 10.
Ways-2 : Set Max usages of System Restore Point to Fix Hard Disk Space Figure displaying incorrect in Windows 10
System Restore points cover a lot of space, but display nothing in windows. You should delete these previously system restore points to create extra space. If extra space will release, you will easily see correct space of hard disk. As we know, system restore is an important feature, so we can’t disable it. We should only delete restore points as well as set a maximum usages point to free extra space in hard disk. To delete previous system restore point and set a maximum usage limit, follow these instruction: –
- Open Control Panel.
- Navigate the System option from the list available.
- Now make a click on the System Protection option from the left pane of windows.
- Here select one of your drive and click on Configure button.
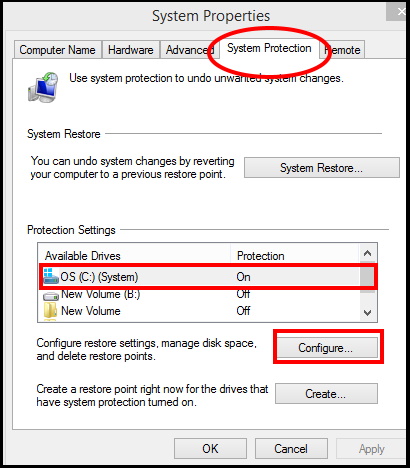
- A new window of System properties for your selected drive will open.
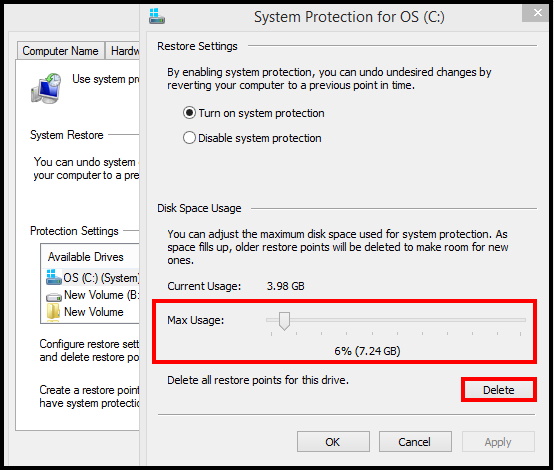
- Go to the Disk usage section of the page.
- Here you will see Current usage and Max usage option.
- You must ensure that the Max Usage should not be set above 10%. If you have 1TB hard disk, then not more than 10% space should be kept for restore point.
- Now, click on the Delete button. This will clear out the space that is currently occupied by System Restore.
- At last, click on Apply and Ok button to make the changes effective.
- Don’t forget to restart your system.
- Now your hard disk disk will show actual space.
Ways-3: Apply Disk Check for Errors
You must check your hard disk for having any malware or errors. For this, Chkdsk is the best windows in-built tool to check and scan the hard disk. The scan will detect for technical as well as physical errors on the drive. This is the most powerful tool as it not only check the disk but also makes an attempt to scan errors and repair them. Follow these steps to complete this task and resolve the error regarding Hard Disk Space Figure displaying incorrect in Windows 10: –
- Open Run Dialog Box.
- Type cmd under it.
- A UAC will prompt on your screen.
- Click on Yes to provide confirmation.
- Now Command Prompt window will appear.
- Make a right click on it and select Run as Administrator option.
- Now type the following command after blinking cursor followed by Enter key: –
chkdsk C: /f /r /x
- Let the system be check the hard disk for any error.
- It will automatically scan the hard disk, and if any error found, it will repair them.
- After completion of process, restart the system.
- Now you hard disk will display with correct space figure.
Ways-4: Perform Maintenance Task to fix Hard Disk Space Figure displaying incorrect in Windows 10
You may solve the issue regarding Hard Disk Space Figure displaying incorrect in Windows 10 through System maintenance tool under Control Panel. Follow these steps: –
- Open Control Panel.
- Navigate the Troubleshooting option.
- If found make a click on it.
- Here select System and Security option.
- Under System and Security option, select System Maintenance.
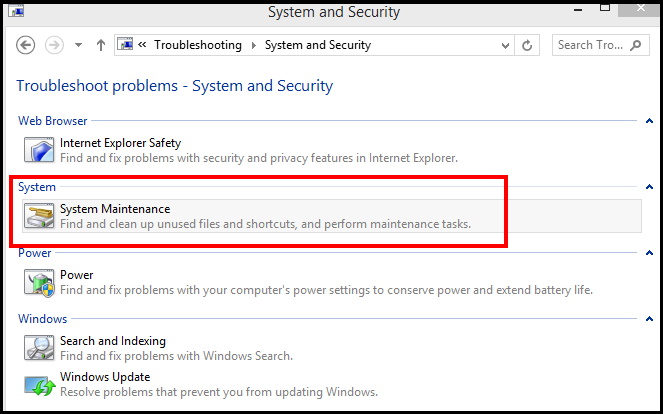
- Choose “Run as administrator“.
- Once the troubleshooter wizard comes into view, click Advanced and select Apply repairs automatically option.
- Click on Next button.
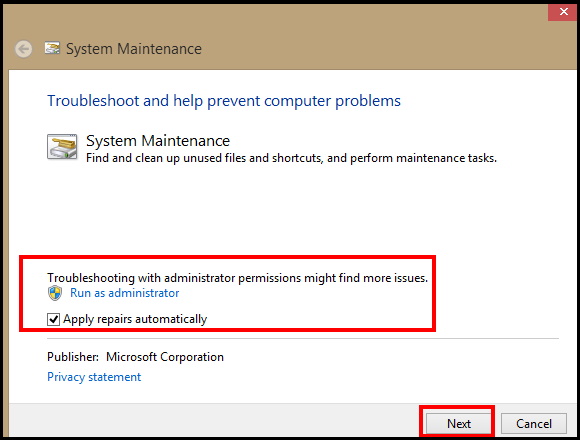
- Let the tool complete detecting the system for any inconveniences. If the tool recommends a fix, click on Apply and allow the repair to finish.
- After it is over, reboot the device and upon startup check hard disk space.
Ways-5: Update Disk Driver
You hard disk comes under the disk driver of Device manager. You should check at the beginning that latest version of hard disk driver installed in your system. Because sometimes outdated driver may be a cause of Hard Disk Space Figure displaying incorrect in Windows 10. For updating the driver, you should follow these steps: –
- Open Device Manager.
- Navigate the Disk Drivers option from the list available.
- Once found, click on it to expand it.
- Here you will find the driver with exclamation mark.
- Make a right click on it.
- Select Update driver software.
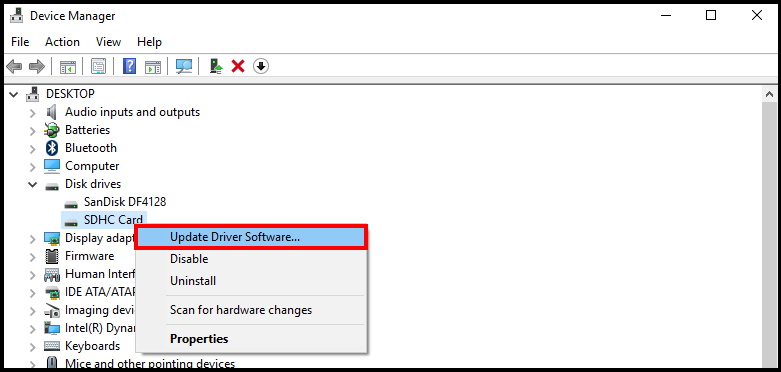
- From the appearing window, select the option Search automatically for updated software.
- Once the installation gets over, reboot the device for the changes to be effective.
Ways-6: Convert Hard Disk from MBR to GPT
As Windows partition styles, both MBR (Master Boot Record) and GPT (GUID Partition Table) are widely used in storage devices like your computer hard drives. But to make full use of a disk with more than 2TB of space, GPT format is recommended. MBR data drive may be a cause of Hard Disk Space Figure displaying incorrect in Windows 10. You should try to covert data drive from MBR to GPT to resolve this issue. Follow these steps: –
- Go to the desktop and right click on This PC option.
- Select Manage option.
- Computer Management window will open.
- Here select the option Disk Management from the left pane of window.
- Now apply right click on each drive and select the option “Delete Volume“.
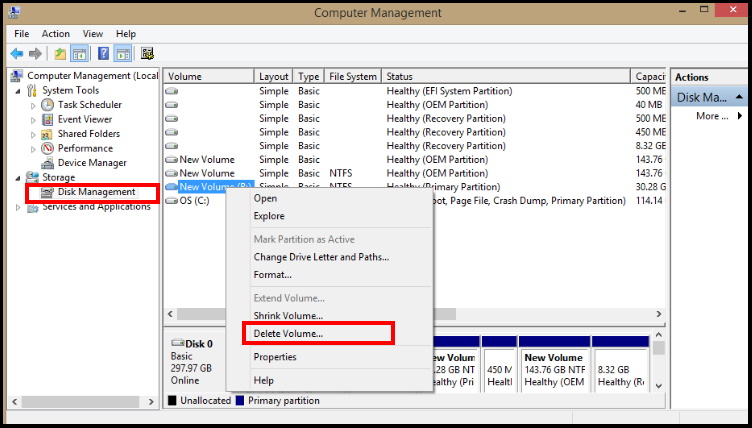
- After deleting all the volumes on your disk, right-click your MBR hard drive and choose “Convert to GPT Disk”.
- If you didn’t delete all the partitions on the MBR disk, the “Convert to GPT Disk” option will be greyed out in Disk Management. You will see it under selection mode after removing the existing partitions.
Hopefully, you will see a correct disk space of your Hard disk.
Ways-7: Show Hidden Files, Folders, Drives
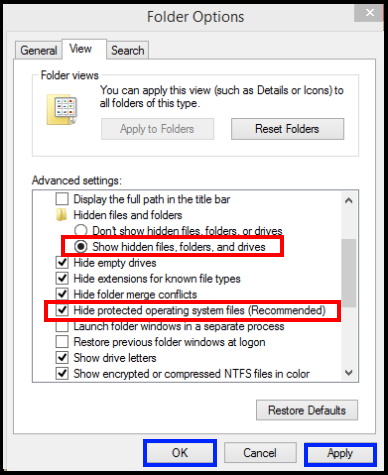
The data of hard disk space is calculated based on visible files, folders, drives etc. this data does not include the hidden files, folders or drives. Accordingly you assume incorrect data displaying in Hard disk properties. So if you choose to show hidden files or folders, the size on disk will automatically increase. You should follow these steps to complete the task: –
- Press Win + E shortcut key conjointly to open File Explorer.
- Click on View button.
- Then select Options.
- Go to the Advanced setting and scroll down the menu list.
- Make the check under the option “Show hidden files, folders, and drives” and “Hide protected operating system files” respectively.
- You may clear all the junk files here.
- Restart your system and check whether the hard disk properties window displaying correct space figure or not.
That’s all.
