How to Fix Ethernet Connection not Working Windows 11. Even after global digitization and establishment of connection wireless, many users still like to use Ethernet to access Internet in their Laptop or Computer. Recently, Microsoft has launched Windows 11 OS and users are eager to download and install Windows 11 or upgrade their existing Windows 10 system. Now a days, Life is nothing without Internet and people use various methods such as Wi-Fi, LAN, VPN, Ethernet to get connected their system. Users, who is using Ethernet to access Internet in their Windows 11 system, raising their following issues: –
- Ethernet Connection not Working Windows 11.
- Ethernet connection keeps dropping.
- Windows 11 Ethernet disconnecting
- Windows 11 Ethernet unidentified network
Causes of Ethernet keeps dropping
After workout and input received from various users, the following causes come to our notice that may be a reason of Ethernet Connection not Working in Windows 11. These are as under: –
- Corrupt Ethernet Driver
- Conflict between two apps
- Restriction imposed by any third party antivirus
- Any hardware related issues
- Malware
- Pending Windows update
- Change in Windows default settings
How to Fix Ethernet Connection not Working Windows 11
Here is the methods to resolve this issue. But you should primarily ensure the following aspects: –
- Cable of Ethernet connection: You should check the fitness of Ethernet cable and check whether it is connected with your device properly or not. If you find loose connection, fit it properly.
- Check the Router connection: You should also check all your cables connected through your router. It should also be fitted properly. Any loose connection may lead to failed Ethernet connection in windows 11.
- Restart Windows 11 system: Sometimes a simple restart resolves various major issues of Computer. You must restart your windows 11 system and then try to connect your laptop or computer via Ethernet.
Ways-1: Enable Ethernet connection
- Open Run command box by pressing Win logo + R shortcut key conjointly.
- Type ncpa.cpl in search field and click on Ok button.
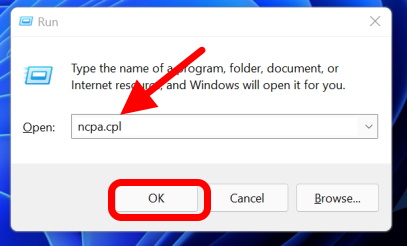
- Network connections window will open under Control Panel.
- Here find out your Ethernet connection option.
- Make a right click on it and choose the option Enable from the drop down menu.
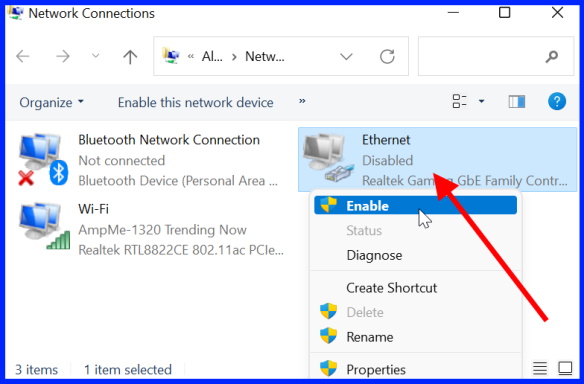
Ways-2: Apply Network Troubleshoot
This is an in-built solution of Windows system that automatically detect issues and fix them accordingly. To apply Network Troubleshoot, follow these steps: –
- Click on Start button.
- Choose Settings widget.
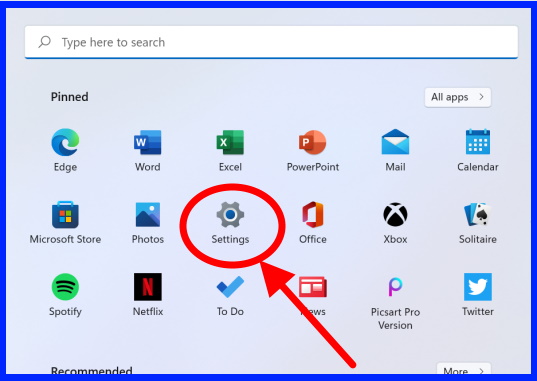
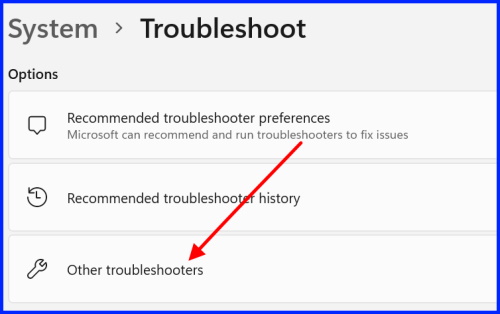
- Under System section, from the right pane, click on the option Troubleshoot.
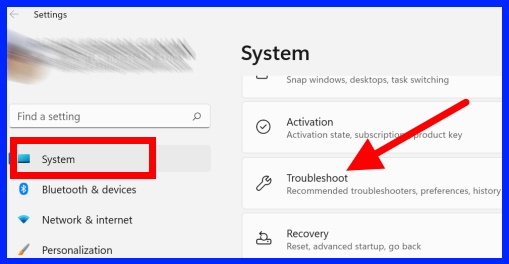
- Thereafter click on the option Other Troubleshooters.
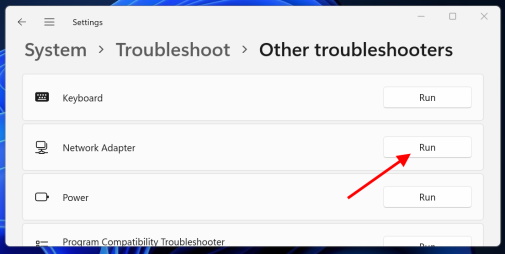
- Here find out the option Network Adapter.
- Click on Run button to execute the task.
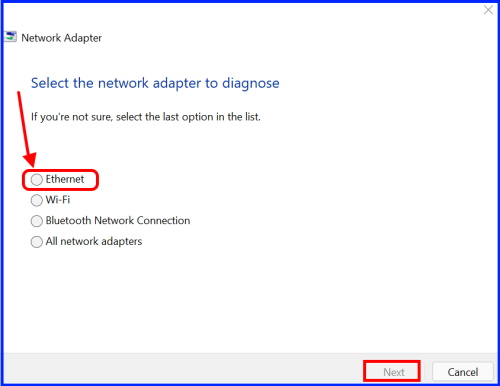
- Another small window will open where you should click on the radio button against Ethernet.
- Make a click on the Next button.
Now window will detect the issue and fix them accordingly, if any problem found. Follow on-screen instruction.
Ways-3: Uninstall and Reinstall Ethernet Driver to Fix Ethernet Connection not Working Windows 11
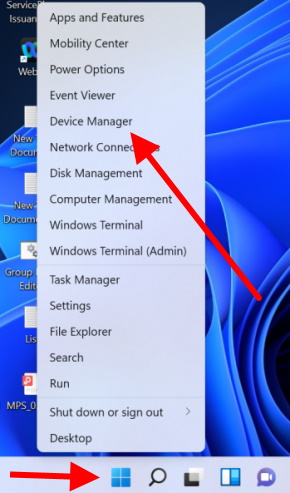
- Apply a right click on the start button and choose Device Manager from the context menu.
- Go to the Network Adapter section.
- Click on it to expand.
- Apply a right click on your installed Ethernet driver from the list.
- Choose Uninstall from the drop down menu.
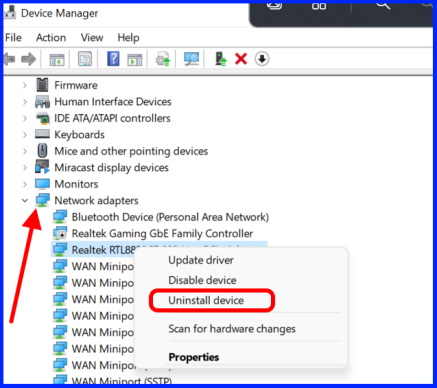
- Once, the uninstallation of Ethernet driver completed, Restart your system.
- Now window will reinstall a fresh version of Ethernet driver in Windows 11 system.
- Thereafter try to connect internet through Ethernet in your system.
Ways-4: Update Network Adapter Driver
Outdated driver may be a reason of Ethernet Connection not Working in Windows 11. To update driver, follow these steps: –
- Apply a right click on the start button
- Choose Device Manager from the context menu.
- Go to the Network Adapter section.
- Expand it.
- Apply a right click on Ethernet driver in Windows 11.
- Select Update driver from the drop down menu.
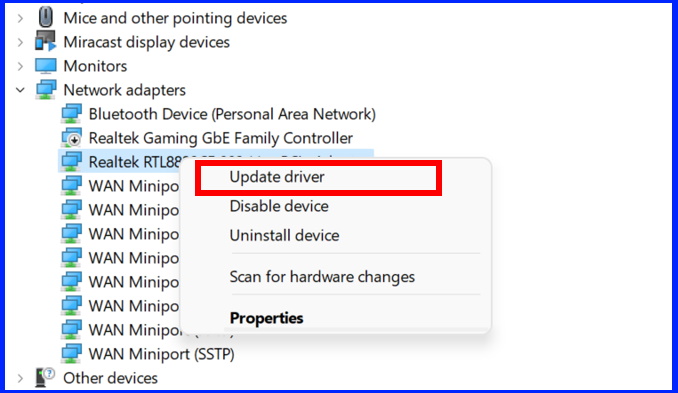
- On the next page, choose the option Search automatically for drivers.
Now windows will automatically find out the best driver for your Windows 11 PC and install them accordingly.
Ways-5: Update Ethernet Driver through Windows Update
- Apply a right click on the start button
- Choose Settings from the context menu.
- Go to the Windows Update section from the left pane.
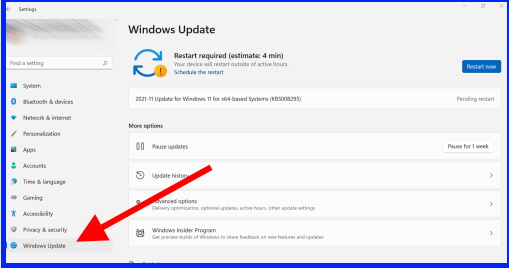
- Thereafter, from the right side of page, click on Advanced options under More options section.
- Here, under Additional updates section, click on Optional updates.
If any driver update available, it will display here. Download and install Network Adapter driver update from here.
Ways-6: Reset Network Settings to Fix Ethernet Connection not Working Windows 11
- Press Win logo + I shortcut key to open Settings app in Windows 11.
- Choose the option Network & Internet from the left side.
- Thereafter go to right side and click on Advanced Network settings.
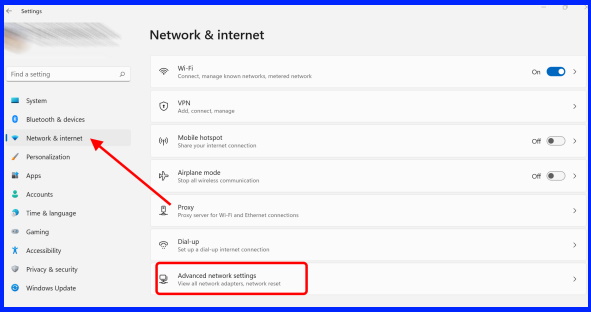
- Thereafter click on Network Reset option.
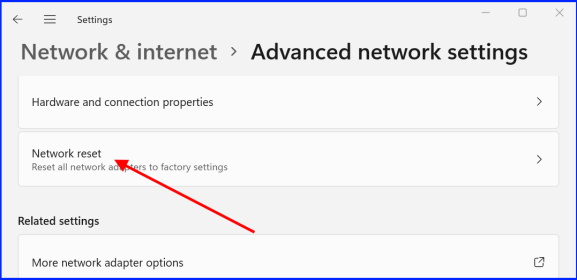
- Then click on Reset Now button.
- Follow on-screen instruction to complete the process.
Once the process finish, check whether your issue regarding Ethernet Connection not Working Windows 11 fixed or not.
Ways-7: Install Windows 11 latest update
If you have not installed Windows updates for a long time, it may be a cause of Windows 11 failed to connect via Ethernet. You must check for updates available and if found, you should download and install it immediately. Go through these steps: –
- Apply a right click on the start button
- Choose Settings option.
- Thereafter select Windows Update from the left pane.
- Now from the right side, click on Check for updates option.
- All the available windows 11 updates will display here.
- Click on Download button and rather install it.
If none of the above solutions get effective and you are still facing the connection issue via Ethernet, you should Boot Windows 11 in Safe Mode. It will definitely resolve your issue.
Other similar query: –
- Windows 11 Ethernet settings
- Windows 11 Ethernet not connected
- Ethernet connection in Windows 11
That’s all.
