How to Resolve Failed to connect WiFi Windows 11. Connection via Wi-fi is today’s necessity for all the users who want to get access over Network. Most of the users connect their system through wi-fi to access network. But sometimes users have to face wifi connection issue in their windows 10 or windows 11 system. As you all know, Microsoft has recently launched newly windows version, i.e windows 11. Similar to Windows 10, you may face the issue regarding Wi-Fi not connecting in Windows 11. Procedure is almost same for both the users of Windows 10 and Windows 11.Here is How to fix Wifi connection issues.
How to Resolve Failed to connect WiFi in Windows 11
Here in this topic, we will discuss How to fix failed to connect Wi-Fi in Windows 11. Before applying major changes to your system, you must ensure some basic things to connect Internet through Wi-Fi.
Initial Steps
1. Reboot Windows 11 system. This is the first and basic solution of all the problems you are facing in Windows 10 or Windows 11. Simply, go to start button. make a right click on it and choose the option Restart.
2. Re-connect the Router. Turn off the router by pressing and hold Power button. Disconnect the power supply of Wi-Fi router. Wait a while and again provide power to your router. Turn on the Wi-Fi router. Check whether the Wi-Fi connection in Windows 11 established or not.
If none of the above mentioned initial steps get effective, try the following solutions to fix the issue failed to connect Wi-Fi in Windows 11.
What to do when Wi-Fi not connecting automatically in Windows 10
Solution-1: Re-connect Wi-Fi Network
This is the first solution, you must try. You should remove all the saved network connected through wifi in windows 11. You should apply Forget Network and reconnect device through wifi network connection. Follow these steps: –
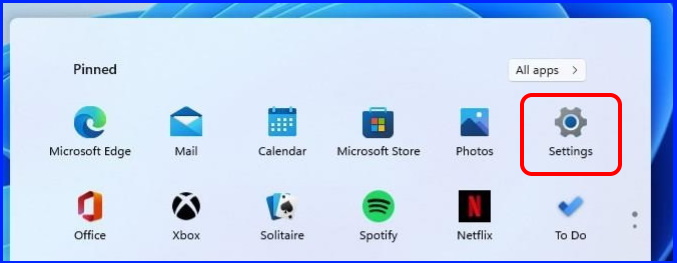
- Choose the settings widget through start option in Windows 11.
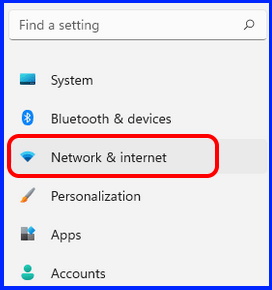
- Select the option Network & Internet.
- Go to right side.
- Choose the option Wi-Fi.
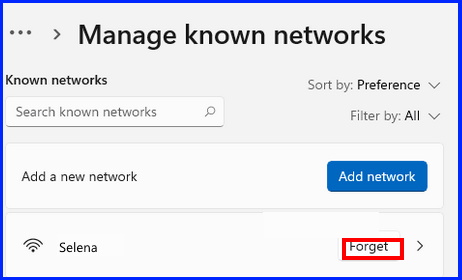
- Here, you will find all your saved known network connection.
- Click on Forget button against your wi-fi network.
- Now go to back of Windows 11 Settings page.
- Click on Show available network option.
- Again click on Network which you forget earlier.
- Make a check against box Connect automatically.
- Put the credential and rather click on Next button.
- It will re-connect wifi network.
Solution-2: Turn On and Off Flight Mode in Windows 11
- Press Windows logo + I shortcut key.
- It will open settings app in Windows 11.
- Select the option Network & Internet.
- From the right side, go to the Flight Mode option.
- Enable the Flight mode by turning on the toggle button.
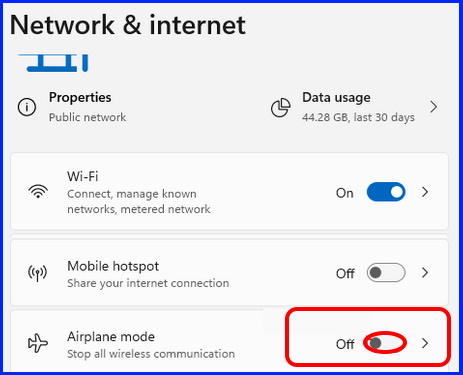
- Wait a while, and turn off the toggle button of Flight mode.
- Now try to connect wifi network again.
Solution-3: Fix Failed to connect Wi-Fi through Network Reset
- Click on Start.
- choose Settings.
- Select Network & Internet.
- Scroll down and click on Advance Network settings.
- Click on Network Reset button.
- Thereafter click Reset Now button.
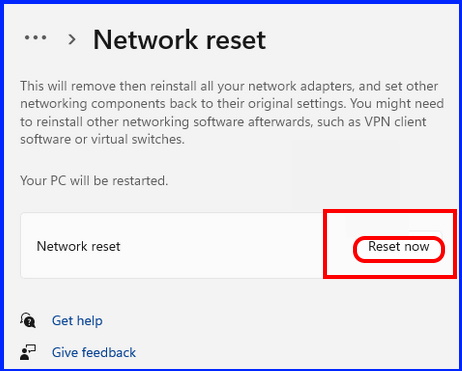
- Finally Reboot your Windows 11 system.
Solution-4: Update Network Adapter Driver to Fix Failed to connect WiFi in Windows 11
Sometimes outdated network adapter driver may be a cause of failed Wi-Fi connection in Windows 11. So you must update network adapter driver to resolve this issue and get a strong wifi connection in Windows 11.
- Type devmgmt in window search box.
- Choose Device Manager from the top result.
- Device Manager window will open now.
- Go to the option Network adapter.
- Click to expand it.
- Apply a right click on your Network adapter.
- Select Update Driver.
- Now here you have two options.
- Choose the option Search automatically for drivers.
- Follow on-screen instruction.
- Reboot your windows 11 system.
Solution-5: Roll back Network Adaptor Driver to Fix failed to connect Wi-Fi connection
Sometimes Wi-Fi failed to connect in Windows 11 when you install any latest Windows update. updated network driver may not functioning well and leads to connection problem through Wi-Fi in Windows 11. In this situation, you should firstly Roll back Network adapter driver. To roll back network adapter driver, follow these steps: –
- Press Win + R.
- Type dvrmgmt.msc in Run command box.
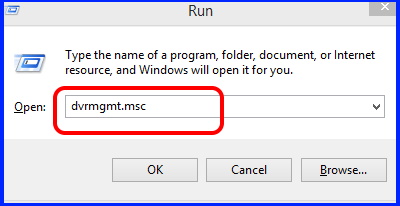
- Navigate the Network adapter driver from the available list.
- Click on it and choose your network adapter driver.
- Double click on it.
- From the top menu bar, go to the Driver tab.
- Thereafter click on Roll back driver option.
- It will revert back to previous update of Network Adapter.
- Now try to connect your system through WiFi.
Solution-6: Uninstall and Re-install Network Adapter Driver
- Press Win + R.
- Type dvrmgmt.msc in Run command box.
- Navigate the Network adapter driver from the available list.
- Click on it and choose your network adapter driver.
- Right click on it and choose Uninstall driver.
- Restart Windows 11 system.
- After restart Windows 11 system, it will automatically re-install Network Adapter driver.
Solution-7: Execute Troubleshooter tool to Fix Failed to connect WiFi Windows 11
- Open Settings widget through start button.
- Choose System.
- From the right pane, go to the section Troubleshoot.
- Click on Other Troubleshooters.
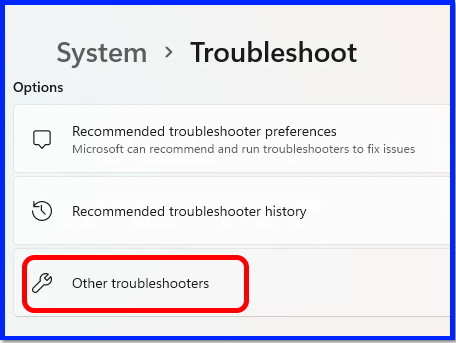
- Here you will find Network Adapter troubleshoot.
- Click on Run button.
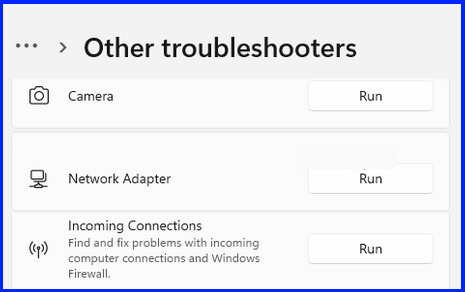
Now system will automatically detect the problems connecting through Wi-Fi and fix them accordingly.
Solution-8: Reset Network IP Address
- Open Run.
- Type cmd.
- Press Ctrl+Shift+Enter to open Command Prompt in Administrator mode.
- Now Enter the following command: –
- ipconfig /release
- Press Enter.
- After executing above command, you will find current DNS of your system.
- Now to reset the IP Address, follow these steps: –
- Again go to Command Prompt window and enter the following command one by one followed by Enter: –
- netsh int ip reset
- ipconfig /flushdns
- ipconfig /renew
- At the end, Reboot your system.
Solution-9: Disable Network Adapter Drivers through Device Manager
- Right click on windows logo.
- Choose Device Manager.
- Go to Network Adapter section.
- Expand it.
- Apply a right click on your Drivers and click on Disable option.
- Shut down Windows 11 system.
- Restart it.
- Again go to Device Manager window.
- Right click on Network Adapter driver.
- Choose the option Enable.
Solution-10: Allow the computer to turn off this device
- Right click on windows logo.
- Choose – Device Manager.
- Go to Network Adapter section.
- Expand it.
- Apply a right click on your Drivers and click on Properties option.
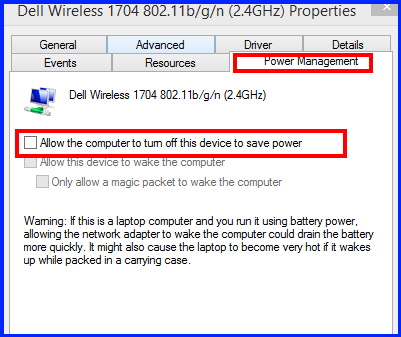
- Choose the option Power Management from the top menu bar.
- Uncheck the box against option Allow the computer to turn off this device to save power.
- Click on Ok button.
Solution-11: Set WLAN Autoconfig service as Automatic
- Open Run by pressing Win +R key.
- Type services.msc in it and press Enter key.
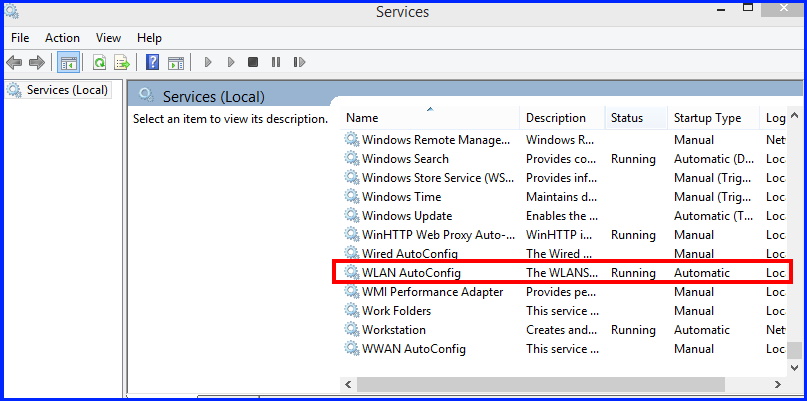
- Look for WLAN Autoconfig option.
- Apply a double click on it to open its properties window.
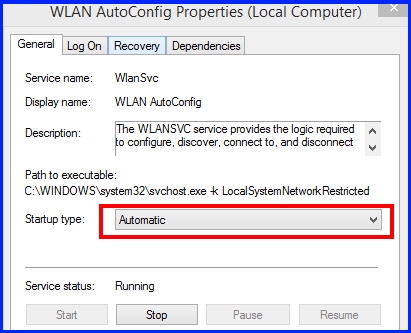
- Go to Startup type section.
- Set it as Automatic.
Solution-12: Change Router setting
- Log in to your router.
- Here click on Advanced option and click Yes button to confirm.
- Thereafter look for IGMP Proxy feature and choose Disable.
- Click on Apply button to save changes.
- Now your Windows 11 PC will automatically connect to Wi-Fi network.
That’s all.
