How to Enable Local Group Policy Editor in Windows 11. As we all know that Local Group Policy Editor is not available with Windows 10 Home edition. Microsoft has later introduced in Windows 10 Pro and Enterprises edition and now in Windows 11. If you have recently installed Windows 11 or upgraded Windows 10 to Windows 11 and you don’t find Group Policy Editor in your Windows 11 system, here in this article we will see How to Enable Group Policy Editor in Windows 11.
Also Microsoft has introduced Windows 11 ADMX Templates through which you can expand the Group Policy Editor’s Settings. ADMX templates also available in October 2021 Update 21H2. These latest administrative templates are fully compatible with Windows 11, 10, and 7 as well as for server platforms.
Is it necessary to enable Local Group Policy Editor in Windows 11
Most of the users even not familiar with use of Group Policy Editor. But do you know, Local Group Policy Editor is also a convenient tool like other tools in Windows 10 or Windows 11. You can configure many features of Windows 11 such as Taskbar, Sign-in screen, Notification area etc through Local Group Policy Editor. If you want more configuration settings tools in your windows 11 system, Local Group Policy Editor may provide it.
How to Enable Local Group Policy Editor in Windows 11
If you want to see a customized view of Windows 11 Taskbar, Start menu and other Windows 11 Components, you should enable Group Policy Editor in your Windows 11 Computer or Laptop. You can enable Local Group Policy Editor through creating a batch file or through Command Prompt window.
Ways-1: Through Command Prompt Window
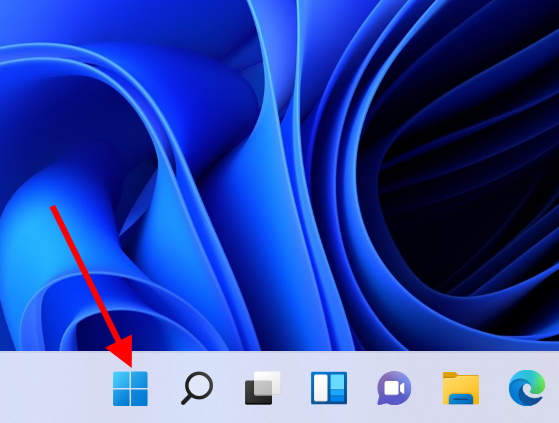
- Go to the Taskbar of your Windows 11 system.
- Apply a right click on Start button.

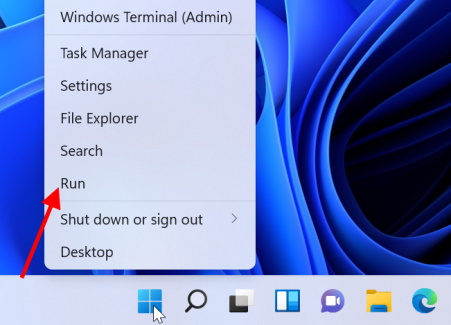
- Choose the option Run from the drop down menu.

- Thereafter type cmd in it and press Ctrl+Shift+Enter shortcut key.
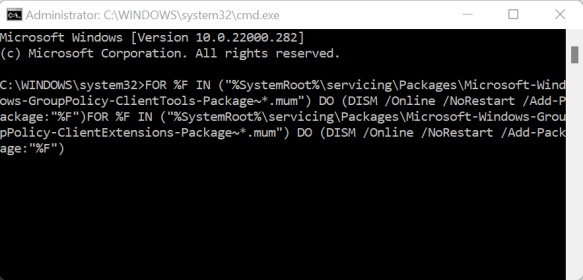
- It will open Command Prompt window in Administrative mode.
- Here type the following command where cursor is blinking and press Enter key to Execute: –
- FOR %F IN (“%SystemRoot%\servicing\Packages\Microsoft-Windows-GroupPolicy-ClientTools-Package~*.mum”) DO (
DISM /Online /NoRestart /Add-Package:”%F”
)
FOR %F IN (“%SystemRoot%\servicing\Packages\Microsoft-Windows-GroupPolicy-ClientExtensions-Package~*.mum”) DO (
DISM /Online /NoRestart /Add-Package:”%F”
)
- FOR %F IN (“%SystemRoot%\servicing\Packages\Microsoft-Windows-GroupPolicy-ClientTools-Package~*.mum”) DO (

- You may simply copy the above mentioned text by pressing Ctrl + C and paste it by pressing Ctrl + V.
- Wait till completion of the process.
Ways-2: Through a Batch File
- At first, open Notepad in Windows 11 System.
- Copy (Ctrl+C) the under mentioned code of batch file and paste (Ctrl+V) it into the Notepad: –
@echo off

pushd "%~dp0"

dir /b %SystemRoot%\servicing\Packages\Microsoft-Windows-GroupPolicy-ClientExtensions-Package~3*.mum >List.txt

dir /b %SystemRoot%\servicing\Packages\Microsoft-Windows-GroupPolicy-ClientTools-Package~3*.mum >>List.txt

for /f %%i in ('findstr /i . List.txt 2^>nul') do dism /online /norestart /add-package:"%SystemRoot%\servicing\Packages\%%i"

pause
- Thereafter go to top menu bar of Notepad and choose File option.
- Click on Save as option.

- Select the option All files under file type section.
- Assign the name of batch file as Group Policy Editor.bat under the file name section.
- Then Set the location Desktop.
- Finally click on Save button.
- Thereafter go to Desktop where you recently saved the batch file.
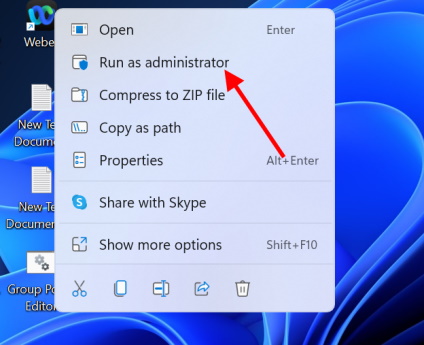
- Apply a right click on that batch file.
- Choose the option Run as Administrator.

- Click on yes if a confirmation window appears.
- Let the Command Prompt window complete the process.
- Wait till 100% completion of adding package Microsoft Windows group policy clients.

- Follow on-screen instruction to complete the process.
That’s all.
