How to Enable Fast Startup to Boot Windows 10 PC Faster. Every user wants to make his PC faster on first boot. It is more comfortable to load the desktop more quickly during startup process. Fast startup feature definitely help to boot your Windows 10 PC Faster. As we know, fast startup is not a new feature. It is working since Windows 8.x operating system. In windows 8.x, fast startup feature is a part of Hibernation. Even Windows 10 having more enhancement features of booting process, some of the windows 10 system take a long time to boot. In this situation, you must enable fast startup feature in your system so that your PC could start soon.
10 Tips to Improve or optimize Windows 10 System Performance
How Fast Startup Feature works?
You can better understand about this feature through Hibernation feature. In Hibernation, Windows 10 stores the data as hiberfil.sys files on a hard drive memory of the system. When your system goes off due to any unconditional circumstances, you can restore the data as well as session through Hibernation. In the case of Fast Startup, the case is similar to hibernation with a little difference. Fast startup feature don’t store or save your data into memory of a hard drive. It quickly restart the system before logging off your system and loosing your data or session. Fast Startup feature having less storage space and allowing faster resume.
How to Enable Fast Startup to Boot Windows 10 PC Faster
In this article, we will see How to Enable as well as disable Fast Startup process to Boot Windows 10 PC Faster. Also we will see how to fix Fast Startup feature missing in Windows 10 system.
To enable Windows 10 fast startup, follow these steps:
- Press Win + I shortcut key to open Windows Settings.
- Go to the System option.
- From the left pane of setting window, click on Power & sleep option.
- Now go to the right pane of same window.
- Under the Related settings section, click on the Additional power settings option.
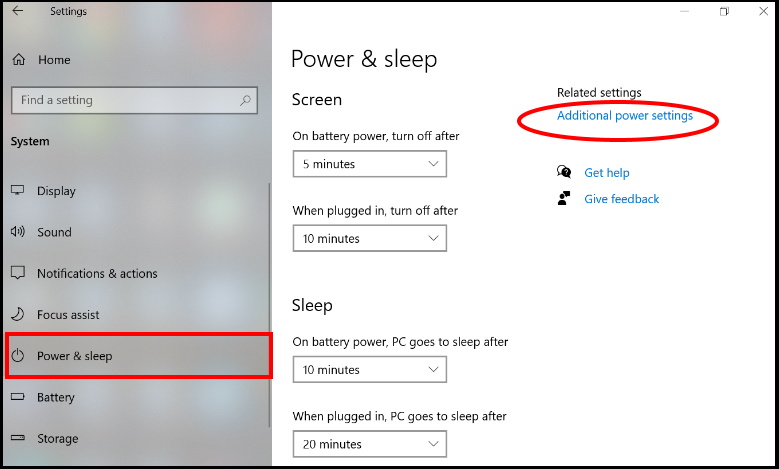
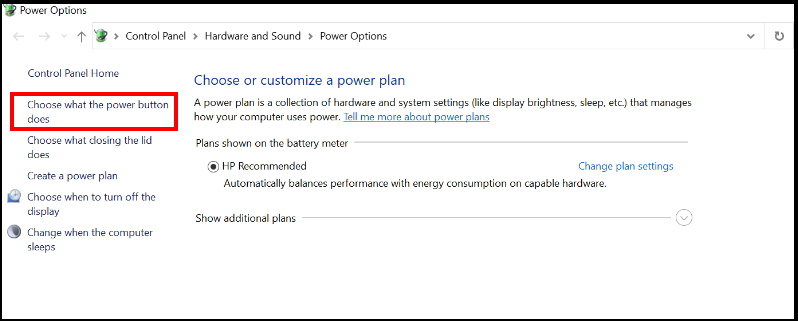
- A new Power option window is open now.
- From the left side, make a click on the option Choose what the power button does.
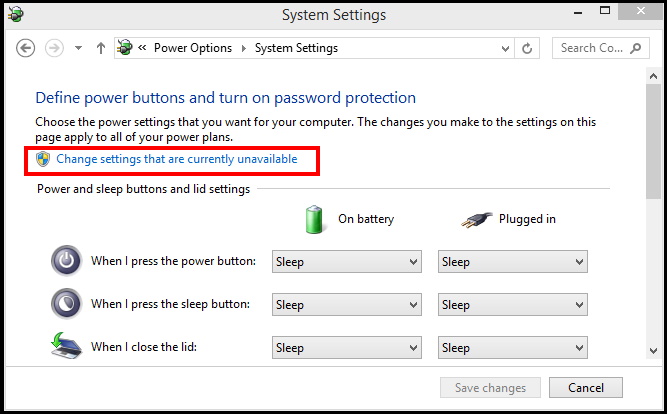
- Thereafter click on the Change settings that are currently unavailable option.
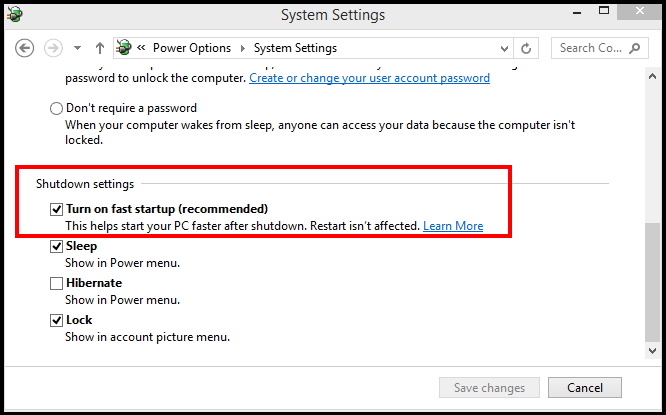
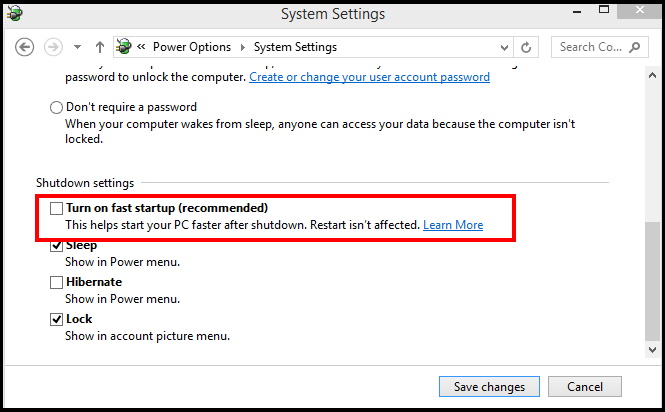
- Now go to the Shutdown settings section.
- Make the check against the option Turn on fast startup.
- Thereafter click on the Save changes button.
Now your Windows 10 PC will start faster than earlier.
How to Disable Fast Startup to Boot Windows 10 PC Faster
Fast startup is based on your system configuration. You should make enable it after due checking of your system configuration. If not required, you should disable it. If your system having limited hard drive space, you should avoid to enable fast startup feature in your system. Because under limited hard drive space, it may not work properly and also you can suffer with some another issues related to it.
To enable Windows 10 fast startup, follow these steps:
- Open Windows Settings.
- Go to the System option.
- Make a click on Power & sleep option from the left pane.
- Now go to the right pane of same window.
- Under the Related settings section, click on the Additional power settings option.
- A new Power option window is open now.
- From the left side, make a click on the option Choose what the power button does.
- Thereafter click on the Change settings that are currently unavailable option.
- Now go to the Shutdown settings section.
- Uncheck tick mark against the option Turn on fast startup.
- Thereafter click on the Save changes button.
How to fix missing fast startup option on Windows 10
Sometimes, Fast startup may be not available in Control Panel of your system. To find and fix this issue, follow these steps: –
- Open Run command.
- Type cmd in it.
- Press Enter.
- Command Prompt window will open.
- Apply a right click on it and choose the option Run as administrator.
- Now type the following command after blinking cursor: –
- powercfg /hibernate on
- Press Enter.
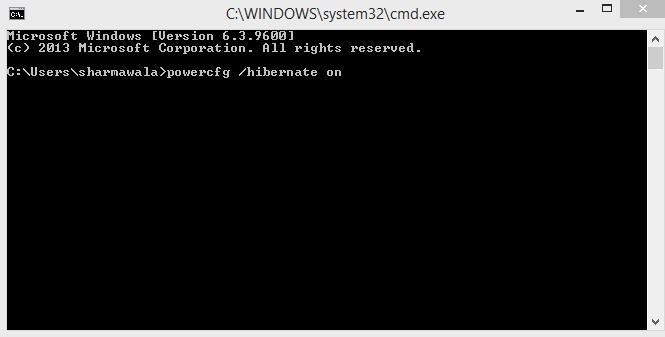
Now, Fast startup feature will be available in your system in Power option under Shutdown settings.
That’s all.
