How to resolve Default Printer keeps changing Automatic in Windows 10. Most of the users keep more than one printer installed in their Windows 10 system. Most used printer automatically set to your default printer. But sometimes users change their default printer, but next time when they try to print a job, the Default Printer keeps changing Automatic to previously most used Printer. It is the annoying happenings when you have an emergency to take out a print.
If you are also encountering this issue, here in this article, we will see various workarounds to fix this issue in your Windows 10 system.
Initial Workaround
Before putting extra effort, you should try few initial workaround to resolve the issue at early stage. Go through these initial tips: –
- Check USB and Power cable of Printer: Faulty cables may be a cause of printer error. To avoid changing default printer automatic in Windows 10, power cable and USB cable properly fitted with your Computer. Avoid loose USB connection, remove damage power cable.
- Restart Windows 10 system: Sometimes a simple restart resolves various errors and problem of Windows system. You must restart your system and check whether problem is still here or not.
How to resolve Default Printer keeps changing Automatic in Windows 10
If above mentioned initial workarounds doesn’t fix your issues with Printer, apply these solution: –
How to Fix Printer Sending Job Notification Error in Windows 10
Tips-1: Change the Printer settings
By default, Windows 10 automatically manages your default printer. If your default printer keeps changing automatic, you should restrict Windows from managing your default printer. To do so, follow these steps: –
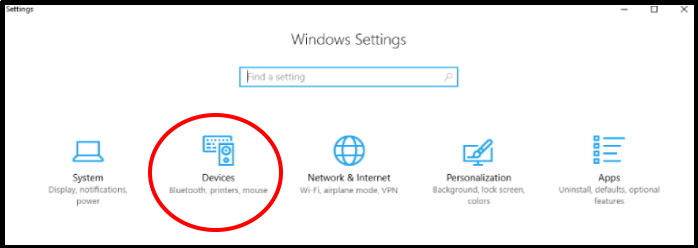
- Open Windows Setting by pressing Win + I shortcut key.
- Go to the Device section.
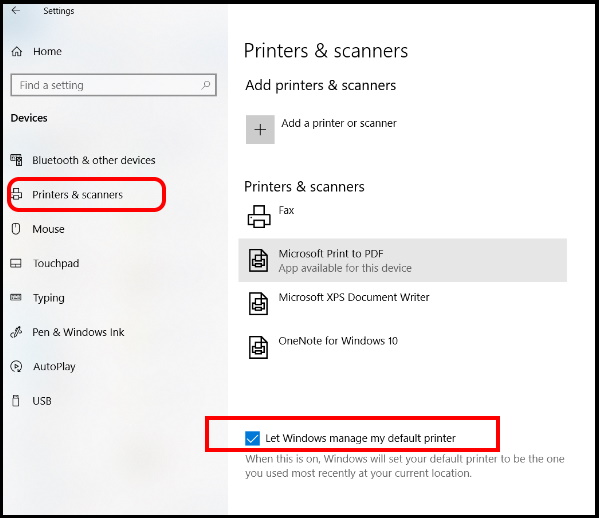
- Now from the left pane of setting window, click on Printers & Scanners.
- Thereafter go to the right side and scroll down to the page.
- Uncheck the box against option Let Windows manage my default printer.
Tips-2: Change Printer setting through Registry Editor
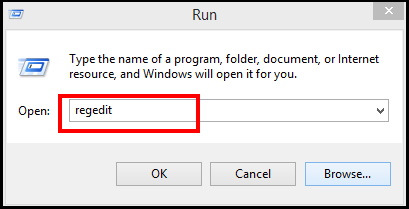
- Press Win + R shortcut key.
- Run dialog box will open.
- Now type regedit in the box and press Ok button.
- Registry editor window will open now.
- Navigate the following path in Registry Editor: –
- HKEY_CURRENT_USER>SOFTWARE>Microsoft>Windows NT>CurrentVersion> Windows
- Thereafter go to the right side of page.
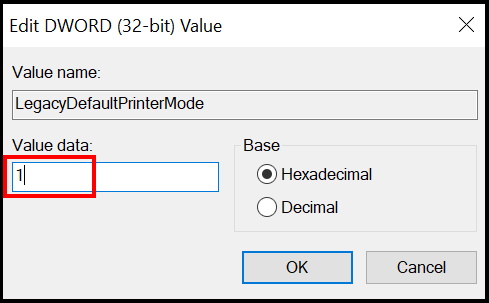
- Apply a double click on LegacyDefaultPrinterMode.
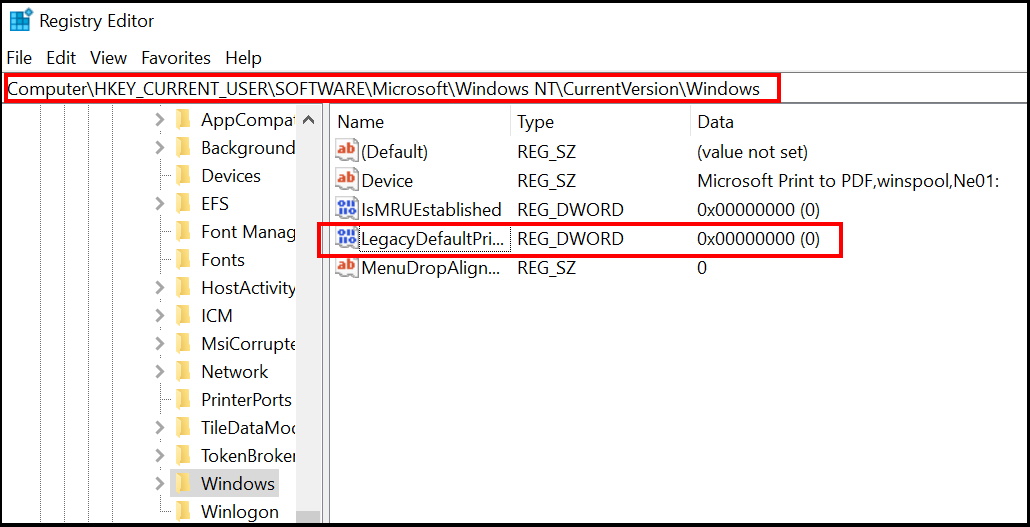
- Set the value to 1.
Tips-3: Reinstall Printer Driver to resolve Default Printer keeps changing Automatic in Windows 10
- Conjointly press Win logo + R keyboard shortcut keys to open Run dialog box.
- Type control and click OK to access Control Panel.
- Find out the option Devices and Printers.
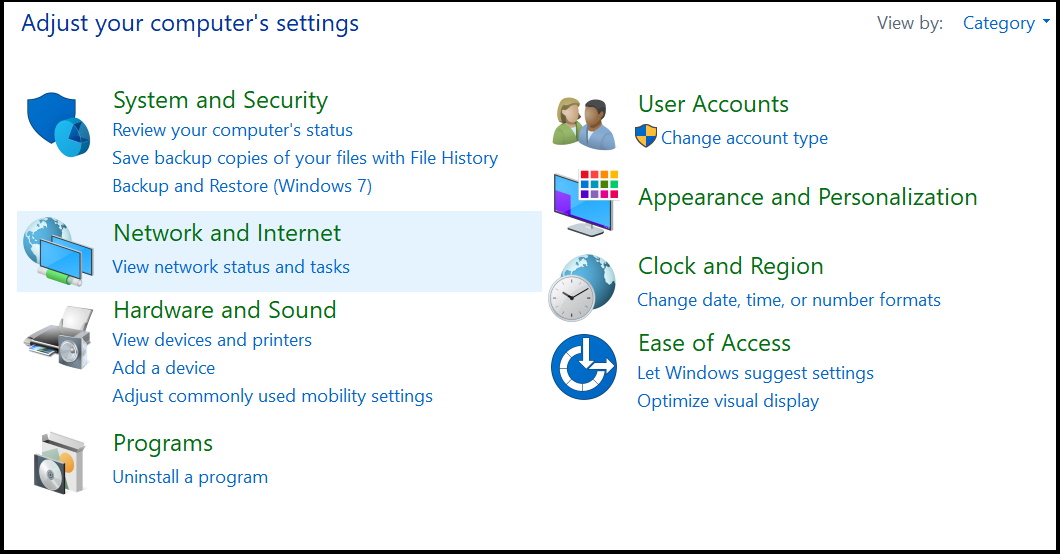
- You having various types of printers installed in your system. Find out that printer which having such type of error.
- Make a right-click on that specific printer and select the option Delete or Remove Device.
- After successfully un-installing the printer, you should visit the “manufacturer’s website” and download the latest driver of your printer model.
- Re-install it, wait for reboot the device and check the error.
Tips-4: Remove old Printer settings through Registry
Every users keep multiple printer software installed in their system. All the data of installed printer is entered in Registry editor. Data of Some old printers still remaining in Registry. It may lead to issue of Default Printer keeps changing Automatic in Windows 10. You can simply resolve this issue by removing old entries from Registry in Windows 10. Follow these steps: –
- Open Run Dialog Box.
- Type regedit in it and press Ok button.
- Registry Editor window is open now.
- Navigate the following path in Registry Editor window: –
- HKEY_USERS>USERS>_SID_HERE>Printers>Connections
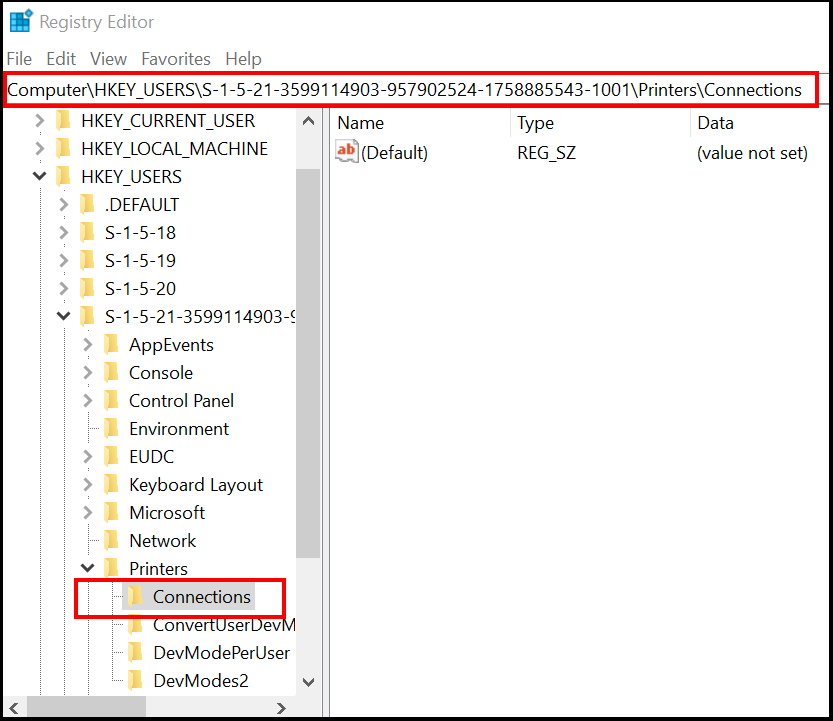
- Here select your own user SID. Generally, your SID is the one that’s the longest, so be sure to select it.
- You should see some old printer connections. Delete them all.
- Now go to HKEY_USERS>USERS>_SID_HERE>Printers>Settings key.
- Delete the old printer settings from there.
Once you remove them, check if the problem with your default printer is resolved.
Tips-5: Manually set Default Printer to resolve Default Printer keeps changing Automatic in Windows 10
You can also resolve this issue by setting default printer manually. Follow these steps: –
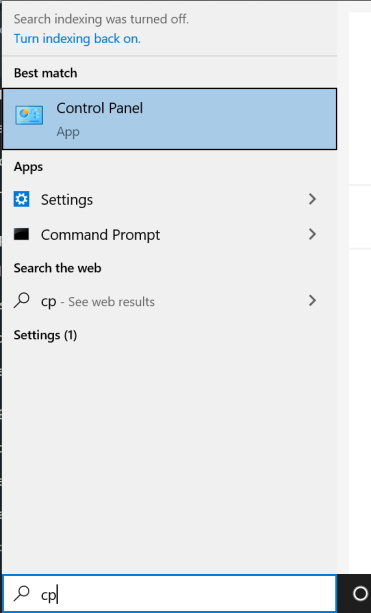
- Go to Search.
- Type cp in it.
- Select the top result as Best Match i.e Control Panel.
- Thereafter choose the option Device & Printers from the available list.
- Here select your Printer which you want to make default.
- Make a right click on it and choose the option Set as default Printer from the drop down menu.
Tips-6: Install Windows Latest Updates
If the default printer keeps changing in your Windows 10 PC, the issue might be due to certain bugs on your system. To install windows latest updates may fix this issue easily. Microsoft is constantly fixing bugs and releasing new updates on its patchday under cumulative updates.
So if you are facing difficulties with your printer, must update your system with latest Windows update. Although windows update is a regular process and occur automatically. But sometimes, due to certain reason one or two update may be miss to update. In this case, follow these steps: –
- Press Windows Key + I to open the Settings app.
- Choose Update & Security section.
- Now go to the right side of setting page.
- Make a click on Check for updates button.
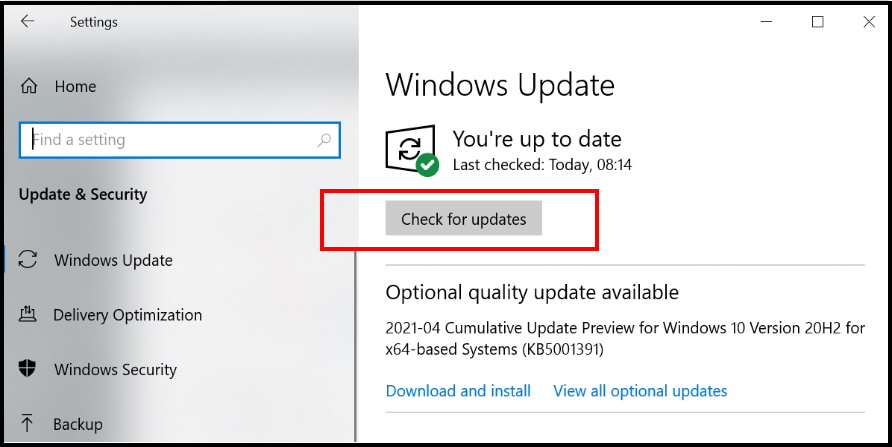
- If any updates are available, Windows will download them automatically in the background.
- Once the updates are downloaded, just restart your Windows 10 PC to install them.
Tips-7: Sign-in with new user Account
If you’re having issues with your default printer, create a new user account. You can fix this issue by sign-in with a new user account. Go through steps: –
- Press Win + I shortcut key to open Settings app.
- Go to the Accounts section.
- Now from the left side of page, select the option Family & other people.
- Thereafter go to the right side of page.
- Go to the Other users section.
- Make a click on Add someone else to this PC.
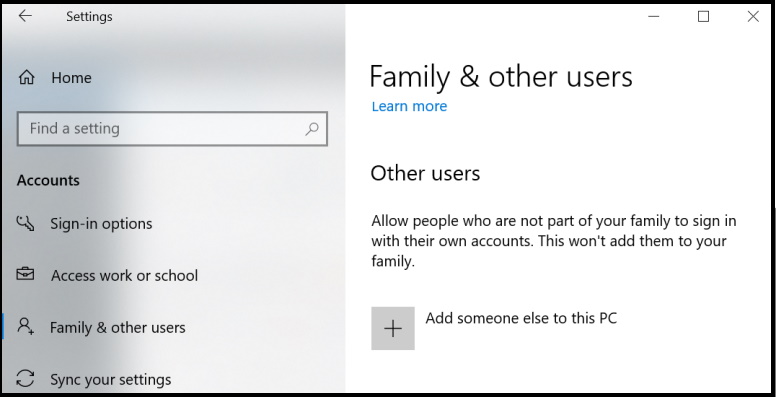
- Click on I don’t have this person’s sign-in information.
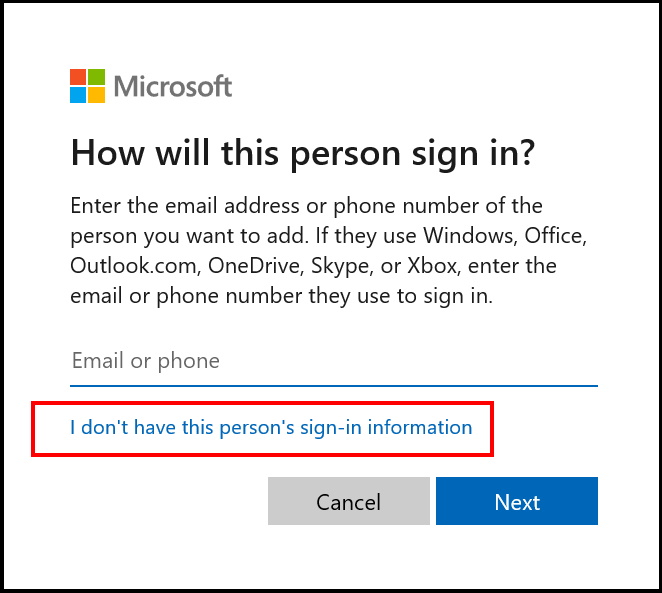
- Now select Add a user without a Microsoft account.
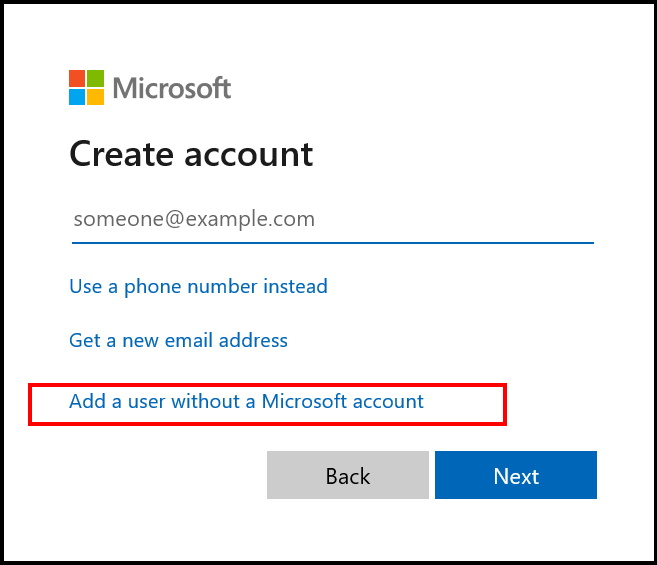
- Then put the desired username and click on the Next button.
- After creating a new user account, switch to it and check if the problem is still there.
- If all ok, move all your files to this user account and remove previous account.
Tips-8: Apply a System Restore to resolve Default Printer keeps changing Automatic in Windows 10
If you have recently made any changes in your system and after that this issue appear, you should apply system restore to resolve the issue regarding Default Printer keeps changing Automatic in Windows 10. System restore will revert back to your system where it was functioning properly. Here is how to apply system restore in Windows 10: –
- Press Win logo + Pause/Break shortcut key conjointly.
- System window will open.
- Select System Protection option from the left menu.
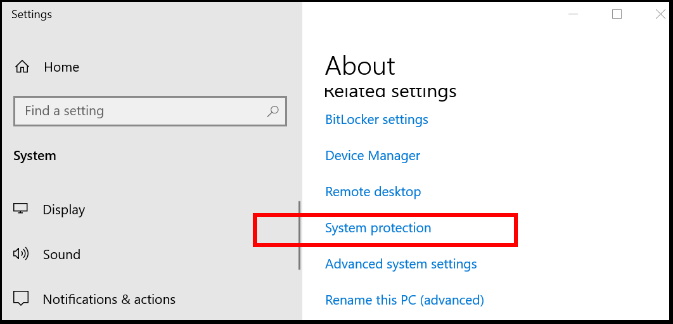
- System Properties window will open.
- To create a restore point, first enable protection by selecting a drive and clicking configure.
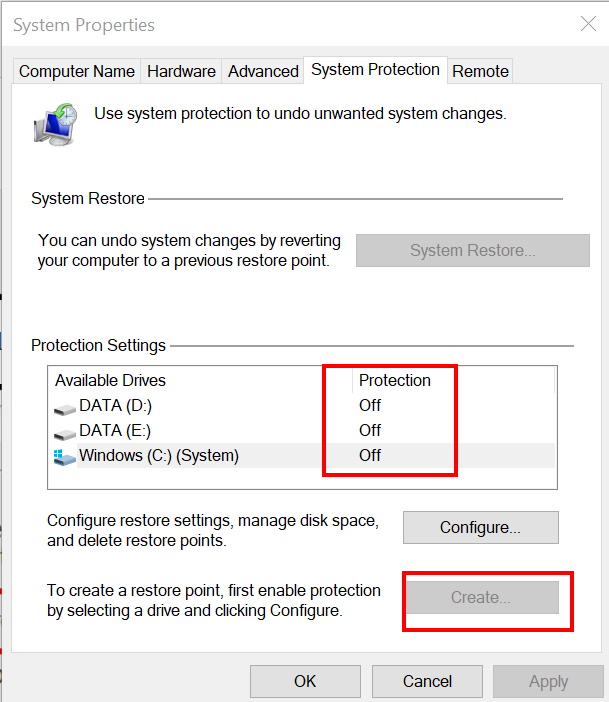
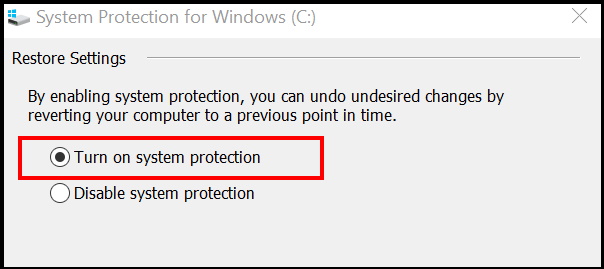
- If you select C drive, a properties window will open now.
- Here select the round button against option Turn on system protection.
- Now again go to the system properties window and select the option Create.
- A new small popup window will open.
- Here you should type a description to help you identify the restore point. The current date and time are added automatically.
- For example, Before installing windows latest update.
- Make a click on create button.
- Now window will initialize to create a restore point.
- Let the window be complete the process.
- As soon as it complete, a small popup confirmation window will appear on your screen.
- The restore point was created successfully.
- Click on Close option.
That’s all.

2 thoughts on “How to resolve Default Printer keeps changing Automatic in Windows 10”