How to Customize Recycle Bin Settings in Windows 11 / 10. Recycle Bin is a storage drive of all your deleted elements. When you delete any files or folders, these deleted items were stored in Recycle Bin. In future, if you want to recover these files, you can easily restore it from Recycle Bin. But question is that, how much time, these deleted files are kept in Recycle Bin. Due to storage issue, Recycle Bin doesn’t keep these files forever. It depends upon your system memory capacity. Windows removes these files from Recycle Bin after sometimes to release extra memory. For more storage in system, users always apply Recycle bin empty option.
But you can store a large number of files by changing Recycle bin settings. If you delete any files accidentally, you can get it back after a long while also. here in this article, we will see How to change Recycle Bin Settings in Windows 11 / 10.
How to Delete Files Permanently without storing in Recycle Bin in Windows 11 / 10
Windows lets you delete files permanently without sending it to Recycle Bin. To do so, change Recycle Bin settings by following these steps: –
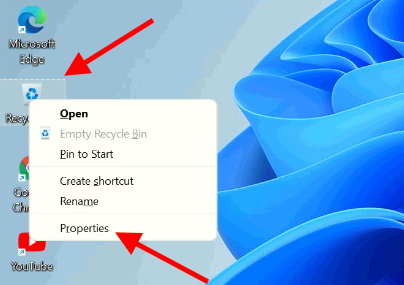
- From the desktop, right click on Recycle Bin icon.
- Select Properties from the context menu.

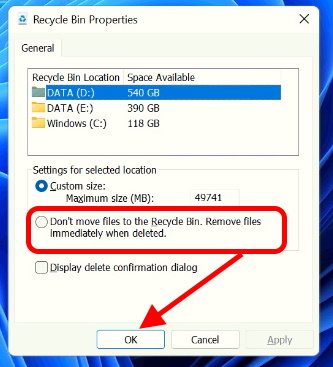
- Here click on radio button against Don’t move files to the Recycle Bin. Remove files immediately when deleted.

- Press on Ok button.
Now when you delete any files, it will not save in Recycle Bin. It will be deleted immediately. However, you can’t recover it in future when needed.
How to change size of storage in Recycle Bin
If you want to delete a large amount of files or folders, you should change the size of storage of Recycle Bin. You can customize the storage size before deleting such files. Follow these steps: –
- Right click on Recycle Bin icon from the Desktop.
- Choose Properties.
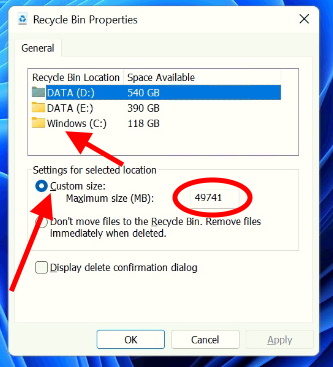
- In Recycle Bin properties window, Choose Recycle bin location as Windows C. You can’t set removable drive for this settings.
- Thereafter under settings for selected location, change the maximum size to keep the maximum storage data in Recycle Bin.

- Finally click on Apply and then Ok button.
Now Recycle Bin folder will keep the files upto the size you have specified in Recycle Bin settings.
How to enable a dialog box before deleting any Files in Windows 11 / 10
Sometimes, user reported that their files were deleted accidentally and no such information found on screen. They are unable to find Recycle Bin recovery in their windows system. In this case, windows let you enable a dialog box before deleting files or folders. When you enable it, every time a dialog box will appear on your windows screen before delete files for your confirmation. To enable it, go through these steps: –
- Apply a right click on Recycle Bin icon.
- Choose Properties.
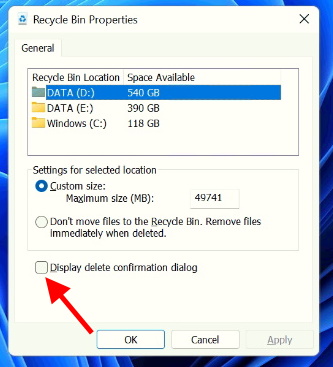
- Tick the box against option Display delete confirmation dialog.

- Thereafter click on Apply and then click on Ok button to save the changes.
That’s all.
