How to Customize Mouse Pointer speed in windows 10. Most of the Windows 10 users prefer Mouse to touchpad in order to complete their task quickly and smoothly. But if you want more option as well as better performance of mouse, you will have to make certain changes or customize Mouse scrolling speed in windows 10. Microsoft allows to make changes in mouse setting as per your requirement. Because, some users prefer slow mouse pointer speed and some users require more speed of mouse pointer and mouse scrolling speed in windows 10. You can easily enhance or limit the speed of your mouse pointer and scroller.
How to Customize Mouse Pointer speed in windows 10
Now we will see How to Customize Mouse pointer speed in windows 10 by various method. We can perform this action by three methods. The first one is through Control Panel, second one is through Windows setting App and also through Registry editor.
How to Fix Middle Mouse Button not working in Windows 10
Through Control Panel
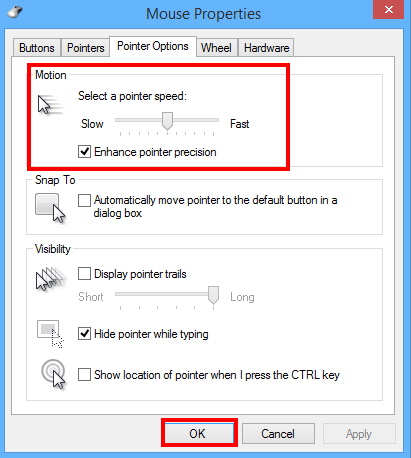
You may change Mouse scrolling speed in windows 10 through Control Panel. Follow these steps to complete the process: –
- Open Control Panel.
- Go to the Hardware and Sound option.
- Here, Click on Devices and Printers option.
- Click the Mouse option.
- Mouse Properties will open.
- Now click on the Pointer Options tab from the top menu bar.
- The first section in this option is Motion.
- Here you will see a slider to increase or decrease pointer speed of mouse.
- You may change pointer speed as per your requirement.

- At the end, click on the Apply and Ok button.
Change Mouse pointer speed in windows 10 through Setting App
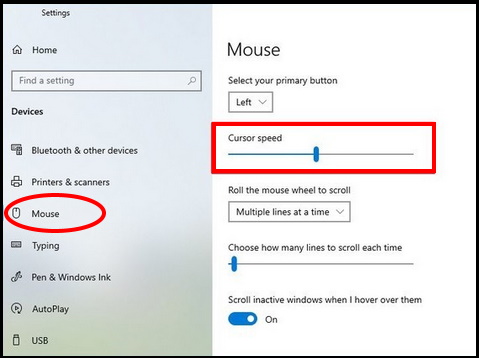
You may change or customize Mouse Scrolling or Pointer speed through windows setting app. Go through these steps: –
- Launch Windows Settings.
- Navigate the option Devices and make a click on it to open.
- From the left pane of setting window, click on the Mouse option.
- Now go to right pane of setting window.
- Use the Cursor speed slider and change the setting as per your requirement.

How to Customize mouse speed using Registry
To customize mouse speed through Registry Editor, is little bit risky. Your silly mistake can harm your system badly. To edit registry, you should be more careful. I recommend you to take a full backup of your system before proceeding to edit Registry of your Windows 10 system. To change the mouse speed modifying the Registry, use these steps:
- Go to Run Command by pressing Win + R shortcut key conjointly.
- Type regedit on it.
- Press Ok or Enter.

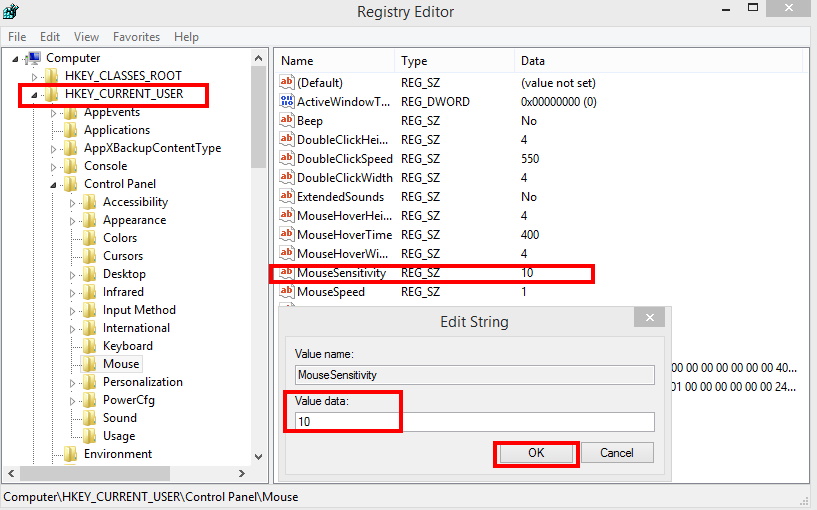
- Registry Editor Window will open now.
- Navigate the following path in Registry Editor Window: –
- HKEY_CURRENT_USER\Control Panel\Mouse
- Now go to the right pane of window.
- Find out the option MouseSensitivity.
- Apply a double click on it.
- A new small window will open.
- Here you should set the value from 1 to 20 as per your requirement.

- At last, click on Ok button to make the changes save.
- Don’t forget to restart your system.
- In future, if you want to change or restore previous speed, apply the same method and keep the data value from 1 to 10 or 10 only.
That’s all.

1 thought on “Tips: How to Customize Mouse Pointer speed in windows 10”