How to Automatic Switch to Strong Wi-Fi Network in Windows 10. Every one wants to have a strongest Wi Fi connections while they work either at office level or personal level. If you are working in urgency and page loading is slower than your requirement, you expect switch to a strong Wi-Fi network for fastest mode of downloads/Uploads. Page loading, downloads and uploads such action required strongest network.
You can apply a speed test of Internet connection, if you having a hotspot in your office or work place. Many third party tools are available to measure the speed of Internet connection through which you can detect the signal strength of your network connection. You can also automatic Switch to Stronger Wi-Fi Network in Windows 10. Although windows 10 does not provide the option to automatically switch to strong wi-fi network. However, you can manually configure wifi settings the windows 10 to Automatic Switch to Strong Wi-Fi Network.
How to Automatic Switch to Strong Wi-Fi Network in Windows 10
Here is the process to automatic switch to strongest Wi-Fi network in Windows 10.
How to increase Wi-Fi range to boost weak Wi-Fi signal in Windows 10
Ways-1: Change Adapter option
- Go to the start.
- Apply a right click on it and choose the option Setting.
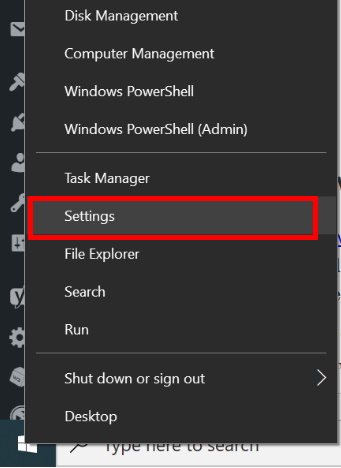
- Windows settings page will open now.
- Go to the Network & Internet section.
- Now go to the right side of settings window.
- Choose the option Change Adapter options under Advance network settings.
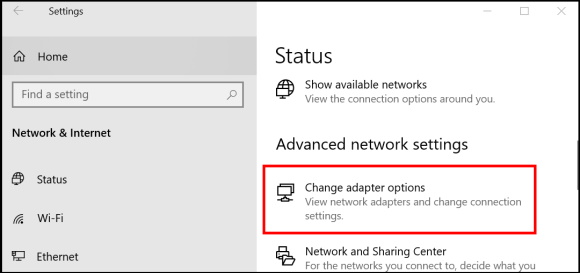
- All the available network will appear in a new window page.
- Make a right click on your network and choose the option status.
- Your Wi-Fi status window will open.
- Click on the option Wireless properties.
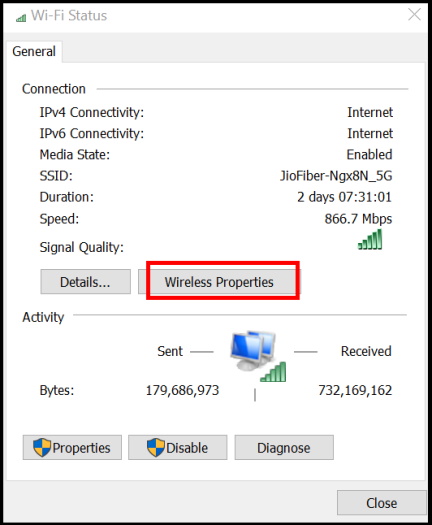
- In the wireless properties network window, go to the connection tab from the top menu bar.
- mark the check against the box Look for other wireless networks while connected to this network.
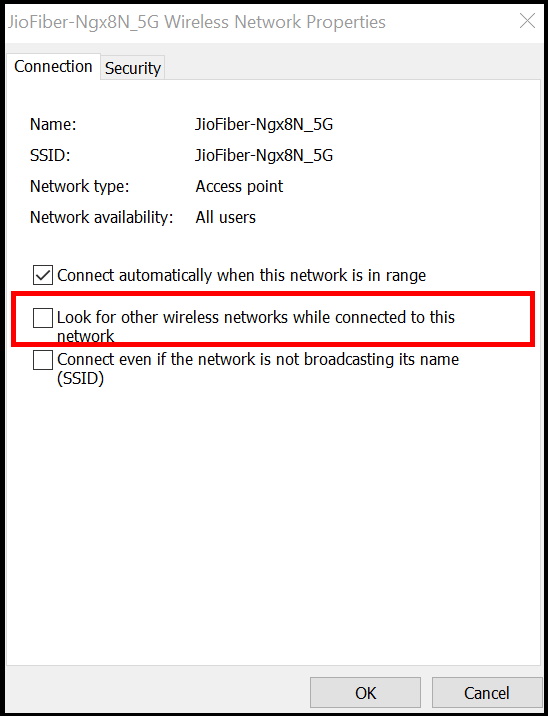
- At the end, click on Ok button to save the changes.
- Now It will look for another available stronger wi-fi signal and connect them accordingly.
Ways-2: Set the Highest value of Roaming aggressiveness to Automatic Switch to Strong Wi-Fi Network in Windows 10
The main role of Roaming Aggressiveness is to modify the strength of signal while scanning of extra candidate access point through Adapter. If you choose the highest value, it will trigger roaming scan for additional candidate AP even when the running AP signal strength is better. Follow these steps: –
- Press Win + R shortcut key.
- Run command will open now.
- Type devmgmt.msc in it and press Ok.

- Device Manager window will open now.
- Now from the left side of page, navigate the option Network Adapter.
- Click on it to expand.
- Thereafter make a right click on your network adapter driver.
- Choose the option properties from the drop down menu.
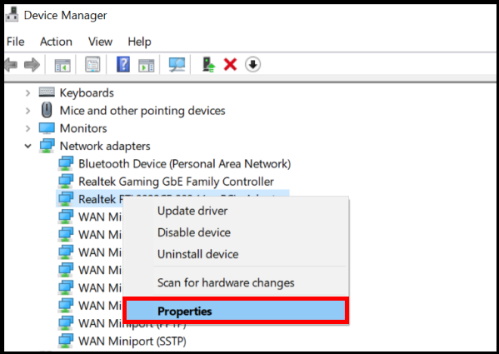
- Here go to the Advance tab from the top menu bar.
- Thereafter go to the Property section.
- Find out the option Roaming Aggressiveness.
- Then go to the Value section adjacent to property section.
- Here set the value Highest.
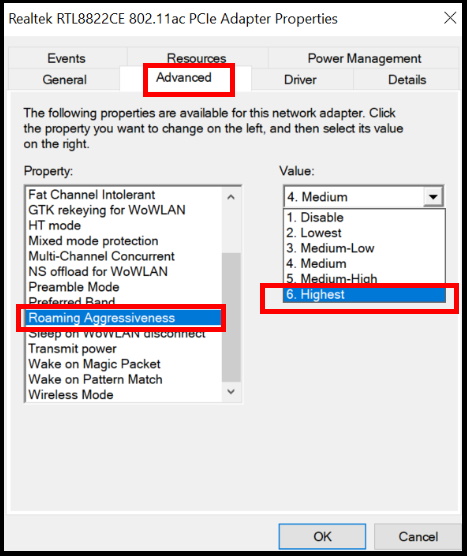
- At the end, click on Ok button to save the changes.
- Now your system will automatically switch to stronger Wi-Fi network in Windows 10.
That’s all.

1 thought on “Automatic Switch to Strong Wi-Fi Network in Windows 10”