How to add “Scan with Windows Defender” option in right click menu in. Microsoft provides an in-built tool Windows defender for better security of your windows system. Windows defender protects your system from external threats such as viruses, malware etc. But today we are going to discuss about an extra feature of windows defender firewall. You can scan your any files or folders as well as removable drives with just one right click.
When you apply a right click on any specific folder, a drop down menu appears in which various task is added. But Scan with Windows defender option may bot be available. Scanning feature of windows defender is not held with context menu. Whenever you add or attach any removable disk, there will be a necessity to be scanned it. For this, scan with windows defender feature must be available in context menu so that you could perform the scanning process with just a right click.
How to add “Scan with Windows Defender” option in right click menu in windows 10
Here is the complete procedure: –
- Go to search menu.
- Type Notepad in it.
- A list of best match will appear.
- Pickup the top result as Notepad Desktop app.
- Now copy the following command as its is and paste into Notepad.
Windows Registry Editor Version 5.00
; Folder Scan
[HKEY_CLASSES_ROOT\Folder\shell\WindowsDefender]
“Icon”=”%ProgramFiles%\\\\Windows Defender\\\\EppManifest.dll”
“MUIVerb”=”Scan with Windows Defender”
[HKEY_CLASSES_ROOT\Folder\shell\WindowsDefender\Command]
@=”cmd.exe /s /c \”\”C:\\Program Files\\Windows Defender\\MpCmdRun.exe\” -scan -scantype 3 -SignatureUpdate -file \”%1 \”\” & pause”
; File Scan
[HKEY_CLASSES_ROOT\*\shell\WindowsDefender]
“Icon”=”%ProgramFiles%\\\\Windows Defender\\\\EppManifest.dll”
“MUIVerb”=”Scan with Windows Defender”
[HKEY_CLASSES_ROOT\*\shell\WindowsDefender\Command]
@=”cmd.exe /s /c \”\”C:\\Program Files\\Windows Defender\\MpCmdRun.exe\” -scan -scantype 3 -SignatureUpdate -file \”%1 \”\” & pause”
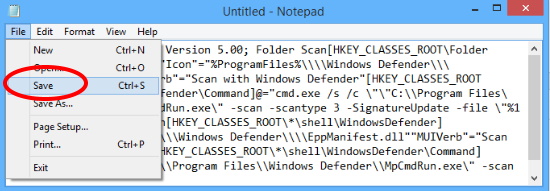
- Now go to the file option from the top menu bar of Notepad.
- Click on save option.

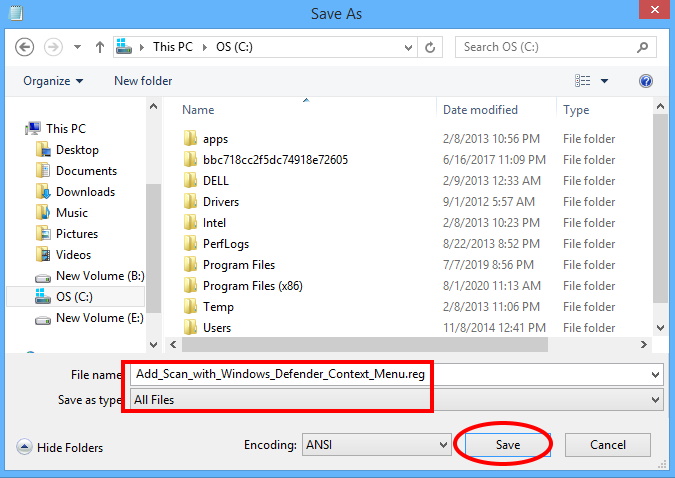
- Save window will open.
- Under the file name option, copy the following and paste into it. Your file name should be as it is: –
- Add_Scan_with_Windows_Defender_Context_Menu.reg
- Click on Save button after selecting a proper file location.
- Under save as type, you should opt All Files.

- Now proceed to the file location where you save Notepad file.
- Make a double click on it to open.
- A wizard will prompt duly asking your permission.
- Click on Yes to confirm.
- Now you may check whether this option appear in context menu or not.
- Make a right click on any file or folder you want to scan.
- Scan with windows defender will appear on drop down menu.
Now there is no any requirement of full scanning of your system. You may apply it for only a single folder as well as save time also.
That’s all.

1 thought on “Tips: Add “Scan with Windows Defender” option in right click menu in windows 10”