How to Remove Login Password in Windows 11 Permanently. Although password or authentication is important in respect of security of every Windows system that are operated publicly or official capacity. But if your system is used single handed and each time required a password when screen is lock, it is little redundant for such users.
Microsoft has also kept the security point in mind while launching Windows 11. Microsoft has added many new or improved security aspects to Windows 11. On each time login required, this feature is also available in Windows 11. You can Windows 11 login without password. Here in this article, we will see how to remove Login Password in Windows 11.

You can’t remove password from Microsoft Account, you can only disable it. When you disable the password, you wouldn’t be required to enter it every time you log in to Windows 11.
How to Remove Login Password in Windows 11 Permanently
There are two ways to remove password in Windows 11. The first one is through User Accounts panel and the second one is through modifying Registry in Windows 11.
Ways-1: Remove Sign in Password through User Accounts Panel
To remove or disable login password, you can use either Microsoft account or Local user account. Here is how to remove password from local account in Windows 11. Follow these steps: –
- Press Win + R key to open Run Command box in Windows 11.
- Type netplwiz in it and press Ok button.
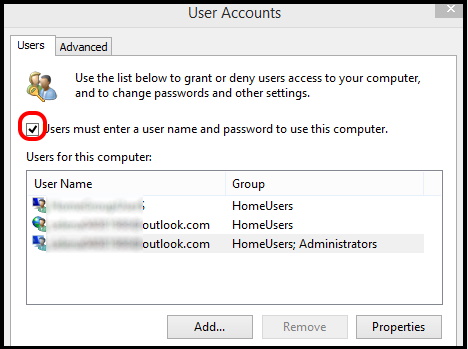
- Here you will find the list of user accounts available in your Windows 11 system.
- Select the user accounts for which you want to disable login password.
- Here Untick the box against option Users must enter a user name and password to use this computer.
- Click on Ok button.
- Now, enter the sign-in details, for the Microsoft/Local Account linked to your computer.
You could either enter the username or email ID in the ‘User name’ section and then enter the password in the following two sections. Finally, click on ‘OK’ at the bottom to save the changes.
Now, each time you restart the computer with the selected account above, you wouldn’t be required to enter the sign-in details.
Ways-2: Go through Registry Editor in Windows 11
This is the second option to remove login password in windows 11. Although editing Registry is risky, so you must keep a backup before modifying registry. Then follow these steps: –
- Go to start.
- Click on Search icon.
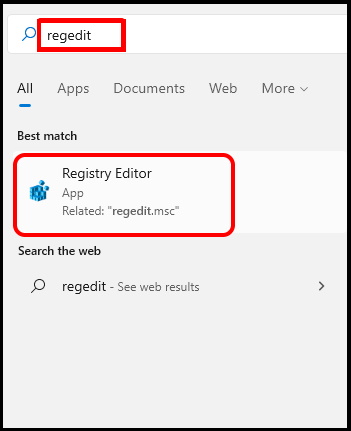
- Type regedit on it.
- Choose the option Registry Editor from appeared result.
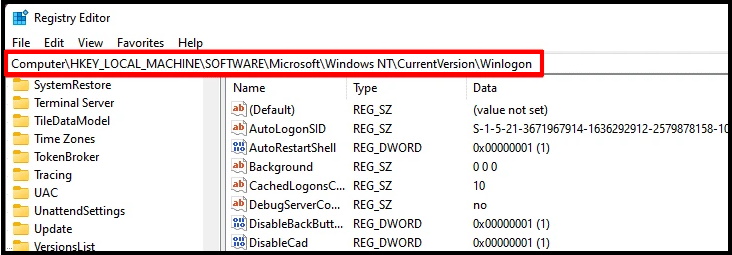
- In registry editor window, navigate the following path: –
- Computer\HKEY_LOCAL_MACHINE\SOFTWARE\Microsoft\Windows NT\CurrentVersion\Winlogon
- Thereafter go to the right side of window.
- Make a right click on empty space and hover the cursor over ‘New’, and select ‘String Value’ from the list of options.
- Name the string as ‘DefaultUserName’.
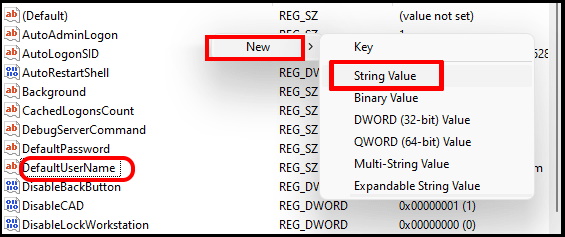
- Next, apply a double-click on the string you just created.
- Here enter your Microsoft Account username or email ID in the section under Value data.
- Finally click on OK to save the changes.
- Now, create another string and rename it as DefaultPassword.
- Apply a double-click on the ‘DefaultPassword’ string you just created.
- Enter your Microsoft account password under the ‘Value data’ section, and click on ‘OK’ at the bottom to save the changes.
- Now, create another string and rename it as AutoAdminLogon.
- Apply a double-click on the ‘AutoAdminLogon’ string you just created.
- Enter 1 under ‘Value data’ in place of ‘0’.
- Make a click on OK bottom to save the changes, and close the Registry Editor.
- Restart your system.
Now, you wouldn’t be required to enter the log-in password for the account you entered in the Registry.
That’s all.

1 thought on “How to easily Remove Login Password in Windows 11 Permanently”