How to Customize Crash Dump Setting in Windows 10. Whenever Windows 10 crash, the system creates a dump file (.dmp) contains system information at the time of error. Users can identify the reason of Windows 10 crash through these dump files. These .dmp files having stop error messages as well as other info about types of dump files. Sometimes while you face any critical error in windows 10, these dump files will take action accordingly to resolve the specific error.
Dump files basically occur on appearance of Blue screen of death error in Windows 10. These dump files are called Bug check, Stop error, System error. It will automatically reboot your windows 10 system as well as completely shutdown your system.
How to Customize Crash Dump Setting in Windows 10
You can customize the settings of Crash dump files so that it could be manage and action taken on each error. All the dump files of different category but you will find a common among these crash dump files, these files having information loaded while crashing the system.
Crash dump files are more useful for you as these are helpful in resolving various troubleshoot as well as debugging of windows 10 system. To customize the Crash Dump file settings, go through the following tips: –
Ways-1: Through Windows Setting App
- Press Win + I shortcut key.
- Settings app will open.
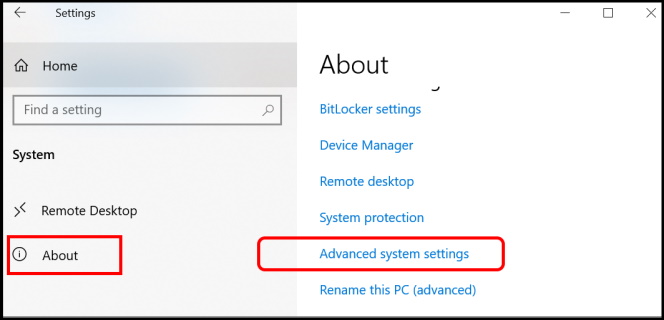
- Go to the section System.
- From the right side of setting window, choose the option About.
- Thereafter go to the right side and select the option Advanced system settings.

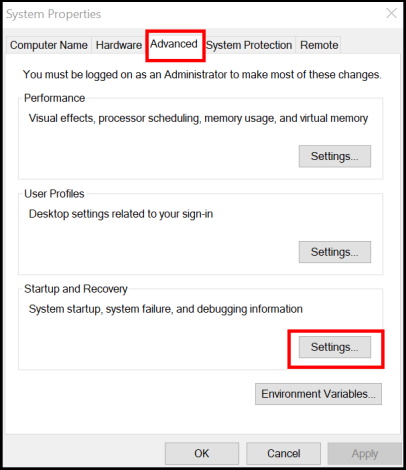
- Now a new System Properties window will open.
- Here go to the Advanced tab from the top menu bar.
- Go to the Startup and Recovery Section.
- Click on the option Settings.

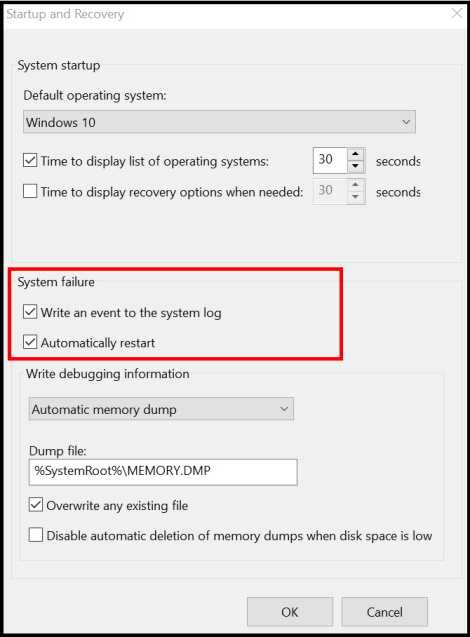
- Now make the check against the option Write an event to the system log as well as clear or check the option against box Automatically restart.

- Now go to the Write debugging information section.
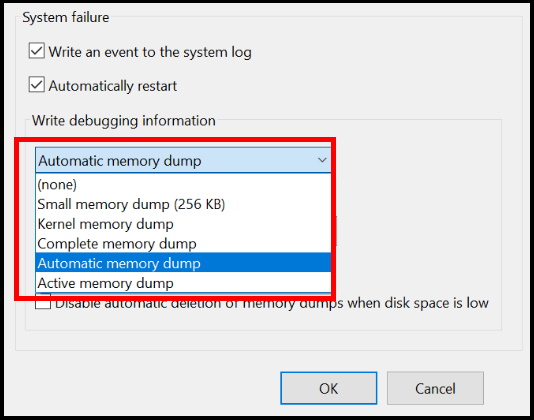
- Make a click on the small arrow, you will find the five options available here.

Write Debugging Information
These are the five options available under the Write debugging information section: –
1. Small Memory Dump: As usual by name itself, this option having a small amount of error code of Blue screen of death. %SystemRoot%\Minidump is the directory or folder where small memory dump data saved. You can save very limited data of an error in this folder.

2. Kernel Memory Dump:This option keeps the record of information related to System Kernel, Kernel mode drivers and programs. Kernel memory dump files stored in %SystemRoot%\MEMORY .DMP directory and consumes half of the total physical memory of windows 10 system. This is the most used as well as recommended option that provides you lot of memory without consuming extra space.

3. Complete Memory Dump: This dump file is a large file having a lot of memory. It requires a .pagefiles to to store maximum file size of your system memory. If you choose this option, all your crash dump file will save in the %SystemRoot%\MEMORY.DMP directory.

4. Automatic Memory Dump: This crash dump file will save in the directory %SystemRoot%\ MEMORY.DMP. It collects the information assigned in memory same as the “kernel memory dump,” but if the virtual memory is set to “system managed size,” Windows 10 can automatically configure the file size to store the data required to scrutinize the issue.

5. Active Memory Dump: This type of dump files are saved into %SystemRoot%\MEMORY .DMP folder. This option is almost same as the Complete memory dump.

You can also make some other settings on the same window. These are as under: –
- Check or clear the Overwrite any existing file option.
- Check or clear the Disable automatic deletion of memory dumps when disk space is low option.
- Thereafter make a click on the OK button.
How to Disable Crash Dump settings in Windows 10
- Press Win + I shortcut key.
- Settings app will open.
- Go to the section System.
- From the right side of setting window, choose the option About.
- Thereafter go to the right side and select the option Advanced system settings.
- Now a new System Properties window will open.
- Here go to the Advanced tab from the top menu bar.
- Go to the Startup and Recovery Section.
- Click on the option Settings.
- Thereafter go to the Write debugging information section.
- Make a click on the small arrow, you will find the five options available here.
- Here choose the option None. It will disable Crash Dump creation in Windows 10.
- At the end, click on Ok button to save the changes.
Ways-2: Customize Crash Dump Settings through Command Prompt
You can also change crash dump file setting through Command Prompt or Windows PowerShell.
At first we will see how to enable / disable System log events and also automatic restart system after a crash through command prompt window. Go through these steps: –
- Go to the search.
- Type cmd in it.
- Choose the option Command Prompt appeared as top result.
- Thereafter go to the right side and select the option Run as Administrator.
- Now type the following command and press Enter: –
- wmic recoveros set WriteToSystemLog = False

- Above command will disable the system from writing event crash logs. If you want to re-enable this feature, simply type the value True in place of False in Command Prompt window.
- Thereafter type the following command to disable automatic restart after appearing a Blue screen error in Windows 10 and press Enter key to execute the command: –
- wmic recoveros set AutoReboot = False

- Now if you want to re-enable it, type the command True in place of False and press Enter.
Now the system will write logs and restart automatically once crash occurs in your system according to your configuration.
How to Disable Creation of Crash Dump Files after Crash in Windows 10
- Go to the search.
- Type cmd in it.
- Choose the option Command Prompt appeared as top result.
- Thereafter go to the right side and select the option Run as Administrator.
- Now type the following command and press Enter: –
- wmic recoveros set DebugInType = 0

Now Windows 10 will no longer create dumps files during a bug check.
How to Enable Debugging Information through Command Prompt in Windows 10
As we have discussed above, there are five option available to write debugging information in Windows 10. You can choose or enable these options through Command Prompt window also.
Enable Small Memory Dump
- Go to Start.
- Search for Command Prompt.
- Apply a right-click on the top result appeared as Best match and choose the option Run as administrator.
- Thereafter type the following command to enable Small memory Dump option in Windows 10 followed by Enter key: –
- wmic recoveros set DebugInfoType = 3
- Now your system will create a smaller amount of crash dump file not more than 64KB in size.
Enable Kernel Memory Dump
- Type the following command to enable Kernel memory Dump option in Windows 10 followed by Enter key: –
- wmic recoveros set DebugInfoType = 2
Windows 10 will now create a file smaller than the complete option with system kernel allocated information, hardware abstraction layer (HAL), kernel-mode drivers, and other kernel-mode programs.
Enable Complete Memory Dump
- Type the following command to enable Complete memory Dump option in Windows 10 followed by Enter key: –
- wmic recoveros set DebugInfoType = 1
Now, after receiving a Blue screen error in Windows 10, a file with everything loaded in memory will be created for debugging and troubleshooting.
Enable Automatic Memory Dump
- Type the following command to enable Automatic memory Dump option in Windows 10 followed by Enter key: –
- wmic recoveros set DebugInfoType = 7
After executing above3 mentioned command, the system will create a dump file similar to the one from when using the “kernel memory dump” option. After this command, now system will automatically manage the size of file.
How to change Default Crash Dump File location in Windows 10 through Command
You can also change the dump file location through Commands in windows 10. Use these steps to complete the process: –
- Go to Start.
- Search for Command Prompt.
- Apply a right-click on the top result appeared as Best match and choose the option Run as administrator.
- Thereafter type the following command to change default crash dump file location in Windows 10 followed by Enter key: –
- wmic recoveros set DebugFilePath = PATH\TO\FOLDER
- Here replace the PATH\TO\FOLDER with your desired file location such as, if you want to save the file location in D drive with the name of file as Error: –
- wmic recoveros set DebugFilePath = D:\Error

How to Enable / Disable Overwrite existing file in Windows 10
To enable or disable the function to overwrite older files, follow these steps:
- Go to the search.
- Type cmd in it.
- Choose the option Command Prompt appeared as top result.
- Thereafter go to the right side and select the option Run as Administrator.
- Now type the following command to disable the overwrite Existing file option and press Enter: –
- wmic recoveros set OverwriteExistingDebugFile = 0
- To enable Overwrite Existing file option, type the following command and press Enter: –
- wmic recoveros set OverwriteExistingDebugFile = 1
That’s all.
