How to fix Transmit Error Code 1231 in Windows 10. Transmit Error code 1231 is basically a network related issue that appears when you try to connect remote computer in workgroup over Network. The following are the main reasons behind this error in windows 10: –
- The name of Machine having lower case letters. You can resolve Transmit Error Code 1231 issue by renaming the faulty machine with upper case letters only.
- Outdated Network Adapter. Outdated network adapter may be a cause of Transmit Error code 1231 in Windows 10.
- Network discovery feature unavailable. Network discovery features must be enable for part of your workgroup.
- Incorrect configuration of TCP / IP. Incorrect configuration of TCP/IP may be a cause of this issue.
How to fix Transmit Error Code 1231 in Windows 10
Here are the various ways to resolve this issue. You may apply any one of them as per your system requirement.
Ways-1: Rename the Machine having Lower case letter only
At first you will have to find out the machine having name with lower case letter only. If any found, you should rename it by following these steps: –
- Type Win + R shortcut key.
- Run command will open.
- Type the following command in Run dialog box and press Enter: –
- ms-settings:about
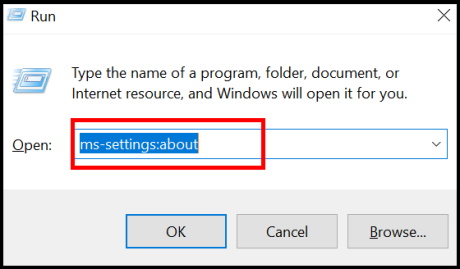
- Windows setting about page will open.
- Go to the right side of the page.
- Make a click on Rename this PC.
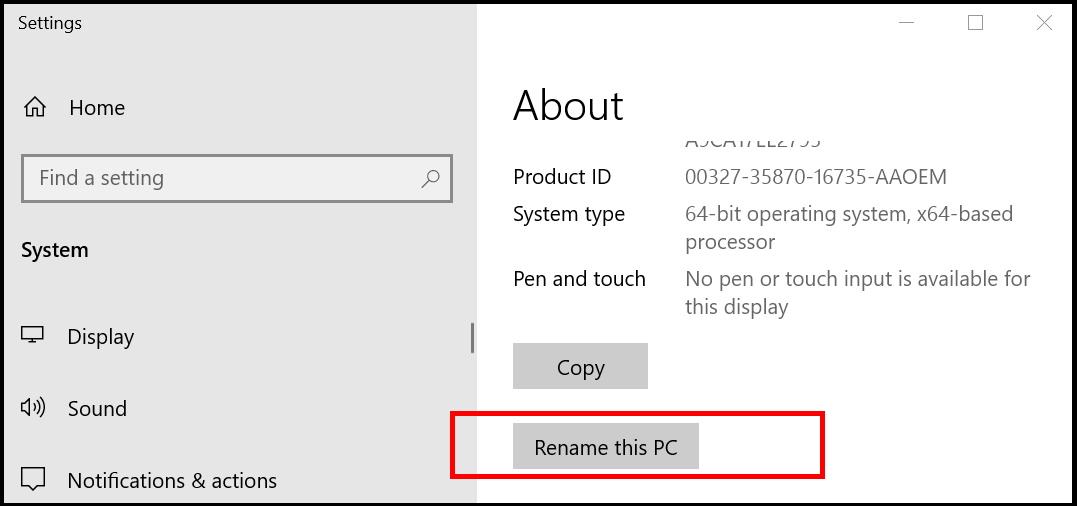
- A new window will open.
- Enter the new name with Upper case letter only.
- Thereafter click on the Next button.
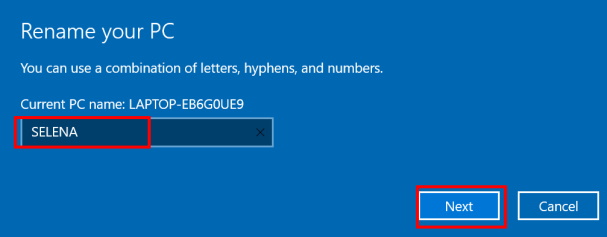
Let the window be complete the renaming process. Wait for some times. It will take a while. Once. complete the process, Restart your windows 10 system and try to connect the workgroup with the new name of system.
If you fail to rename the system through above mentioned method, you may go through these steps: –
- Apply a right click on the start button.
- Choose the option Run.
- Now type the following command in the Rin box and press Enter key.
- sysdm.cpl
- Now System properties window will open.
- Once the System Properties appear, go to the “Computer Name” tab.
- To change the name of the computer, click on “Change…“.
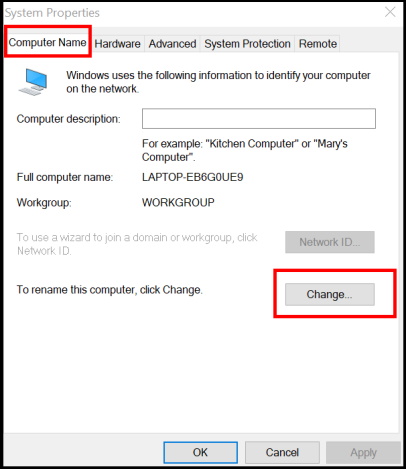
- A new window will open.
- Here go to the Computer name section.
- Choose a name of system having upper case letter only.
- Thereafter click on Ok button to save the changes.
- Restart your system.
Ways-2: Update the Network Adapter Driver to fix Transmit Error Code 1231 in Windows 10
- Go to the start button.
- Apply a right click on it and choose the option Device Manager from the menu list.
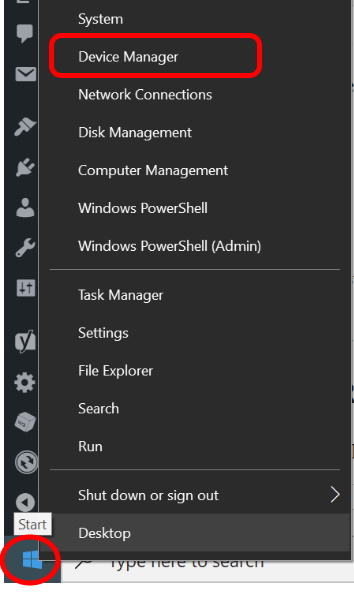
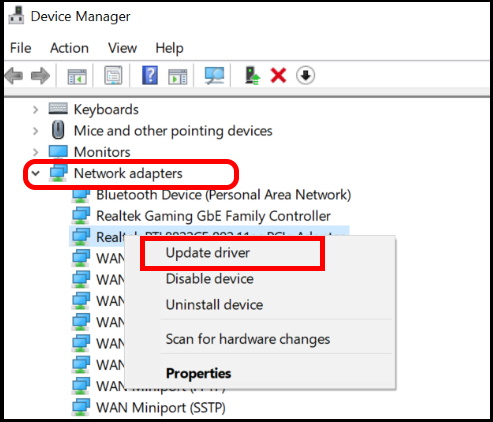
- Now go to the Network Adapter section in Device manager list.
- Make a click on it to expand.
- Here choose your Network adapter.
- Make a right click on it and select the option Update Driver.
- In new window, How do you want to search for drivers?
- Choose the option Search automatically for drivers.
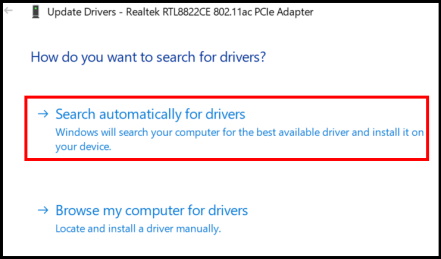
- Let the window be update the driver with available update in Windows 10.
- Once complete the process, Restart your system.
Ways-3: Reinstall Network Adapter driver
- Press Windows key+R.
- Type devmgmt.msc in it and press Enter.
- In the Device Manager window, navigate the option Network Adapter.
- Make a click on it to expand.
- Apply a right click on your Network Adapter driver.
- Choose the option Uninstall.
- Let the window complete the uninstallation process.
- Thereafter Restart your Windows 10 system
- Windows will now automatically reinstall Network Adapter driver.
- Now again go to the Device Manager window.
- Here select the Action tab from the top menu bar.
- Choose the option Scan for Hardware changes from the drop down menu.
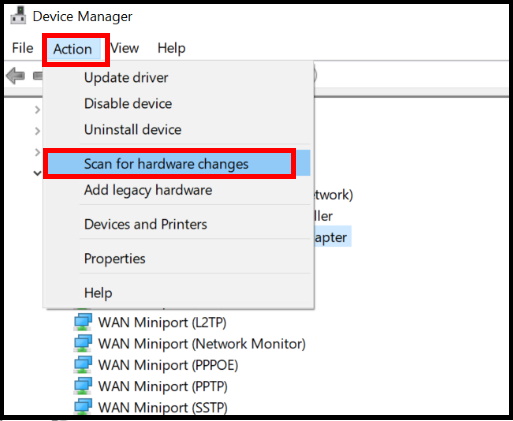
Now, try to connect to that specific system again. Check if this is functioning or not.
Ways-4: Enable Network Discovery Feature to fix Transmit Error Code 1231
- Press the Win key+R keys conjointly.
- Type the following command and click on “OK“.
- control.exe /name Microsoft.NetworkAndSharingCenter
- Control Panel window will open.
- Here click on the option Change Advanced Sharing settings.
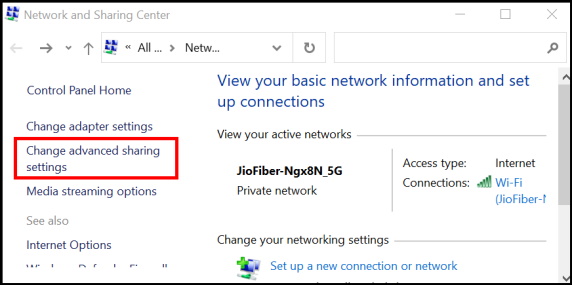
- Advance sharing settings window will open now.
- Thereafter go to the Network discovery feature under private Network.
- Turn the toggle button On against the option Turn on Network Discovery.
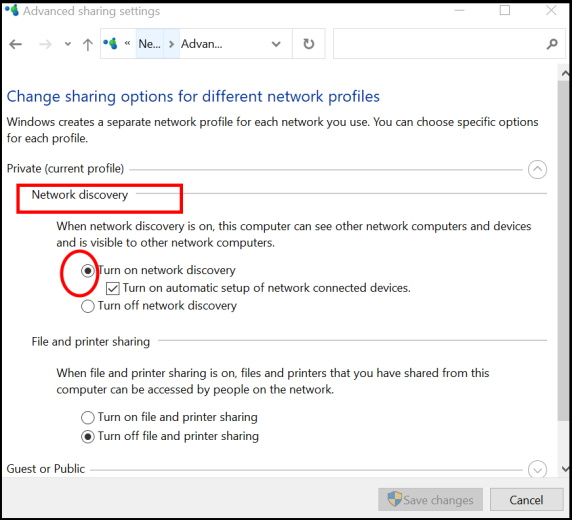
- At the end, click on Save changes button from the top bottom.
Check whether your issue regarding Transmit Error Code 1231 in Windows 10 resolved or not.
How to fix Network Discovery Missing Error in Windows 10
Ways-5: Reset TCP/IP configuration to fix Transmit Error Code 1231 in Windows 10
- Go to the Windows search.
- Type cmd in it.
- Command prompt will appear as best match.
- Now go to the right side of page and choose the option Run as Administrator.
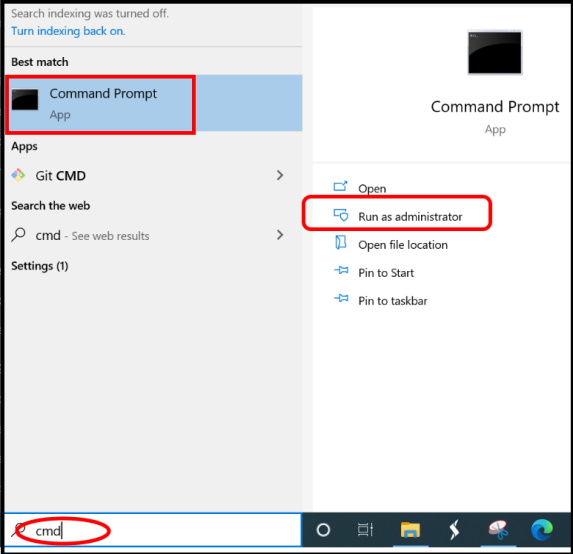
To reset the TCP/IP configuration, type these commands one by one and press Enter to execute these codes: –
1. ipconfig /flushdns
2. nbtstat -R
3. nbtstat -RR
4. netsh int reset all
5. netsh int ip reset
6. netsh winsock reset
After executing these commands, close the Command Prompt terminal.
Check if this works out.
Ways-6: Create a new executable batch File
According to some user’s experience, after creating a new executable batch file may resolve this issue. You should follow these steps: –
- Open the Notepad on your system.
- Type the following command in the notepad. You may copy-paste from here.
- sc.exe config lanmanworkstation depend= bowser/mrxsmb10/nsi
sc.exe config mrxsmb20 start= disabled
- sc.exe config lanmanworkstation depend= bowser/mrxsmb10/nsi
- Thereafter click on the file menu from the top menu bar.
- Click on the option Save as from the drop down menu.
- A new box will open.
- Here choose the file type as All Files.
- Under name of file column, put the name as newscript.bat.
- Thereafter click on Ok button.
- Close the Notepad.
- Now go to the file location that you saved recently.
- Make a right click on newscript.bat file and choose the option Run as Administrator.
- Restart your system.
This script will run on your Windows system and resolve the issue regarding Transmit error code 1231 in Windows 10.
That’s all.
