How to Fix Internal Hard Drive not Showing in Windows 10 This PC. Sometimes when you open File explorer in your windows 10 system, no any drives icon displays under devices and drives section. In other word, you may say that your system failed to recognize one of your Hard drives. The same different issues also reported by several users, such as: –
- Hard drive shows up in Disk Management but not in Windows.
- Disk not showing in Disk Management.
- Hard disk shows up in BIOS but not in Windows.
- Hard drives cannot be detected in BIOS.
- USB drive or external hard drives not showing up.
- Newly created Hard drives not recognized by computer.
Initial Workaround
Before checking or changing in settings, you should try few initial workaround to resolve the issue regarding Internal Hard Drives not Showing in Windows 10 This PC.
- You should ensure that hard drive is correctly connected to the computer with accurate power supply adapter.
- In case of external Hard Drive, disconnect once and try to change it to another USB Port.
- If you are using USB hub to connect Hard drive with the system, try to connect directly with system without USB hub.
- In case of internal drive, data and power cable must be fitted properly with the PC.
- While checking the internal components, ensure power off and unplug the computer before starting the process.
- You should check the device correctness by plugging in with another computer. If it works with another computer, your device is correct and problem is with system.
- Try to access the computer Basic Input Output System (BIOS) or Unified Extensible Firmware Interface (UEFI), and ensure proper detection of storage.
How to Fix Internal Hard Drive not Showing in Windows 10 This PC
If none of the above mentioned initial workarounds effective and failed to resolve your issue, go through the tips described below. You may apply any one of them.
Tips-1: Find Hard Drive through Device Manager
If none of the hard drive is showing in File explorer as well as Disk management, there may be a possibility of hard drives are in disable mode in Device Manager. You should make enable it through Device Manager. Follow these steps: –
- Go to start menu.
- Make a right click on it and choose Device Manager.
- From the available menu, navigate the option Disk drives.
- Make a click on it to expand.
- Apply a right click on your disk drives and choose the option Properties.
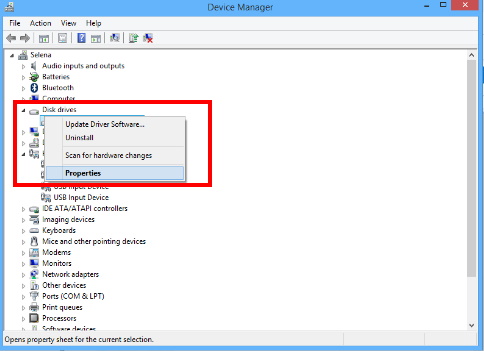
- Thereafter go to the Driver tab from the top menu bar.
- Now click on the Enable Device button.
- Then click on the OK button.
Tips-2: Use Disk Management to Fix Internal Hard Drive not Showing in Windows 10 This PC
For display of Hard drive in file Explorer, the following are the minimum requirement, you must ensure: –
- Your drive must be available online.
- The device should properly initialized
- Properly configuration of Drive partition
- Also assignment of Drive letter completed
- Configure new partition
If you are encountering above issue in your windows 10 system, here are the solution to resolve the issue related to Disk Management.
1. Set Hard Drive Online
To set a Hard drive online, follow these steps: –
- Press Win + R shortcut key.
- Run command is open now.
- Type diskmgmt.msc in it and press Enter key.
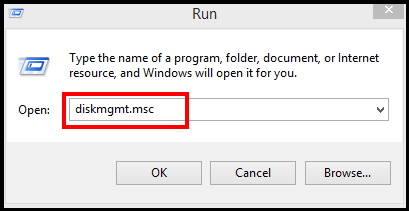
- Disk Management window will open.
- Here find out the drive partition having offline label.
- Make a right click on it and choose the option Online.
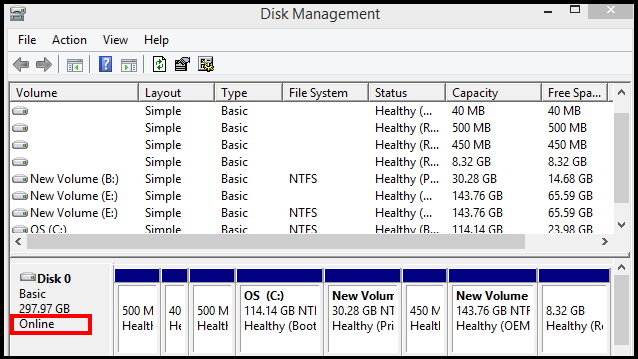
- Now that hard drive will definitely appear in File Explorer.
2. Initialize Hard Drive
To initialize hard drive, follow these steps: –
- Go to Start.
- Look for Disk Management and choose the top result to open the app.
- Thereafter make a right-click on the disk having Unknown label.
- Choose the option Initialize Disk.
- Now go to “Select disks” section and mark the check against the drive you want to initialize.
- Select the GPT (GUID Partition Table) option.
- Thereafter click on the OK button.
Now, this process will clean everything on the drive and prepare it to be formatted if the storage was never initialized.
3. Import foreign disks
If any of your drive not displaying in File Explorer, it may having quality of Dynamic disk. Dynamic disk acts as a foreign disk on another computer. In this case, you will have to import foreign disk via disk management. The process of importing will never loose your data, even though you must create a backup of your data before applying this process.
How to Create Backup of Settings and Restore in Windows 10
To import hard drives having dynamic configuration to make it accessible through File Explorer, follow these steps:
- Open Start.
- Look for Disk Management and select the top result to open Disk Management window.
- Thereafter make a right-click on the disk having Dynamic label.
- Choose the Import Foreign Disks option.
- Now go to the “Disk groups” section.
- Select the Foreign disk group (1 of 1 disks) item.
- Then click on the OK button.
- Again click on the OK button.
4. Configure drive letter
Hard drives should have own drive letter. If the hard drives are online and initialized, but not appearing in the system, there may be two reasons behind this. Either the drive does not have a drive letter Or if it was connected to another computer, and the new system is now trying to assign the same drives letter already assigned to another drives on the machine.
To assign a drive letter to external drive in Windows 10, follow these steps: –
- Press Win + R shortcut key.
- Run command is open now.
- Type diskmgmt.msc in it and press Enter key.
- Make a right-click on the partition of the hard drive doesn’t having drive letter.
- Select the option Change Drive Letter and Paths.
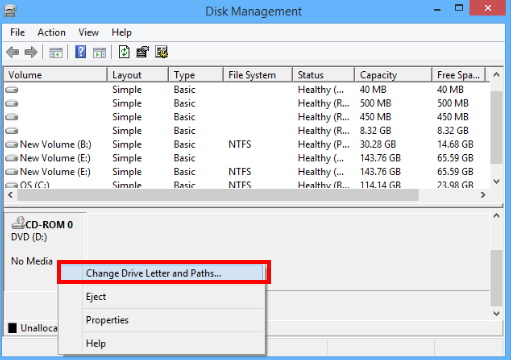
- Thereafter click on the Add button.
- Choose the option Assign the following driver letter.
- Now click on small arrow and from the drop-down menu option, select a drive letter – for example, M, N, or O.
- At the end, click on the OK button.
Now the drives will show in File Explorer of Windows 10 This PC.
5. Configure New Partition
An online initialized and configured drives must have a formatted partition. You should use the disk management tool to assign a letter to partition as well as configure a partition. Go through these steps: –
- Open Start.
- Search for Disk Management.
- Select the top result displayed as Disk Management.
- Now make a right-click on the partition of the hard drive that doesn’t having a drive letter.
- Select the New Simple Volume option from the drop down menu.
- Thereafter click on the Next button.
- Again click on the Next button to use all the available space for the partition.
- You may specify the size in the option Simple volume size in MB.
- Now choose the option Assign the following driver letter.
- Here, you should select a drive letter from the drop down menu under small arrow – for example, M, N, or O.
- Then click on the Next button.
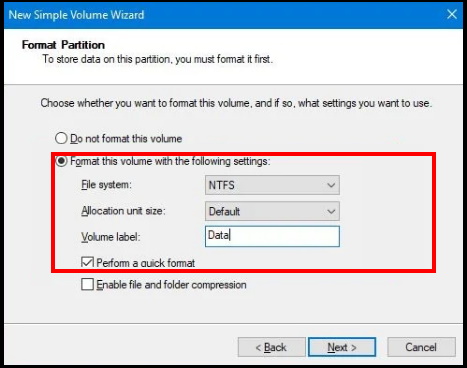
- Select the Format this volume with the following settings option.
- Use the “File system” from the drop-down menu and choose the option NTFS.
- Use the “Allocation unit” size from the drop-down menu and choose the option Default.
- In the “Volume label” field, confirm a descriptive name for the drive, Such as data.
- Then check on the Perform a quick format option.
- Thereafter click on the Next button.
- At the end, click on the Finish button.
Tips-3: Update Driver to Fix Internal Hard Drive not Showing in Windows 10
Outdated driver may be a cause of Hard drives not showing in File Explorer of Windows 10. You must update driver to fix this issue. Follow these steps: –
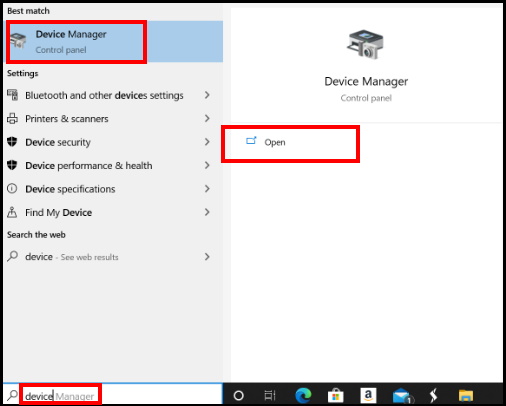
- Go to Windows search option.
- Type device in it.
- Select the Device Manager option from the top result.
- From the right side of page, click on Open.
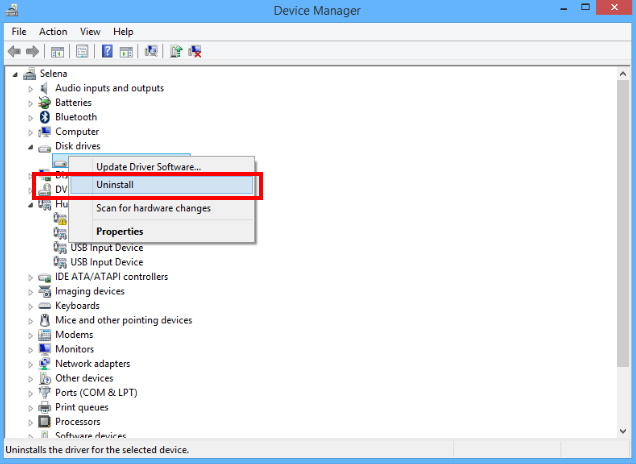
- Now go to the Disk Drives section.
- Make a click on it to expand.
- Thereafter make a right-click on the hard drives and choose the option Uninstall device.
- Click the Uninstall button.
- Restart the Windows 10 system.
- Windows will now automatically reinstall disk drive and accordingly all the hard drives will show in File Explorer.
Tips-4: Use Diskpart to fix Hard Drive not showing in Windows 10
Even after applying all the above mentioned tips, if Hard drives are still not showing in File explorer window, it means it is a logical issue. You should apply command in tool such as diskpart.
To use diskpart to missing hard drive in File Explorer, follow these steps:
- Open Command prompt window and choose Run as administrator option.
- To open the diskpart tool, type the following command and press Enter: –
- diskpart
- Type the following command to view a list of the available drives and press Enter:
- list disk
- To delete a flash drive, type the following command and press Enter:
- select disk DISK-NUMBER
- Here, replace DISK-NUMBER to the number representing the drive you are trying to format.
- Type the command clean to remove the partition and Press Enter.
- Type the following command to create a primary partition and press Enter:
- create partition primary
- If you want to apply quick format, type the following command and press Enter:
- format fs=FILE-SYSTEM label=DRIVE-NAME quick
- Here, replace FILE-SYSTEM with your preferred file system, such as “FAT32,” “exFAT,” or “NTFS.”
- Also, replace DRIVE-NAME with the name you want to give the device.
- Type the following command to assign a drive letter and press Enter:
- assign
- Type the following command to close diskpart and press Enter:
- exit
That’s all.
