How to Customize Mouse Button Configuration in Windows 10. If you think mouse button does not matter, its absolutely wrong. Many users prefer right button of mouse to drag or select any files or folders in windows 10. Microsoft also permits you to change the mouse button configuration from left to right or right to left. Generally, when you purchase a new mouse, it’s button function is set as left side. It is called Primary button. But you may swap or switch button option in Windows 10. In this article, we will see How to Customize Mouse Button Configuration in Windows 10.

How to Customize Mouse Button Configuration in Windows 10
There are various way to customize or change mouse button configuration in windows 10. Apply any one of them.
Through Windows Setting App
You may switch the setting of mouse button from left to right through Windows Setting by following these steps: –
- Open Windows Setting App by pressing Win + I shortcut key altogether.
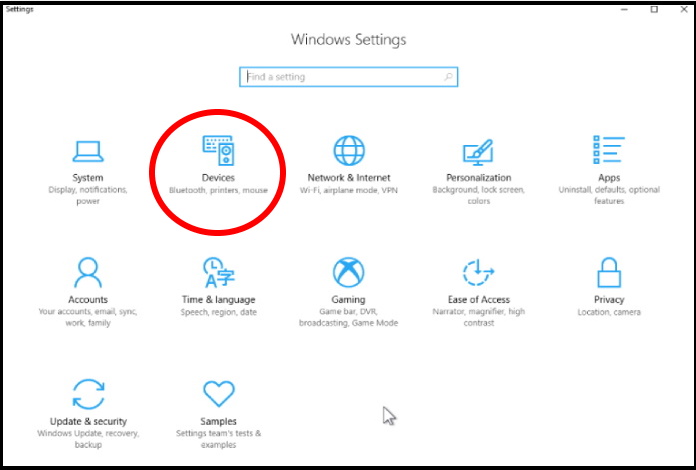
- Go to the devices option.

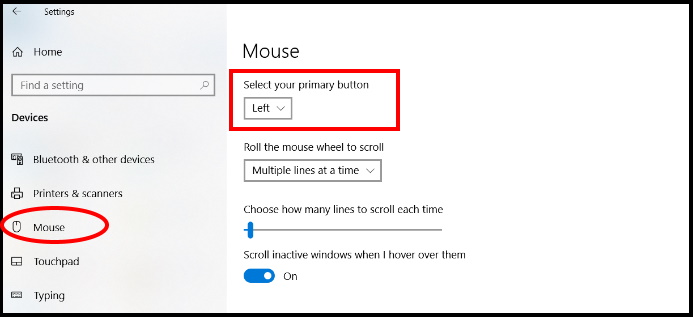
- From the left panel of Setting Window, select Mouse option.
- Now go to the right side of same setting window.
- Here you will see the option Select your primary button.
- Make a click on small arrow.
- A drop down menu with left and right option will appear.
- Choose any option as per your requirement.

The one another option also available in windows setting app by which you may customize Mouse button configuration in windows 10. Follow these steps: –
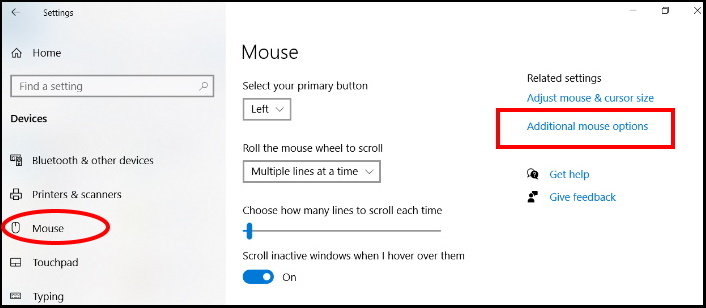
- From the right pane of mouse setting window, click on the option Additional Mouse option.

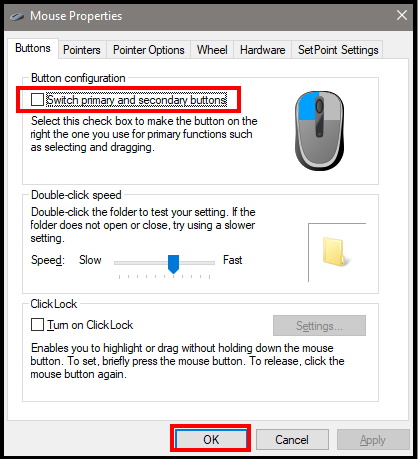
- Mouse properties will open.
- From the top menu bar, select Button tab.
- Under button configuration, the Switch primary and secondary buttons available.
- Mark the check box with tick to make the button on the right the one you use for primary functions such as selecting and dragging.

- At the end, click on Apply and Ok button to save the changes.
Customize Mouse Button Configuration in Windows 10 through Control Panel
The another method to change or swap mouse button option is through control panel. Go through these steps: –
- Open Control Panel.
- This will open All Control Panel Items.
- Select the Mouse option to customize the Settings.
- Now, Mouse Properties wizard will open.
- Select Button tab From the top menu bar.
- Under button configuration, the Switch primary and secondary buttons available.
- Mark the check box with tick to make the button on the right the one you use for primary functions such as selecting and dragging.
- At last, click on the Apply and then OK button to save the modifications.
Through Registry Editor
- Open Run Command by Pressing Windows key + R key conjointly.
- Under the text bar, type ‘regedit’ and press Enter.
- User Account Control dialog will prompt asking for your approval. Click on Yes.
- Registry Editor window will open.
- From the left pane of registry window, navigate the following path: –
- HKEY_CURRENT_USER\Control Panel\Mouse
- Go to the right pane, right-click and then select New => DWORD (32 bit) Value.
- Name it SwapMouseButtons.
- Apply double click on the same and here set it to value either 0 or 1.
- If you put 0, it will change mouse to left sided.
- If you put 1, this will change mouse cursor to right button as your primary key.
- At last, click on the OK button
- Restart your system.
That’s all.
