How to Manage Columns Event Viewer in Windows 10. Windows Event Viewer is a tool through which you can find out unusual incidents in your windows 10 system. Event viewer will show you a error log, timing of error occurred, exact cause of error. It keeps the record of all the events in your windows 10 system. Any warnings or error are recorded in Event viewer log. You can see all error messages received in your system here.
In other word, you can say, Event Viewer is an standard location where you can find all occurrence of your system in phased manner. Event Viewer produce genuine reason of any of the system error. You can observe the level, date & time, source, event ID and task category easily in Event Viewer in Windows 10. You can also customize Event Viewer for better result by adding or removing column within it. Here in this, we will see, How to Manage Columns in Event Viewer in Windows 10.
How to Manage Columns Event Viewer Windows 10
We will customize or modify Event Viewer by adding or removing Column in Windows 10. First we will see how to add column in Event Viewer and later how to remove columns.
Add / Remove Columns in Event Viewer
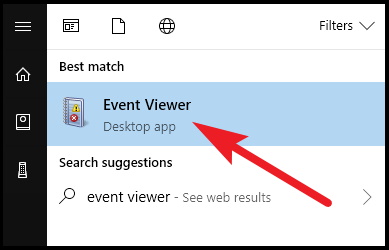
- Go to start and type Event Viewer in search.
- Click on Event Viewer from the best result.

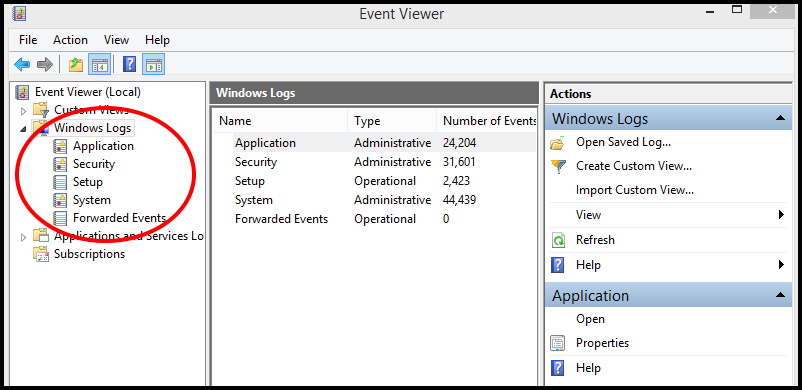
Event Viewer window will open . There are different types of category exist under the window log. Each category having its own log. You may select any category as per you problem or error face while operating windows 10 system. These category are of following types: –
- Application: The Application log keeps details of events related to Windows system components, such as drivers and built-in interface elements.
- Security: This log keeps details of events related to security, such as login attempts, password etc.
- System: The System log records events related to programs installed on the system.

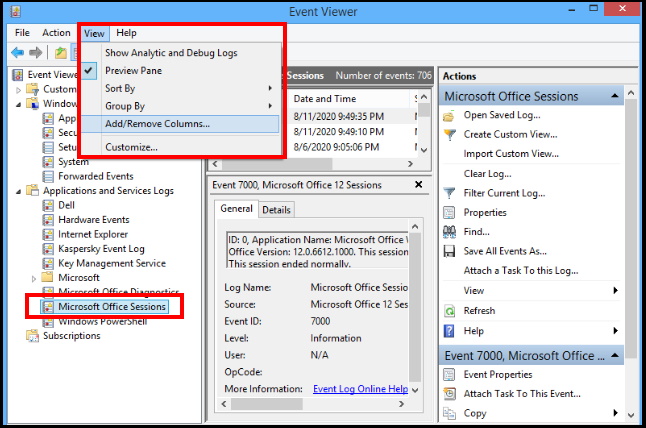
- Expand Applications and service log.
- Correspondingly go to top menu bar and click on view button.
- Select Add/Remove Columns option from the drop down menu.

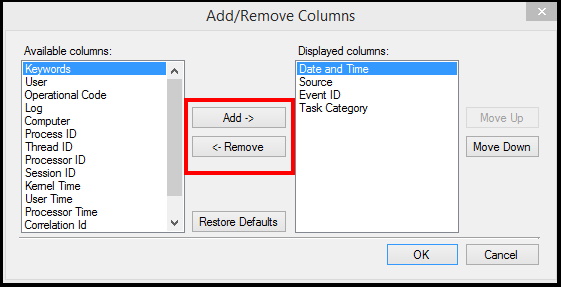
- A new window Add/Remove Columns will now open on your screen.
- This window is of two parts. The first one is of Available columns and the another one is of Displayed columns. Add and Remove buttons are in the middle of both parts.

- First select your required item from the Available properties list and thereupon tap Add -> button, located in the middle of the window.
- Now, you will see the added added item underneath the Displayed columns list and thereafter to include the procedure.
- Select Ok button.
- Now the selected item will visible and it will display its necessary information.
Remove Columns in Event Viewer
- Again open Event viewer and proceed until the option Add/Remove columns appear on your screen.
- Select your item from the right part of displayed columns.
- Thereafter click on <- Remove button.
- The column will not available under the Displayed columns list.
- Select Ok button.
That’s all.

1 thought on “Tips: How to Manage Columns in Event Viewer in Windows 10”